The focus on interactive chat-generation (or conversational response-generation) models has greatly increased in the past several months. Conversational response-generation models such as ChatGPT* and Google Bard* have taken the AI world by storm. The purpose of interactive chat generation is to answer various questions posed by humans, and these AI based models use natural language processing (NLP) to generate conversations almost indistinguishable from those generated by humans.
This article showcases a code sample on how to create interactive chats based on a pre-trained DialoGPT model from Hugging Face with the addition of the Intel® Extension for PyTorch* to perform dynamic quantization on the model.
Get Started
Why DialoGPT?
DialoGPT (Dialogue Generative Pre-trained Transformer) is a large-scale, pre-trained dialogue-response-generation model trained on 147M conversation-like exchanges pulled out from Reddit comment chains and discussion threads. DialoGPT was proposed by Microsoft in 2019. The main goal was to create open-domain chatbots capable of producing natural responses to a variety of conversational topics. The conversational response-generation systems that leverage DialoGPT generate more applicable, resourceful, diverse, and context-specific replies.
DialoGPT Architecture
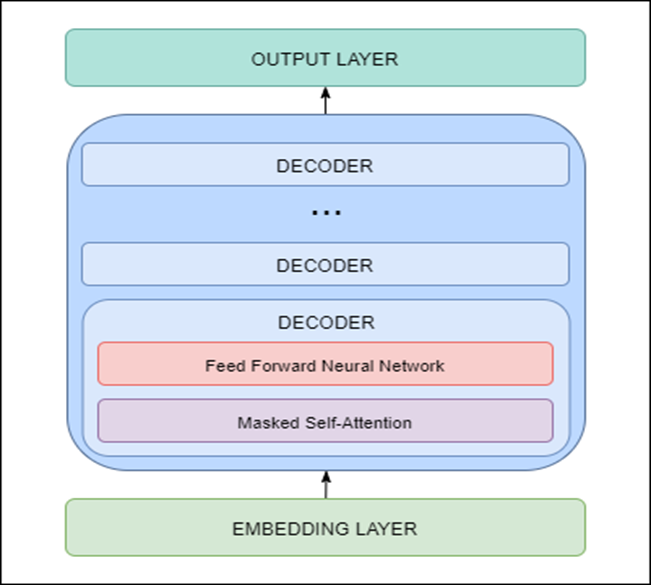
DialoGPT architecture is based on the GPT-2 model. It is formulated as an autoregressive language model and uses a multi-layer transformer as the model architecture. GPT-2 was proposed by OpenAI. GPT-2 models are trained on general text data whereas DialoGPT is trained on Reddit discussion threads.
Let’s look at the GPT-2 architecture. There are two types of blocks in general transformer architecture:
- Encoder - contains self-attention layer and feed-forward neural network
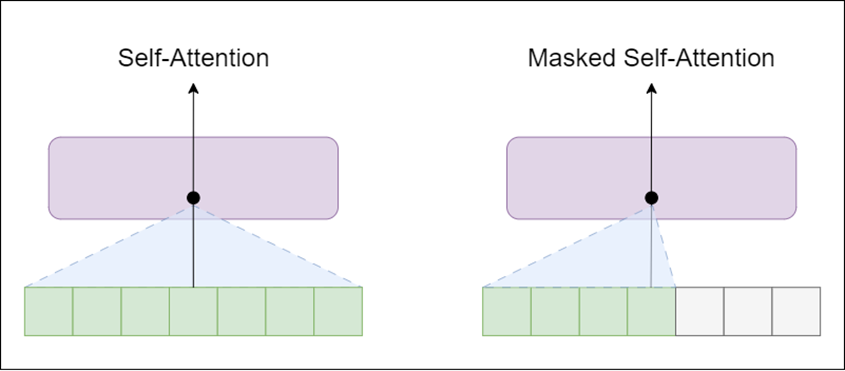
- Decoder - similar to encoder, but the self-attention layer is masked
The self-attention layer allows a position to peak at tokens to the right of the current word (the successive words in text), whereas masked self-attention layer prevents that from happening.
GPT-2 is built using transformer decoder blocks. This means that the following layers are used in the architecture:
- Embedding Layer – responsible for converting input text into embeddings (each word is converted to a fixed-length vector representation)
- Transformer Decoder – includes multiple decoder blocks with masked self-attention and feed forward neural network layers
- Output Layer – responsible for converting embeddings obtained from the decoder into words
GPT-2 architecture (and DialoGPT architecture) is shown below.
As the model is based on transformers architecture, it has the issue of repetition and copying the inputs. To avoid repetition, we can use Top-K sampling and Top-p sampling.
- Top-K sampling - filters the K most likely next words and redistributes the probability mass among only those K next words.
- Top-p sampling - rather than selecting only the most likely K words, selects the smallest possible set of words whose cumulative probability exceeds the probability p.
The probability mass is then redistributed among the words in the set. As a result, the size of the set of words can be dynamically increased and decreased based on the probability distribution of the next word.
Quantization using Intel® Extension for PyTorch*
What is Quantization?
Quantization is a systematic reduction of the precision of all or several layers within the model. This means a higher-precision type, such as the single-precision floating-point (FP32) mostly used in deep learning, is converted into a lower-precision type such as FP16 (16 bits) or INT8 (8 bits).
This helps in achieving,
- lower memory bandwidth
- lower storage
- higher performance with minimum-to-zero accuracy loss
Quantization is especially important with large models such as those based on the Transformer architecture like BERT or GPT.
There are two types of quantization:
- Static – Static quantization quantizes the weights and activations of the model. This quantization is used when both memory bandwidth and compute savings are important.
- Dynamic – In dynamic quantization, the weights are quantized ahead of time, but the activations are dynamically quantized during inference.
Intel Extension for PyTorch: The Intel Extension extends PyTorch with up-to-date features and optimizations for an extra performance boost on Intel® hardware. Learn how to install it standalone or get it a part of the Intel® AI Analytics Toolkit.
The extension can be loaded as a Python* module or linked as a C++ library. Python users can enable it dynamically by importing intel_extension_for_pytorch.
- This CPU tutorial gives detailed information about Intel Extension for PyTorch for Intel CPUs. Source code is available at the master branch.
- This GPU tutorial gives detailed information about Intel Extension for PyTorch for Intel GPUs. Source code is available at the xpu-master branch.
How to perform dynamic quantization using Intel Extension for PyTorch?
Here are the steps to quantize the existing FP32 model to INT8 model using dynamic quantization:
- Prepare quantization configuration - We can use default dynamic quantization configuration with ipex.quantization.default_dynamic_qconfig.
- Prepare the FP32 model by using the ipex.quantization.prepare method (provide the input parameters such as FP32 model to quantize, the prepared configuration, example inputs and information if the quantization should be in place).
- Convert the model from FP32 to INT8 - Use ipex.quantization.convert method for conversion. The input model will be the model prepared in step 2.
We also encourage you to check out the Intel® Neural Compressor tool that automates popular model-compression technologies such as quantization, pruning, and knowledge distillation across multiple deep learning frameworks.
Code Sample
The following steps are implemented in the code sample:
- Load model and tokenizer: Transformers library (check out Intel® Extension for Transformers) and Auto Classes available in the Hugging Face Main Classes are used in this step. These allow us to automatically find the relevant model by the given name. It also allows to easily change the model without major changes in the code on the developer's side as shown below:
tokenizer = AutoTokenizer.from_pretrained(model)
model = AutoModelForCausalLM.from_pretrained(model)
The model parameter is specified as an input for the tokenizer, and model initialization is just the path to the pre-trained DialoGPT model. In this sample, we are using ‘microsoft/DialoGPT-large.' If you have limited resources, you can use ‘microsoft/DialoGPT-medium’ or ‘microsoft/DialoGPT-small’ models and receive comparable results.
- Perform dynamic quantization of the model:
- Create the configuration using the default dynamic quantization configuration from Intel Extension for PyTorch library.
- Prepare the model.
- Convert the model from FP32 to INT8.
The steps are explained in detail in the above section.
- Response generation: The first step in response generation is to encode the input sentence as shown in the code below:
In this sample, we want our model to save history, so we are adding input sentences in the form of tokens to the chat history:new_input_ids = tokenizer.encode(input(">> You:") + tokenizer.eos_token, return_tensors='pt')
The text generation can be done by the model.generate function, where we can specify all important parameters like saved chat history, length of the response in tokens, and usage of both Top-K and Top-p sampling.bot_input_ids = torch.cat([chat_history_ids, new_input_ids], dim=-1) if chat_round > 0 else new_input_ids
The last step is to decode and print the response:chat_history_ids = model.generate(bot_input_ids, do_sample=True, max_length=2000, top_k=50, top_p=0.95, pad_token_id=tokenizer.eos_token_id) - Preparation for interactive conversation: After response generation, the last step is to add interaction. This can be done by using a simple for loop. Based on the initialized tokenizer, model, and empty chat history, responses are generated for a number of rounds:
for chat_round in range(n):
chat_history_ids = generate_response(
tokenizer,
model,
chat_round,
chat_history_ids
)
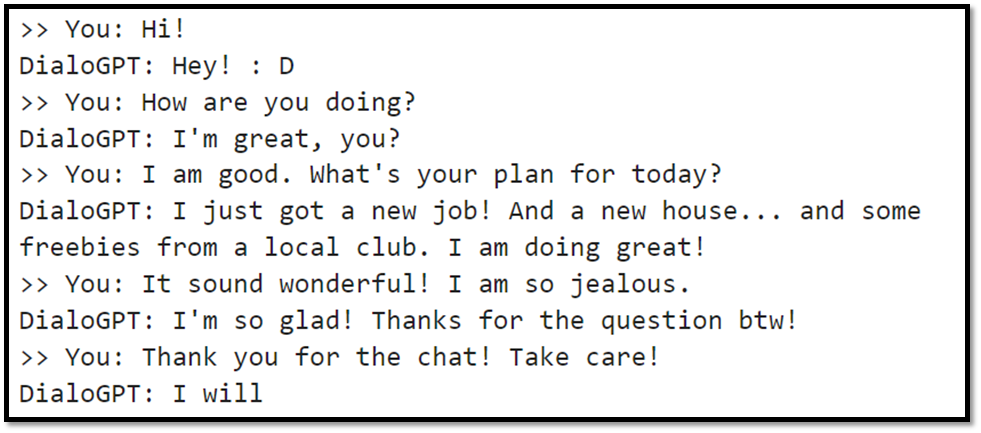
An example of interactive chat generation will look like the one shown in the picture below.
What’s Next?
Get started with interactive chat-generation models using Intel Extension for PyTorch and DialoGPT. Download and try the Intel AI Analytics Toolkit and Intel Extension for PyTorch for yourself to build various end-to-end AI applications.
We encourage you to also check out and incorporate Intel’s other AI/ML Framework optimizations and end-to-end portfolio of tools into your AI workflow and learn about the unified, open, standards-based oneAPI programming model that forms the foundation of Intel’s AI Software Portfolio to help you prepare, build, deploy, and scale your AI solutions.
For more details about the new 4th Gen Intel® Xeon® Scalable processors, visit Intel's AI Solution Platform portal where you can learn how Intel is empowering developers to run end-to-end AI pipelines on these powerful CPUs.
Useful resources
- Intel AI Developer Tools and resources
- oneAPI unified programming model
- Official documentation - PyTorch* Optimizations from Intel
- Intel® Extension for PyTorch* - Documentation