Intel® Software Guard Extensions (Intel® SGX) is an Intel technology for application developers seeking to protect select code and data from disclosure or modification. Intel SGX makes such protections possible through the use of enclaves. Enclaves are protected areas of execution. Application code can be put into an enclave through special instructions and software made available to developers by the Intel SGX SDK.
Intel Software Guard Extensions has the following features:
- Hardware enforced security
- Remote attestation support
- Data sealing
This article provides an overview of the process for enabling applications with Intel SGX using Microsoft* Visual Studio* 2015 on a 64-bit Microsoft Windows* OS. The article covers product contents, configuring the Intel SGX development system, defining Intel SGX project settings in Visual Studio, building sample applications, creating new enclave projects, and signing enclaves. A discussion of typical errors and their resolution is also provided at the end.
Note: Intel Software Guard Extensions SDK is offered for evaluation purposes only. If you would like to deliver a production-quality application using Intel SGX, contact the Intel® SGX Program for more information about a production license.
If you are already familiar with the basics of Intel SGX application development and want a deeper understanding the kinds of design decisions you may have to make when developing your own application, jump into the Intel SGX Tutorial Series, starting with: https://software.intel.com/articles/intel-software-guard-extensions-tutorial-part-1-foundation.
Product Contents
Intel Software Guard Extensions SDK comprises the following main components:
- Trusted libraries includes standard C library, C++ runtime support, C++ STL, and so on.
- Development tools includes edger8r, signing tool, Microsoft Visual Studio IDE plug-in, and so on.
- Sample projects
Prerequisites
Required Software:
- 64-bit Microsoft Windows OS
- Microsoft Visual Studio 2015
- Intel Software Guard Extensions SDK
See Intel Software Guard Extensions SDK for Windows* OS Release Notes for details.
Your development system must support Intel SGX (CPU and BIOS) if you want to execute your Intel SGX enabled applications on the same system where you build them. If you want to build Intel SGX enabled applications and run them on a different platform, or run them in simulation mode only, then your development system does not need to support Intel SGX. (But the execution system does need to support Intel SGX.) The discussion that follows assumes you want to build and run your enclave applications on the development platform.
Configuring the Intel SGX development environment
Intel SGX development environment must be configured properly to build Intel SGX applications. The first step is to check whether the system’s CPU supports Intel SGX. If the target system CPU does not support Intel SGX, there is no point in trying to configure the system BIOS/SW to support Intel SGX. (You can still build and debug Intel SGX applications in Simulation mode, but you can’t test/run them on actual system hardware unless your CPU/BIOS/SW stack supports Intel SGX.)
Developers can check the Intel website http://ark.intel.com/, to determine if the CPU in their target system supports the Intel SGX instruction set, first introduced in the 6th Generation Intel® CoreTM processors. The website lists each CPU and whether or not they support Intel SGX.
Configuring Intel SGX in BIOS
After confirming CPU support for Intel SGX, check the system BIOS to see if Intel SGX is supported. While it’s likely that systems with an Intel SGX supported CPU will also support Intel SGX in the BIOS, it’s also good to check, as there may be some exceptions. This can be checked in either of two ways:
- Using the Intel-provided tool: Intel provides a tool to verify whether the target system (including the BIOS) supports Intel SGX and whether it is enabled. This can be verified by following the procedure at /content/www/cn/zh/develop/articles/properly-detecting-intel-software-guard-extensions-in-your-applications.html. The link to download the source code for the tool is provided at the end of that procedure and at: https://software.intel.com/sgx-sdk/download.
- Navigating through BIOS menu (manually): The BIOS menu can be navigated manually to verify whether Intel SGX support is enabled.
If Intel SGX is not supported in the BIOS, you can’t enable it, but you can still build and debug Intel SGX applications in Simulation mode.
Manual BIOS Configuration
The OEM for your system may have included an Intel reference BIOS for Intel SGX or may have included their own custom BIOS. If your system includes an Intel reference BIOS for Intel SGX, the steps that follow can be used to ensure Intel SGX is enabled. (If your system uses an OEM custom BIOS, the same general process can be followed, but the messages you see on the screen will be different.)
1. During system boot, type the keystroke(s) (usually a function key) to enter BIOS.
2. Navigate through the following menus:
Intel Advanced Menu->CPU Configuration->SW Guard Extensions (SGX)
3. The BIOS displays the options that follow. (Not all system OEMs support all three options.)
Enabled
Software Controlled
Disabled
These options are defined as follows:
Enabled
If this option is set, Intel SGX is enabled and available for use by applications.
Note: If Enabled is set, Intel Advanced Menu->CPU Configuration->PRMRR must also be configured. (Some OEMs may automatically assign a PRMRR value when Intel SGX is enabled.) If the OEM supports PRMRR selection, set the value to 32 MB, 64 MB or 128 MB. The default option for the Intel reference BIOS is 128 MB.
Software Controlled
If Software Controlled is set, your application must use the API for enabling Intel SGX mentioned in the Intel SGX feature detection procedure (link previously provided).
Note: Enabling Intel SGX via software opt-in may require a system reboot.
Disabled
If Disabled is set, Intel SGX is explicitly disabled and it cannot be enabled through software applications. You should change this setting to Enabled. If Disabled, you can only build/run Intel SGX enabled applications in Simulation Mode. Also, the Intel SGX Platform Software (PSW) will not install.
4. After enabling Intel SGX, enter the keystrokes to Save and Exit the BIOS.
Installing Development SW
Install the software listed below. (Visual Studio must be installed before the Intel SGX SDK.)
- Full set of Intel Management Engine (ME) software components 11.5.0.1000 or later.
- Microsoft Visual Studio 2015 (Professional or higher)
- The Wizard requires Microsoft Visual C++ tools to be installed, which is no longer done by default in Visual Studio 2015. Please make sure the C++ tools are installed before using the Wizard to create an enclave project.
- Intel SGX SDK 1.8 or later
- Intel SGX Platform Software (PSW) 1.8 or later
ME SW: The Intel ME software components that must be installed depend on the system's specific hardware and firmware features. You can determine the version of the ME SW in your system by checking the Control Panel->Programs and Features list. If the version of ME in your system is not high enough, download and install the most current version. The Intel ME installer detects the system's capabilities and automatically installs the relevant drivers and applications.
Visual Studio: Obtain the Professional Edition (or higher) from Microsoft at: https://msdn.microsoft.com. Make sure you manually install the Microsoft Visual C++ tools after installing Visual Studio.
Intel SGX SDK: The Intel SGX SDK from Intel is a collection of APIs, sample source code, libraries, and tools that enable the software developer to write and debug Intel SGX applications in C/C++. The SDK installs a Microsoft Visual Studio software wizard to aid in rapid development of Intel SGX enabled applications. This wizard can be used to create an enclave project with the proper settings to take advantage of the various components that are shipped with the Intel SGX SDK.
Intel SGX PSW: The Intel SGX PSW provides the platform services, run-time components for attestation, and Intel SGX Driver for EPC memory allocation and de-allocation. The Intel SGX PSW exposes an API that Intel SGX applications should call prior to application initialization. The API sgx_enable_device provided by the Intel SGX PSW configures and enables the Intel SGX device if the platform has NOT been previously enabled. (The PSW will not install if Intel SGX is not supported by the CPU and supported/enabled in BIOS.)
The SDK and PSW can be obtained by first registering here: https://registrationcenter.intel.com/en/forms/?productid=2614. Download and install both SW packages.
After the installation is done, check the Windows Control Panel->Programs and Feature list to confirm the Intel SGX SW components were installed.
Oops … out of order installation
Microsoft Visual Studio must be installed before installing the Intel SGX SDK. If the Intel SGX SDK is installed before installing Visual Studio, the Intel SGX SDK Visual Studio software Wizard and Intel(R) SGX Debugger will not be embedded properly into Visual Studio. If this occurs, you will experience errors while building your Intel SGX enabled application and enclaves cannot be created.
If you find yourself in this situation, uninstall the Intel SGX SDK, then reinstall it.
Project settings in Visual Studio
Make sure the Visual Studio Project settings are configured properly before attempting to build any of the sample applications. The following steps make use of SampleEnclave, a small application that creates an enclave. (SampleEnclave is one of several sample applications installed with the SDK.)
Walk through the steps that follow to make sure the Visual Studio settings are configured to build applications. Important points are discussed at the appropriate step.
The following steps assume you are opening the sample solution as Admin from its default installation folder. Alternately, you can copy the sample solution to a folder in your user area.
1. Open Visual Studio, then open the SampleEnclave solution using the following menu sequence:
a. File->Open->Project/Solution
b. Navigate to C:\Program Files (x86)\Intel\IntelSGXSDK\src\SampleEnclave
c. Click on SampleEnclave.sln to open the solution file
Your screen should open the solution as shown in Figure 1. The location of the Solution Explorer window on your screen may be different, depending on your Visual Studio layout preferences.
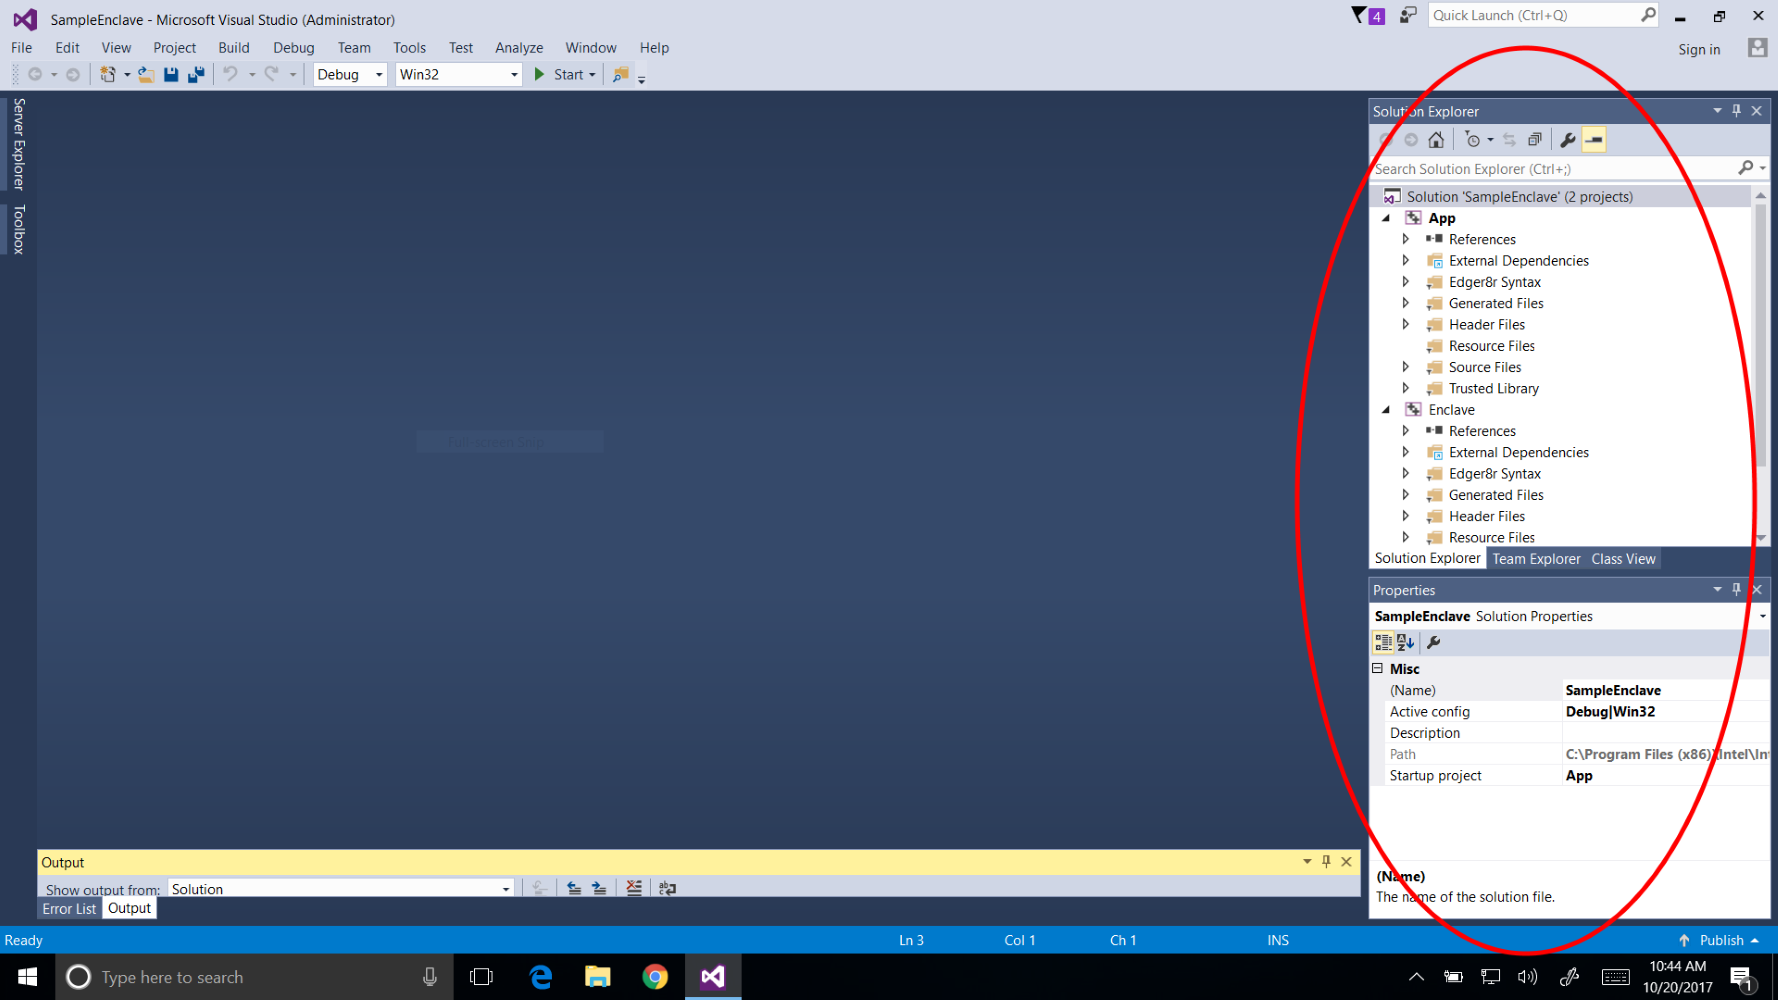 |
Figure 1. Visual Studio with SampleEnclave solution open
2. Check the Build configuration on the Visual Studio toolbar. Note that the Build configuration is set to Debug mode, as shown in Figure 2. Debug mode is the default mode for developing an Intel SGX enabled application.
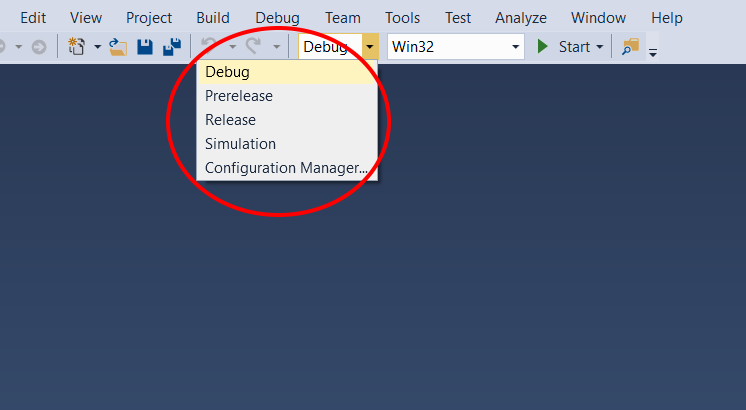 |
Figure 2. Verifying Debug mode in Visual Studio
Here is a summary of the four build configurations:
The Intel SGX architecture supports two modes of operation for enclaves: Debug Mode and Production (non-debug) Mode. Production Mode enclaves have the full protection provided by the Intel SGX architecture, while Debug Mode enclaves have slightly less protection to support debug capabilities.
Traditionally, developers are familiar with two basic compilation profiles:
- Debug: compiler optimizations are disabled and symbol information is saved. This mode is suitable for source-level debugging. Enclaves built in debug mode are launched in enclave-debug mode.
- Release: compiler optimizations are enabled and no symbol information is saved. This mode is suitable for production build, performance testing, and final product release. Enclaves built in this mode are launched in enclave-production (non-debug) mode.
In addition, the Intel SGX SDK offers two more compilation profiles:
- Pre-release: same as Release with regard to compiler optimizations and symbol information. However, the enclaves are launched in enclave-debug mode, suitable for performance testing.
- Simulation: builds the enclave without compiler optimizations and links the application with libraries that simulate the Intel SGX instructions. This allows the enclave to be run on any platform without Intel SGX.
A more detailed discussion of Debug and Build Configurations is provided at: /content/dam/develop/external/us/en/documents/intel-sgx-build-configuration-737361.pdf. You can also check the SDK Developer Guide and Developer Reference.
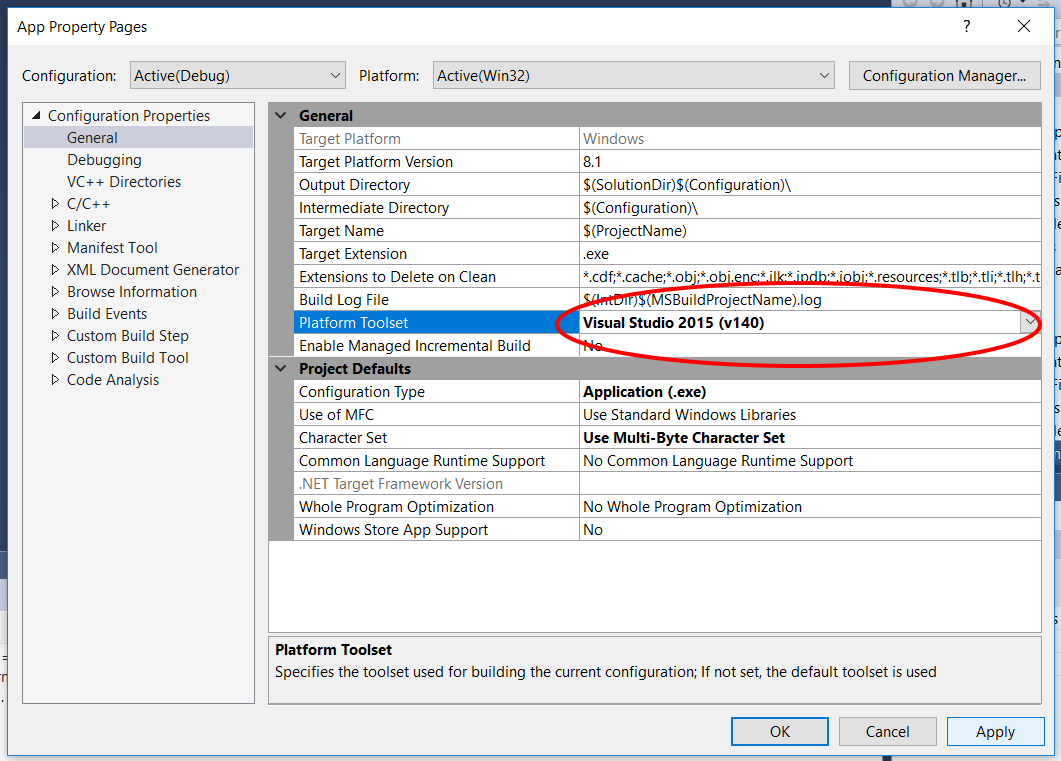
3. For both the App and Enclave application in the project, make sure the compiler and debugger settings are set. Right click on Project->Properties to check the compiler selection. The default is Intel C++ 16.0 Compiler. If you have not purchased and installed the Intel compiler, change the Platform Toolset setting to the Visual Studio 2015 compiler as shown in Figure 3. Click Apply to save the new compiler choice.
 |
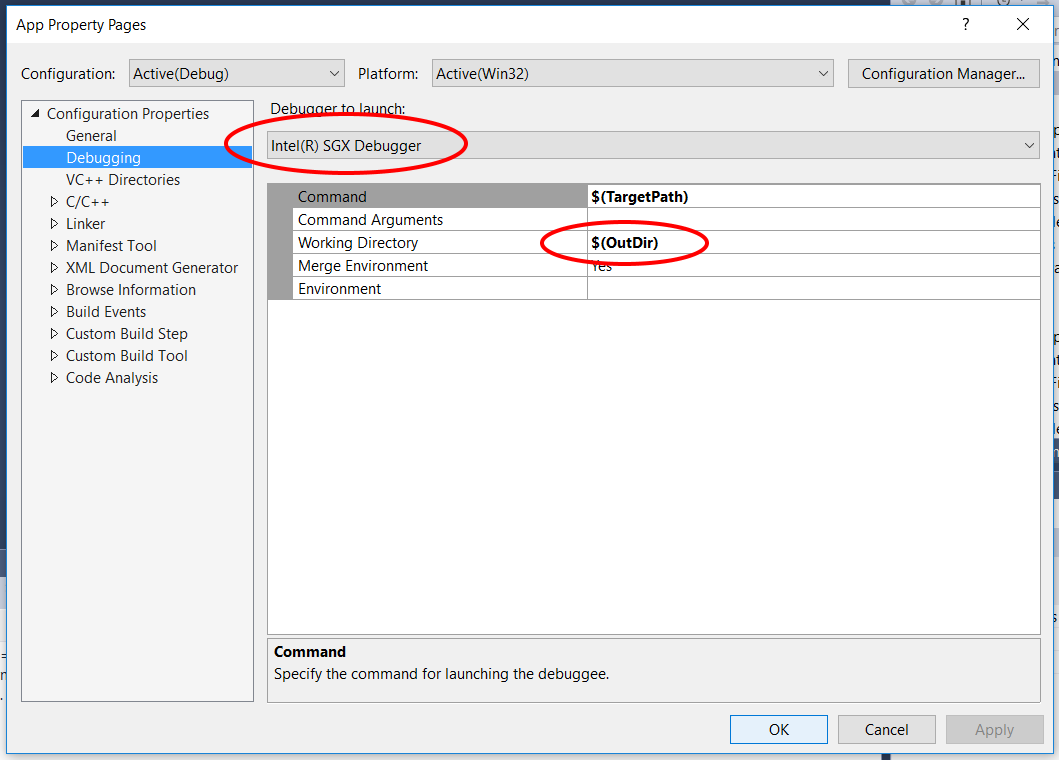
4. While still in the Properties window, select Debugging. Verify that the Intel(R) SGX Debugger is selected and that the Working Directory is set to $(OutDir) as shown in Figure 4. These settings may already be configured properly. Select OK when done.
 |
5. Select Build->Build Solution (Cntl+Shift+B) to build SampleEnclave. If you experience any errors, refer to Errors during application development near the end of the paper.
6. When finished, select Debug->Start Without Debugging (Cntl+F5) to run the sample application. The application starts and creates an enclave. Then it opens a command line window, as shown in Figure 5. Enter a character followed by <Enter>, or just press <Enter> to end the application.
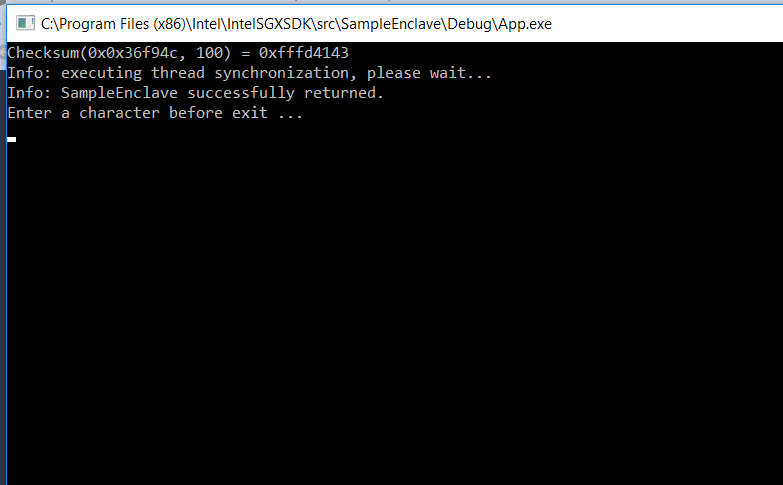 |
Once you can successfully build and run sample Intel SGX enabled applications, you know that your Visual Studio + Intel SGX SDK configuration is set up properly.
Creating a new Enclave project
The steps in this section describe how to create a new Intel SGX Enclave Project from scratch in Microsoft Visual Studio. These are steps you must perform each time you start work on a new Intel SGX enabled application in Visual Studio. The discussion that follows assumes you have a skeleton application. (Some code snippets are provided near the end if you want to use them instead of your own application.) The major steps are:
- Create the Intel(R) SGX Enclave Project
- Configure the Enclave Settings
- Import the EDL File into the untrusted application project
Create the enclave project
The following steps explain how to create the enclave project. (You also need to create the untrusted application project like you typically do.)
1. In Visual Studio, select File->New->Project. The New Project dialog box opens.
2. Select Templates->Visual C++->Intel® SGX Enclave Project as shown in Figure 6.
a. Enter Name, Location, and Solution name in the respective fields like any other Visual Studio project.
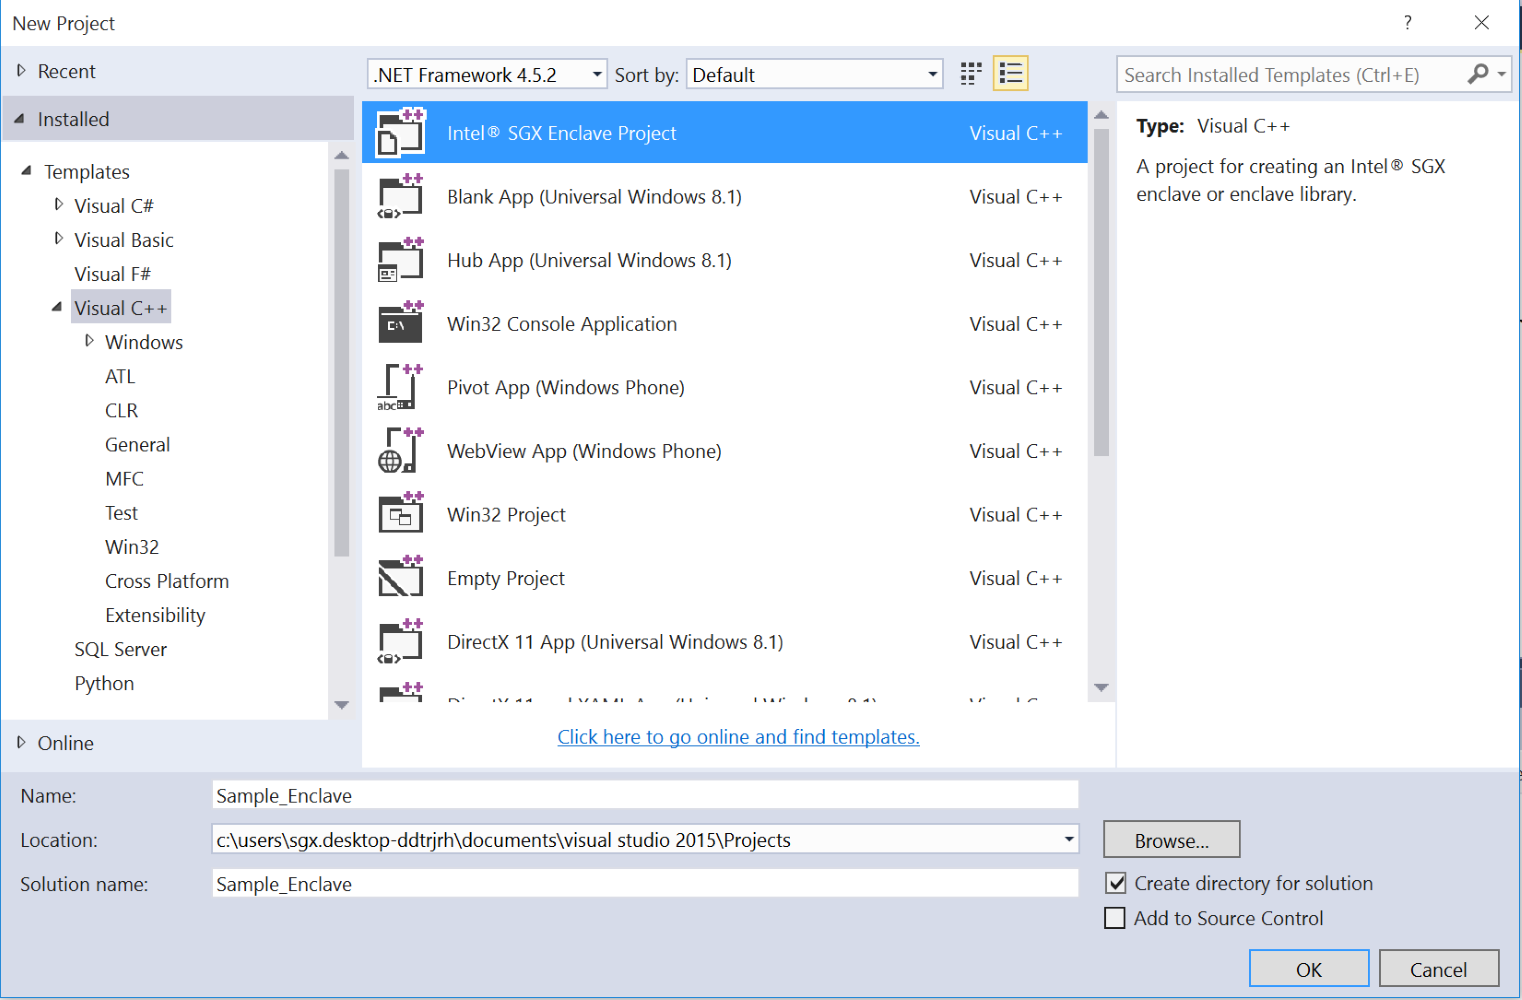 |
Figure 6. Creating an Intel SGX enclave project
3. Click OK. The Intel® SGX SDK Project Wizard displays the default Enclave Settings window, as shown in Figure 7.
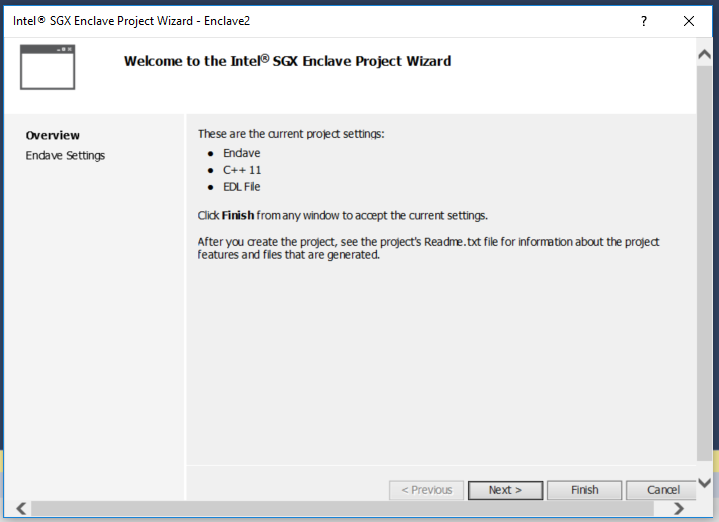 |
Figure 7. Enclave project settings window
4. If these settings are appropriate for your project, click Finish, to jump to the end of step 6. To make changes (or just to learn about the settings), click Next. The wizard displays the screen shown in Figure 8.
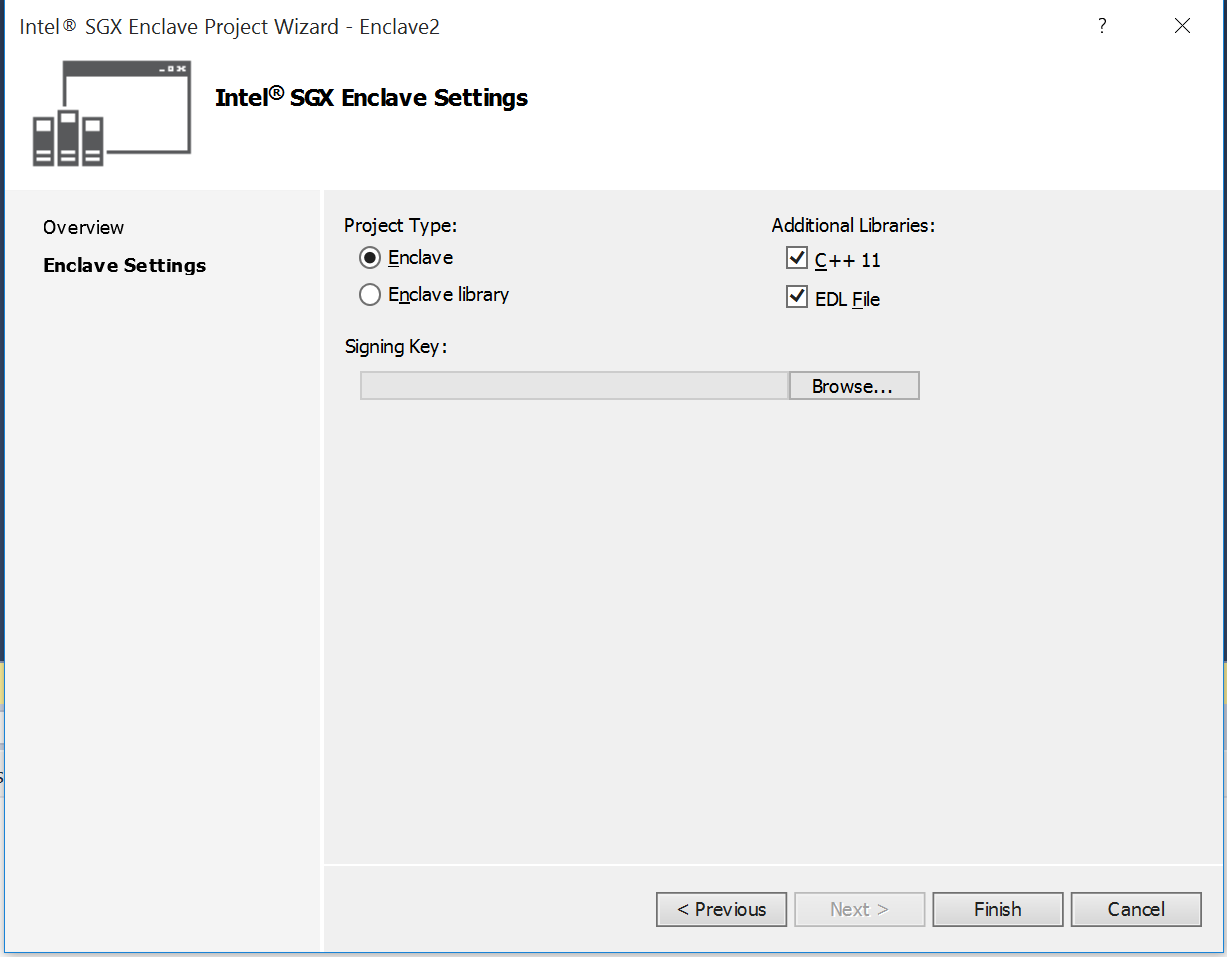 |
Figure 8. Configuring enclave project settings
5. Configure the Visual Studio enclave project settings. See the notes below for help.
Project Type:
- Enclave — Create an enclave project. This is likely your choice if you are creating your first enclave project.
- Enclave library — Create a static library for an enclave project. This is the choice if you are creating an enclave library that could be shared across several applications.
Additional Libraries:
- C++ 11 — Link to C++ 11 libraries. This is the choice if you are developing in C++. Uncheck this checkbox if you are writing in pure C. Note that the linking option to C++ 11 is grayed out when Enclave library is selected.
- Note: If creating an enclave that uses a library, and that library uses C++, then when you create the enclave project you must select the C++11 option, even if the enclave itself does not use C++.
- EDL File — Link an EDL file with the enclave project. This is mandatory if you are building an enclave that exposes enclave interfaces, but optional if your library does not include any enclave interfaces.
Signing Key:
Import an existing signing key to the enclave project if you have a private key and want to use it for your enclave. Use the Browse… option to navigate to your PEM file and select it. A random key will be generated by Visual Studio if no file is selected. The enclave signing tool will sign the enclave with the key at the end of the build flow unless you are building a Production mode enclave.
If you are building an enclave library, no signing key is needed. Enclave libraries are not signed.
Note: Use of the Visual Studio generated key for the enclave with the one-step signing process is supported in Debug, Simulation, and Pre-Release modes. You must provide a key and use the two-step signing process if you are creating/building an enclave in Release mode.
6. Click Finish when done. The Intel SGX SDK Visual Studio wizard will create the enclave project with the chosen settings.
Configure the enclave settings
The Enclave Settings dialog window helps you create and maintain the Enclave Configuration File (ECF). The ECF is part of the enclave project and provides the information for the enclave metadata. To configure enclave settings, follow these steps:
1. In Visual Studio, open the solution that contains the enclave project.
2. Right click on the enclave, then select Intel® SGX Configuration->Enclave Settings, as shown in Figure 9. The Enclave Settings dialog window opens, as shown in Figure 10, allows you to modify the enclave settings.
- The Enclave Settings dialog window (organized into Basic and Advanced screens) allows you to update the enclave settings summarized in Table 1. Accepting the defaults works for most applications during the early stages of development.
- The Advanced Settings dialog, shown in Figure 11, shows the interface to modify the advanced features. If you have enough Intel SGX knowledge to modify these settings, click the Advanced… button.
- The Debug Selection checkbox should be unchecked, since the build configuration for your project is set to Debug mode. When your application is complete and you change your project build configuration to Release mode, the Debug Selection box will be checked to reflect that change.
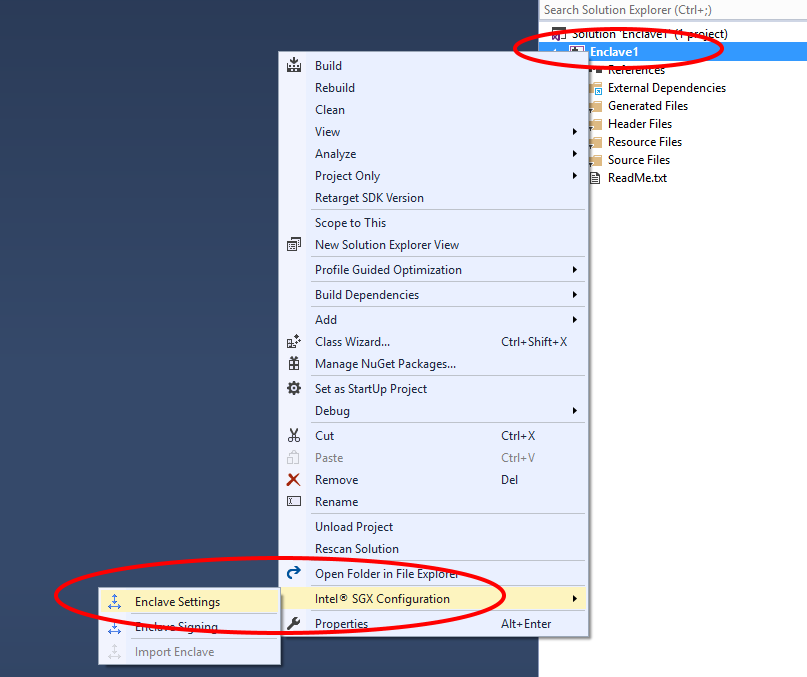 |
Figure 9. Opening the Enclave Settings dialog window
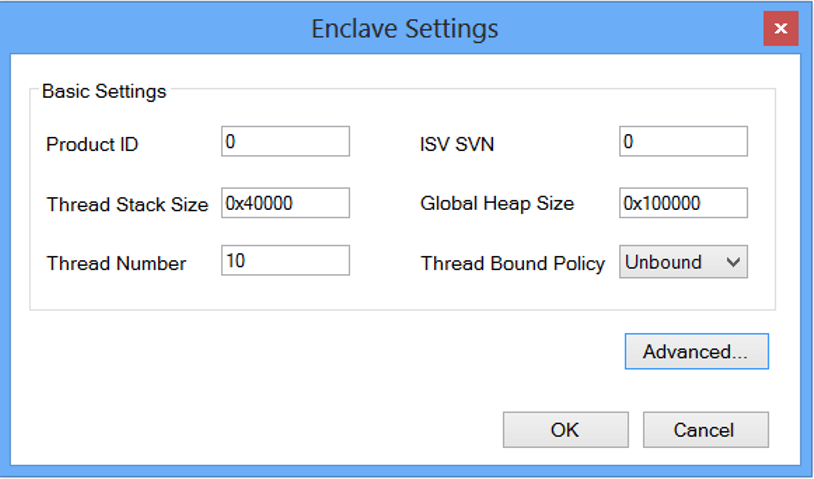 |
Figure 10. Enclave Settings dialog window—Basic Settings
Table 1. Enclave Settings Descriptions
| Basic |
||
|---|---|---|
| Setting Name | Description | ECF Tag |
| Product ID | ISV assigned Product ID | <ProdID> |
| ISV SVN | ISV assigned SVN | <ISVSVN> |
| Thread Stack Size | The stack size per trusted thread (in bytes). |
<StackMaxSize> |
| Global Heap Size | The heap size for the enclave (in bytes). |
<HeapSizeMax> |
| Thread Number | The number of trusted threads. | <TCSNum> |
| Thread Bound Policy | TCS management policy. | <TCSPolicy> |
| Advanced |
||
| Setting Name | Description | ECF Tag |
| Disable Debug | 0 = Enclave can be debugged. 1 = Enclave cannot be debugged | <DisableDebug> |
| Miscellaneous Select | Reserved for future use. Must be 0. | <MiscSelect> |
| Miscellaneous Mask | Reserved for future use. Must be 0xFFFFFFFF. | <MiscMask> |
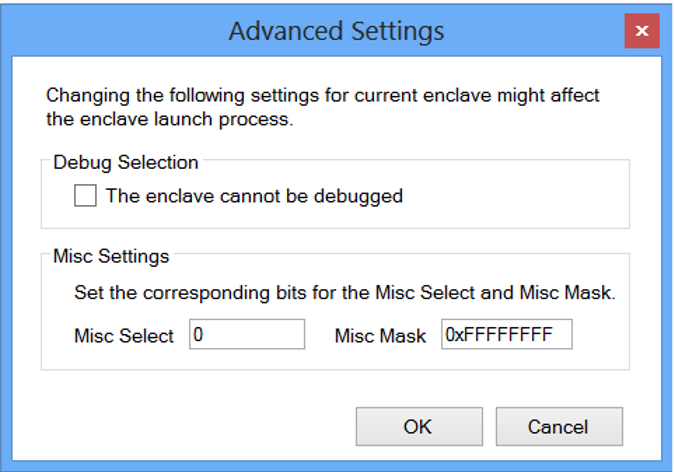 |
Figure 11. Enclave setting dialog window—advanced settings
The Misc Select and Misc Mask fields are reserved for future extension. Currently only 0 can be set for Misc Select and 0xFFFFFFFF can be set for Misc Mask.
Note: For efficient memory usage, you may want to adjust the stack and heap memory sizes during the later stages of development, using the Enclave Memory Measurement Tool (EMMT) to help you make decisions. Information on this tool is found here: /content/dam/develop/external/us/en/documents/enclave-measurement-tool-intel-sgx-737361.pdf.
3. Click OK on the Advanced Settings dialog (if you opened that window) and OK on the Basic Settings dialog window to save any setting changes you may have made.
Import the EDL
The Enclave-Definition Language (EDL) file defines the interface between the two (untrusted and trusted) parts of your application. Figure 12 shows the EDL file template, which is divided into a trusted and an untrusted section. The trusted functions are written to the enclave’s .cpp file, while the untrusted functions must be implemented in the application.
You can get a feel for how to implement your application’s EDL file by examining the SDK code samples. Also, detailed information on the supported data types and usage is provided in: /content/dam/develop/external/us/en/documents/input-types-and-boundary-checking-edl-737361.pdf.
enclave {
    //Include files
    //Import other edl files
    //Data structure declarations to be used as
    //parameters of the function prototypes in edl

trusted {
        /* define ECALLs here. */
        //Include file if any.
        //It will be inserted in the trusted header file (enclave_t.h)
        //Trusted function prototypes
    };

untrusted {
        /* define OCALLs here. */
        //Include file if any.
        //It will be inserted in the untrusted header file (enclave_u.h)
        //Untrusted function prototypes
    };
Figure 12. Enclave-Definition Language file template.
1. To import the EDL file for the enclave into the application in Visual Studio, right click on the Application Settings, then navigate to Intel® SGX Configuration->Import Enclave. The dialog shown in Figure 13 is displayed. Select the checkbox for the EDL file to import and click Import EDL.
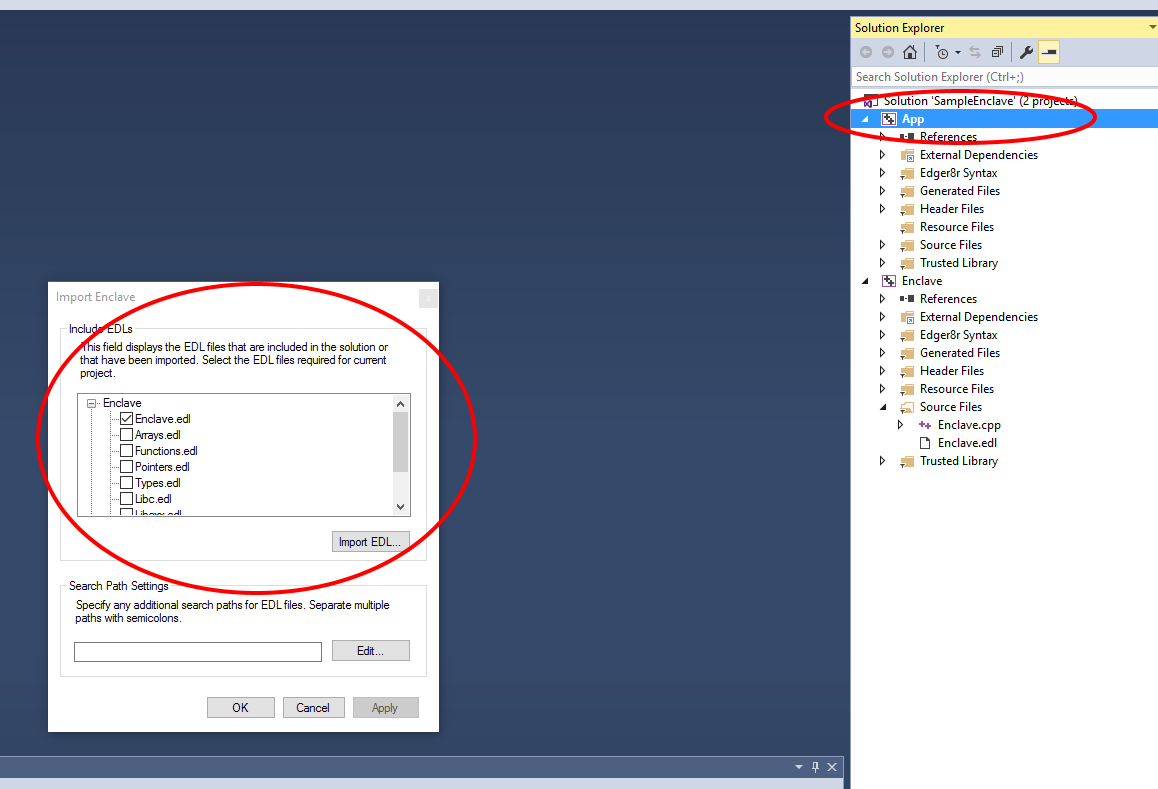 |
Figure 13. Importing an Enclave definition (EDL file)
Building, signing, and debugging the application
After the EDL file has been imported into the application, you are ready to verify the project build settings and build the application. Follow these steps:
1. Verify the following in Visual Studio:
- Make sure that the build configuration is set to Debug mode, as shown in Figure 2. (You can change this to Pre-Release or Release mode near the end of your design cycle.)
- Make sure that Platform Tools is set to the correct compiler, as shown in Figure 3.
- Make sure that Debugger to launch is set to Intel(R) SGX Debugger, as shown in Figure 4.
- Make sure that Working Directory is set to $(OutDir) for both the enclave and application settings, as shown in Figure 4.
2. Build the solution. Common build errors and suggested resolutions are described later in this article.
Enclave signing
Signing an enclave is a process that involves producing a signature structure containing enclave properties such as the enclave measurement. Once an enclave is signed in such a structure, modifications to the enclave file (such as code, data, signature, etc.) can be detected (and blocked by Intel SGX at enclave load time).
For Simulation, Debug, and Pre-Release mode enclaves, you can use the one-step signing process to sign your enclave; this flow uses the private key on the development platform. However, for Production mode enclaves, you must use the two-step signing process because the ISV’s private key will be on a separate signing facility/platform. These two signing processes are summarized below.
- One-step signing process—Signing an enclave using a private key available on the build system.
- Two-step signing process—Signing an enclave using a private key stored on a secure facility or platform. The overall flow is as follows:
- Generate the enclave signing material and take the material to the signing facility/platform.
- At the signing facility/platform, sign the file containing the enclave signing material.
- Take the resulting signature file (signature.hex) back to the build platform).
- On the build platform, sign the enclave using the signature file and public key:
The Intel SGX SDK includes the sgx_sign tool to perform enclave signing. This tool is automatically invoked when building an Intel SGX application in Visual Studio. One-step signing is used for Simulation, Debug, and Pre-Release mode enclaves, while two-step signing is used for Release mode enclaves.
See /content/dam/develop/external/us/en/documents/overview-signing-whitelisting-intel-sgx-enclaves-737361.pdf for more information on signing enclaves and whitelisting enclave signers.
Debugging enclaves
The topic of debugging enclave code goes beyond the Getting Started phase. For now it's good to understand that the standard Windows Debugger will not work with enclaves; you must use the Intel(R) SGX Debugger for that. An introduction to using the Intel(R) SGX Debugger with enclaves is provided at: /content/dam/develop/external/us/en/documents/debugging-intel-sgx-enclaves-in-windows-737361.pdf.
Note: Debugger breakpoints inside enclaves do not work in the initial release Windows 10 Anniversary Edition—version 1607. If you are using Windows 10 Anniversary Edition, please update the OS Build to 14393.479 or later. See https://technet.microsoft.com/en-us/windows/release-info.aspx for more details.
Performance analysis
Performance analysis of enclave code is typically performed later in the development cycle, usually with Pre-Release code. When your application is ready, you can use the Intel® VTune® Amplifier XE to capture performance information to help you tune your enclave code. An introduction to using Intel VTune is provided at: /content/dam/develop/external/us/en/documents/using-vtune-intel-sgx-applications-windows-737361.pdf.
Errors during application development
This section contains common errors related to development of Intel SGX applications, along with suggested resolution:
1. Error: MSB8020: The build tools for Intel C++ Compiler 16.0 (Platform Toolset = ‘Intel C++ Compiler 16.0’) cannot be found. (actual message shortened). The default C++ compiler cannot be found.
- Resolution: The quickest fix is to select Visual Studio Compiler under Properties->General->Platform Toolset for the project. You can also purchase the Intel C++ 16.0 Compiler and install it.
2. Error: Enclave file not created: This error occurs when the project has the Working Directory set to $(ProjectDir)
- Resolution: Right click Project->Properties->Debugging->Working Directory and change $(ProjectDir) to $(OutDir)
3. Error: Unable to start program: This error occurs when the application program is not set up as the startup program.
- Resolution: Right click the application and select Set as startup project.
4. Error: SGX_ERROR_INVALID_METADATA (0X2009): The metadata embedded within the enclave image is corrupt or missing. The signature, heap size and no. of threads are a part of the metadata of the enclave.
- Resolution: Check and change the corresponding components to valid values.
5. Error: LNK2019: unresolved external symbol: This error occurs when any trusted or untrusted library required for a function is not available to the application/enclave. When a trusted/untrusted library is used in an application/enclave it must be linked to the application/enclave or a Linker error is thrown.
- Resolution: Right-click the Project->Properties->Linker->Input-.Additional Library dependencies. Select Edit from the drop down list and add the required libraries, and click OK.
6. Error: SGX_ERROR_INVALID_VERSION (0x200D): Metadata version is inconsistent between uRTS (untrusted Run-time System) and sgx_sign or the uRTS is incompatible with the current platform.
- Resolution: Uninstall the current SDK and PSW version and install the version suitable for the platform.
7. Error: Application Crash: When there is a power failure or an application is terminated, the enclave gets destroyed.
- Resolution: Rebuild the enclave after the termination process is done to resolve the power failure issue. Repeated crashes with no evidence of power failure indicates the need for debugging of an issue.
8. Error: SGX_ERROR_NO_DEVICE (0x2006): This error is encountered when there is an older version of Intel SGX PSW installed in the system or if the CPU does not support the version of Intel SGX currently installed. The version can be detected using the code provided at: https://software.intel.com/articles/properly-detecting-intel-software-guard-extensions-in-your-applications.
- Resolution: Uninstall the mismatched Intel SGX PSW and install a version supported by the system.
9. Error: SGX_ERROR_OUT_OF_EPC: There is not enough EPC memory to load one of the Architecture Enclaves needed to complete Intel SGX service, (attestation, enclave launching, etc.) The numbers of system enclaves and running application enclaves created requires more memory than the allocated memory.
Intel SGX applications should call sgx_destroy_enclaves () so the OS can reclaim the protected memory or EPC pages from enclaves that have been removed due to power events. Not destroying an enclave will result in EPC memory leakage that could prevent subsequent enclave from loading.
- Resolution: The application can destroy enclaves not in use.
10. Error: SGX_ERROR_INVALID_PARAMETER: At least one of the parameters is invalid.
- Resolution: Check whether the pointers used in the EDL file have been given proper direction attributes and/or are being used properly. Detailed information on the supported data types and usage is provided at: /content/dam/develop/external/us/en/documents/input-types-and-boundary-checking-edl-737361.pdf.
11. Error: SGX_ERROR_INVALID_MISC: The Misc Select/Misc Mask settings are not correct.
- Resolution: Set the Misc Select/Misc Mask settings to a supported value.
12. Error: SGX_ERROR_NDEBUG_ENCLAVE: The enclave is signed as a product enclave and cannot be created as a debuggable enclave.
- Resolution: Rebuild the enclave as a Debuggable enclave.
Code snippets
Application starting point
Assume you have the non-Intel SGX enabled application listed below. The program displays the string Hello App!
#include <stdio.h>
#include <string.h>
#define MAX_BUF_LEN 100
void foo(char *buf, size_t len)
{
    const char *secret = "Hello App!";
    if (len > strlen(secret))
    {
        memcpy(buf, secret, strlen(secret) + 1);
    }
}
int main()
{
    char buffer[MAX_BUF_LEN] = "Hello World!";
    foo(buffer, MAX_BUF_LEN);
    printf("%s", buffer);
    return 0;
}
The snippets that follow show how this same functionality can be divided between an untrusted application and trusted enclave. These snippets include: (1) an EDL file to define the interface between untrusted code and trusted code, (2) enclave code, and (3) application code. When implemented and built correctly, the final application displays the string Hello Enclave!
EDL snippet
This EDL file content defines the enclave interface, which exposes the trusted interface foo.
// sample_enclave.edl
enclave {
    trusted {
        public void foo([out, size=len] char* buf, size_t len);
    };
};
Enclave Code
// sample_enclave.cpp
#include "sample_enclave_t.h"
#include <string.h>
void foo(char *buf, size_t len)
{
    const char *secret = "Hello Enclave!";
    if (len > strlen(secret))
    {
        memcpy(buf, secret, strlen(secret) + 1);
    }
}
Application Code
#include <stdio.h>
#include <tchar.h>
#include "sgx_urts.h"
#include "sample_enclave_u.h"
#define ENCLAVE_FILE _T("sample_enclave.signed.dll")
#define MAX_BUF_LEN 100
int main() {
    sgx_enclave_id_t eid;
    sgx_status_t ret = SGX_SUCCESS;
    sgx_launch_token_t token = {0};
    int updated = 0;
    char buffer[MAX_BUF_LEN] = "Hello World!";
    // Create the Enclave with above launch token.
    ret = sgx_create_enclave(ENCLAVE_FILE, SGX_DEBUG_FLAG, &token, &updated, &eid, NULL);
    if (ret != SGX_SUCCESS) {
        printf("App: error %#x, failed to create enclave.\n", ret);
        return -1;
    }
    // An Enclave call (ECALL) will happen here.
    foo(eid, buffer, MAX_BUF_LEN);
    printf("%s", buffer);
    // Destroy the enclave when all Enclave calls finished.
    if(SGX_SUCCESS != sgx_destroy_enclave(eid))
        return -1;
    return 0;
}
Training and Documentation
| Document | Description |
|---|---|
| Release Notes | The Release Notes document contains the most up-to-date information about the product, including:
|
| Installation Guide | The Installation Guide contains information on obtaining, installing, and uninstalling Intel® Software Guard Extensions on Windows* OS. |
| Developer Guide | The Developer Guide provides guidance on how to develop robust application enclaves based on Intel® Software Guard Extensions technology. |
| Developer Reference | The Developer Reference covers tutorials, tools, API reference as well as sample code. |
| Online Resources |