The intent of this tutorial is to design a playground-like environment for the prototyping and evaluation of potential edge services in a virtualized environment that uses the Intel Atom® C3000 processor series kit for the Network Functions Virtualization Infrastructure (NFVI). To accelerate packet processing, one physical network interface controller (NIC) will be passed to a set of containers by making use of the Data Plane Development Kit (DPDK) and a plugin for vector packet processing (VPP).
Alternatively, the same setup can be achieved by using real DPDK-supported hardware, as described in our hardware tutorial.
This playground includes the following tools and frameworks

Kata Containers
Kata Containers is a Docker* runtime alternative for greater workload isolation and security. It is an open source project targeted towards bringing the advantages of both virtual machines and containers together by implementing a lightweight virtual machine. Because the Kata runtime is compatible with the Open Container Initiative* (OCI) specification, Kata Containers can run side by side with Docker (runc*) containers - even on the same host - and work seamlessly with the Kubernetes* Container Runtime Interface (CRI). Kata Containers enjoys industry support from some of the world's largest cloud service providers, operating system vendors, and telecom equipment manufacturers. The code is hosted on GitHub* under Apache* License Version 2 and the project is managed by the OpenStack* Foundation.
Data Plane Development Kit (DPDK)
DPDK is a Docker networking alternative that consists of libraries to accelerate packet processing workloads on a wide variety of CPU architectures.
Open Baton
Open Baton is a network function virtualization (NFV) management and orchestration (MANO) framework, driven by Fraunhofer FOKUS and TU Berlin, that provides full automation of service deployment and lifecycle management. It is the result of an agile design process for building a framework capable of orchestrating virtualized network functions (VNF) services across heterogeneous infrastructures.
The goal of the following sections is to set up a test environment that uses Docker to deploy a Kata Container. The container will be connected to one of the host’s physical NICs, providing a boost in packet throughput. This is achieved by configuring the host to allocate hardware resources to VPP (using DPDK) such as RAM (in the form of HugePages), CPUs (by dedicating cores to DPDK), and network resources (using DPDK NIC drivers). Once configured, the original operating system no longer manages these resources and cannot interfere with subsequent operations. Finally, this tutorial introduces Open Baton as an NFV MANO framework with a modified/enhanced Docker Virtual Network Function Manager (VNFM) to deploy DPDK-empowered VNFs in the virtual environment. This tutorial is partially based on the following guides:
Kata Containers Developer Guide
DPDK Getting Started Guide for Linux* (PDF)
Prerequisite for following this tutorial:
Workstation with Ubuntu* 18 to serve as your host machine
Here are the conventions we followed when writing the tutorial:
# Lines starting with a ‘#’ are comments
# Lines starting with a ‘$’ are commands to be executed in your shell
$ echo ‘Like this.’
Like this
# Lines starting with a ‘%’ are commands to be executed by root
% whoami
root
# You can simply become root by executing
$ sudo su
# Colored lines without a ‘#/$/%’ prefix are expected output of your shell
# [...] means that long shell output has been snipped
# All commands should be executed in the virtual machine unless otherwise explicitly noted!
Set Up the Virtual Environment
In this tutorial, we use an all-in-one VM to play with Open Baton, Kata, and DPDK. We are using virt-manager to manage this machine, as it is capable of passing the specific CPU flags necessary to run Kata Containers. The first step is to install virt-manager on your workstation.
Depending on your operating system the command may differ. For Debian*-like environments, simply execute the following command:
# Install virt-manager
$ sudo apt-get install -y virt-manager
Once virt-manager is installed, the next step is to create four networks inside of virt-manager, configured as follows:
| Name | IPv4 | Network | Type | DHCPv4 | Static Route Definition | IPv6 |
| mgmt | enabled | 192.168.0.0/24 | NAT to internet | disabled | disabled | disabled |
| bridge | enabled | 192.168.1.0/24 | isolated network | disabled | disabled | disabled |
| unused | enabled | 192.168.2.0/24 | isolated network | disabled | disabled | disabled |
| dpdk | enabled | 192.168.3.0/24 | isolated network | disabled | disabled | disabled |
You will find the tools to do so in the Edit menu located at the top left of the window, where you'll open Connection Details.
You must also confirm that nested virtualization is enabled on your workstation. Here we have to differentiate between Intel® CPU and AMD*-based Central Processing Unit:
# Check for and enable nested virtualization
# If your machine uses an intel cpu:
% cat /sys/module/kvm_intel/parameters/nested
N
% echo "options kvm-intel nested=1" >> /etc/modprobe.d/kvm-nested.conf
% modprobe -r kvm_intel && modprobe -a kvm_intel
% cat /sys/module/kvm_intel/parameters/nested
Y
# If your machine uses an amd cpu
% cat /sys/module/kvm_amd/parameters/nested
N
% echo "options kvm-amd nested=1" >> /etc/modprobe.d/kvm-nested.conf
% modprobe -r kvm_amd && modprobe -a kvm_amd
% cat /sys/module/kvm_amd/parameters/nested
Y
Create and Configure Your Own VM
To start, boot a VM using the CentOS* 7 ISO file. While installing, you will have to configure the networking properly. Here you have to take care to use an order consistent with that of the NICs assigned to the VM in respect to the network interface names. Take care as the networks in the VM are ordered alphabetically but require a numerical order.
CPU Flags and HugePages
We use GNU GRUB* to set a few CPU flags and allocate HugePages. You can decide whether to allocate the HugePages at boot or afterward. You can use 2 MB (hugepage) or 1 GB (gigapage) pages. In this tutorial, we will allocate 1600 * 2 MB pages after booting as we have a total of about 8 GB RAM available on the machine. These HugePages will be used by VPP as well as by the Kata Containers. The intent of the HugePages is to increase overall performance.
Specifically, the translation lookaside buffer (TLB) between the CPU and CPU cache caches the virtual to physical address mapping.
Assuming the TLB contains 256 entries and each entry can save 4,096 bytes, it can store up to 1MB in the TLB without using HugePages. With huge pages, the TLB entry can now point to 2 MB, which increases the memory mapping capability to 500 MB.
We also need to enable input–output memory management unit (IOMMU) known as Intel® Virtualization Technology (Intel® VT) for Directed I/O (Intel® VT-d) to pass hardware resources down to virtual machines.
You may want to consider limiting the available CPUs for the operating system to have dedicated CPUs for the VPP-DPDK environment. In our VM example with 2 cores, core 0 is managed by the OS and core 1 will be isolated.
# modify /etc/default/grub and rebuild grub.cfg
$ sudo sed -i 's/\(rhgb quiet\)/\1 iommu=pt intel_iommu=on isolcpus=1/' /etc/default/grub
# check the GRUB_CMDLINE_LINUX parameter
$ grep iommu /etc/default/grub
GRUB_CMDLINE_LINUX="crashkernel=auto rd.lvm.lv=centos_kata/root rd.lvm.lv=centos_kata/swap rhgb quiet iommu=pt intel_iommu=on isolcpus=1"

# rebuild grub.cfg
$ sudo grub2-mkconfig -o /boot/grub2/grub.cfg
# check if the kernel parameters got added correctly
$ sudo grep iommu /boot/grub2/grub.cfg
	linux16 /vmlinuz-3.10.0-957.el7.x86_64 root=/dev/mapper/centos_kata-root ro crashkernel=auto rd.lvm.lv=centos_kata/root rd.lvm.lv=centos_kata/swap rhgb quiet iommu=pt intel_iommu=on isolcpus=1
 linux16 /vmlinuz-0-rescue-cc9deb04bf664cfbbeda8905b285ef54 root=/dev/mapper/centos_kata-root ro crashkernel=auto rd.lvm.lv=centos_kata/root rd.lvm.lv=centos_kata/swap rhgb quiet iommu=pt intel_iommu=on isolcpus=1
Now let's allocate a few HugePages. We check the default settings and currently available HugePages and afterward apply a new configuration.
# You can check the default hugepage settings via :
$ cat /proc/meminfo | grep Huge
AnonHugePages:     10240 kB
HugePages_Total:       0
HugePages_Free:        0
HugePages_Rsvd:        0
HugePages_Surp:        0
Hugepagesize:       2048 kB

# Allocate 1600 hugepages
$ echo "vm.nr_hugepages = 1600" | sudo tee -a /etc/sysctl.conf
vm.nr_hugepages = 1600
$ sudo sysctl -p
vm.nr_hugepages = 1600

# See the allocation via :
$ cat /proc/meminfo | grep Huge
AnonHugePages:     10240 kB
HugePages_Total:    1600
HugePages_Free:     1600
HugePages_Rsvd:        0
HugePages_Surp:        0
Hugepagesize:       2048 kB
Network Configuration
As the OS is CentOS* 7, we set up the network interfaces with static IPv4 addresses as follows.
# Depending on your setup (virtualized NICs) the interface names may differ

# The network scripts are located at : /etc/sysconfig/network-scripts/ifcfg-*
# We will overwrite the files with the following multiline strings

# ens3 will serve as management (mgmt) interface (Port 1)
% cat > /etc/sysconfig/network-scripts/ifcfg-ens3 << EOF
DEVICE=ens3
DEFROUTE=yes
ONBOOT="yes"
IPADDR="192.168.0.2"
PREFIX="24"
GATEWAY="192.168.0.1"
EOF

# ens4 will later serve as DPDK (dpdk) interface (Port 2)
% cat > /etc/sysconfig/network-scripts/ifcfg-ens4 << EOF
DEVICE=ens4
DEFROUTE=no
ONBOOT=no
IPADDR="192.168.3.2"
PREFIX="24"
GATEWAY="192.168.3.3"
EOF

# ens5 won’t be used later (unused), still we can set it up (Port 3)
% cat > /etc/sysconfig/network-scripts/ifcfg-ens5 << EOF
DEVICE=ens5
DEFROUTE=no
ONBOOT="yes"
IPADDR="192.168.2.2"
PREFIX="24"
GATEWAY="192.168.2.3"
EOF

# ens6 will later serve as bridged (bridge) interface (Port 4)
% cat > /etc/sysconfig/network-scripts/ifcfg-ens6 << EOF
DEVICE=ens6
DEFROUTE=no
ONBOOT="yes"
IPADDR="192.168.1.2"
PREFIX="24"
GATEWAY="192.168.1.3"
EOF

# Also disable NetworkManager so it won’t interfere
% systemctl disable Networkmanager
% systemctl enable network

# Set a static nameserver, for example your host machine
% echo "nameserver 192.168.0.1" > /etc/resolv.conf
Consider adding your SSH public key to the authorized users file, reducing the requirement to type your credentials when connecting to the box. Since we have changed the GRUB config and set up static IPv4 addresses, we now perform a reboot.
Install Go*
To build the VPP Docker plugin as well the Kata Containers components, we need to install Go*.
$ curl -O https://storage.googleapis.com/golang/go1.9.4.linux-amd64.tar.gz
$ sudo tar -zxvf  go1.9.4.linux-amd64.tar.gz -C /usr/local/
$ export PATH=$PATH:/usr/local/go/bin
# The GOPATH will likely be in your root home directory
$ GOPATH=/root/go
# to make the PATH changes persistent (execute as root):
% echo "export PATH=$PATH:/usr/local/go/bin" >> /etc/profile.d/path.sh
% echo "export GOPATH=/root/go" >> /etc/profile.d/path.sh
Install Docker*
As the Kata runtime is a replacement for the default Docker runtime (runc) we will have to install Docker as well.
# Installing necessary packages for Docker
$ sudo yum install -y yum-utils device-mapper-persistent-data lvm2
# Adding Docker repository
$ sudo yum-config-manager --add-repo https://download.docker.com/linux/centos/docker-ce.repo
# Install latest Docker (At the time this tutorial was written it was 18.09)
$ sudo yum install -y docker-ce
Install Kata Containers
Decide how to install the Kata Containers components. You can use the prebuilt packages from their repositories or check out the source code and build them yourself. It is also possible to run a mixed setup.
$ source /etc/os-release
$ sudo yum -y install yum-utils
$ ARCH=$(arch)
# Adding Kata Container repositories"
$ sudo yum-config-manager --add-repo "http://download.opensuse.org/repositories/home:/katacontainers:/releases:/${ARCH}:/master/CentOS_${VERSION_ID}/home:katacontainers:releases:${ARCH}:master.repo"
# Install Kata Containers via prebuild packages
$ sudo yum -y install kata-runtime kata-proxy kata-shim
# Enable hugepages usage
$ sudo sed -i -e 's/^# *\(enable_hugepages\).*=.*$/\1 = true/g' /usr/share/defaults/kata-containers/configuration.toml
# disable initrd image option
$ sudo sed -i 's/^\(initrd =.*\)/# \1/g' /usr/share/defaults/kata-containers/configuration.toml
# Set default memory to 512 MB
$ sudo sed -i 's/^\(default_memory = 2048\)/default_memory = 512/g' /usr/share/defaults/kata-containers/configuration.toml
Download and Install DPDK
We will download, build and install the DPDK source code manually, making use of the DPDK usertools to build the igb_uio DPDK NIC driver.
# Perform an update, install the appropriate headers and reboot just to on the be safe side
$ sudo yum update --exclude=kernel
$ sudo yum install "kernel-devel-uname-r == $(uname -r)"
$ sudo reboot
# Install necessary packages to build the DPDK source code
$ sudo yum install -y kernel-devel numactl-devel gcc
$ cd /usr/local/src
$ sudo curl -O http://fast.dpdk.org/rel/dpdk-17.11.2.tar.xz
$ sudo tar -xf dpdk-17.11.2.tar.xz
$ dpdkfolder=$(ls /usr/local/src | grep dpdk | grep "$(echo dpdk-17.11.2 | cut -d '-' -f2)" | grep -v tar)
$ cd $dpdkfolder
Open config/common_base to set your preferred build options.
% cat >> config/common_base << EOF
CONFIG_RTE_BUILD_SHARED_LIB=y
CONFIG_RTE_EAL_IGB_UIO=y
CONFIG_RTE_EAL_VFIO=y
CONFIG_RTE_EAL_NUMA_AWARE_HUGEPAGES=y
CONFIG_RTE_VHOST_USER_IOMMU_SUPPORT=y
CONFIG_RTE_LIBRTE_VHOST=y
CONFIG_RTE_LIBRTE_VHOST_NUMA=y
CONFIG_RTE_LIBRTE_PMD_VHOST=y
CONFIG_RTE_KNI_PREEMPT_DEFAULT=n
EOF
Be sure to disable the KNI-related build options in config/common_linuxapp.
% cat >> config/common_linuxapp << EOF
CONFIG_RTE_KNI_KMOD=n
CONFIG_RTE_LIBRTE_KNI=n
CONFIG_RTE_LIBRTE_PMD_KNI=n
EOF
Now we are ready to build and install DPDK.
# Build
$ sudo make install T=x86_64-native-linuxapp-gcc DESTDIR=install
Afterwards we will add the usertools to our PATH.
$ export PATH=$PATH:/usr/local/src/dpdk-stable-17.11.2/usertools/
% echo "export PATH=\$PATH:/usr/local/src/dpdk-stable-17.11.2/usertools/" >> /etc/profile.d/path.sh
Load Drivers
# If you intend to use igb_uio as you have build the DPDK source code manually :
$ sudo modprobe uio
$ sudo insmod /usr/local/src/$dpdkfolder/x86_64-native-linuxapp-gcc/kmod/igb_uio.ko

$ sudo modprobe uio_pci_generic
$ sudo modprobe vfio-pci

# To do so persistent :
% echo "uio" >> /etc/modules-load.d/obkatadpdkenv.conf
% echo "uio_pci_generic" >> /etc/modules-load.d/obkatadpdkenv.conf
% echo "vfio-pci" >> /etc/modules-load.d/obkatadpdkenv.conf
% echo "insmod /usr/local/src/dpdk-stable-17.11.2/x86_64-native-linuxapp-gcc/kmod/igb_uio.ko" >> /etc/sysconfig/modules/obkatadpdkenv.modules
Bind the NIC Supporting DPDK to the DPDK Driver
We choose NIC number 2 (0000:03:00.1) for DPDK support. First, we have to check to see if the kernel already brought up the NIC interface.
# If you want to put down an active interface without greater effort, we will need some additional tools, we will need them anyway for the DPDK usertools to work properly
$ sudo yum install -y net-tools pciutils libpcap-devel

# First lets list the available NICs
% dpdk-devbind.py --status
Network devices using kernel driver
===================================
0000:00:03.0 '82540EM Gigabit Ethernet Controller 100e' if=ens3 drv=e1000 unused=igb_uio,vfio-pci,uio_pci_generic *Active*
0000:00:04.0 '82540EM Gigabit Ethernet Controller 100e' if=ens4 drv=e1000 unused=igb_uio,vfio-pci,uio_pci_generic
0000:00:05.0 '82540EM Gigabit Ethernet Controller 100e' if=ens5 drv=e1000 unused=igb_uio,vfio-pci,uio_pci_generic *Active*
0000:00:06.0 '82540EM Gigabit Ethernet Controller 100e' if=ens6 drv=e1000 unused=igb_uio,vfio-pci,uio_pci_generic *Active*
If the NIC you want to use for VPP-DPDK is shown as active, you will have to take the interface down as the kernel should not control this interface. The procedure may look like the following:
# Assuming your interface name was ens4 (relating to the NIC at pci address 0000:00:04.0) :
% ifconfig ens4 down

# Now we are able to change the driver for that NIC
% dpdk-devbind.py --bind=igb_uio 0000:00:04.0

# The DPDK device status should have changed to something like this
% dpdk-devbind.py --status
Network devices using DPDK-compatible driver
============================================
0000:00:04.0 '82540EM Gigabit Ethernet Controller 100e' drv=igb_uio unused=e1000,vfio-pci,uio_pci_generic

Network devices using kernel driver
===================================
0000:00:03.0 '82540EM Gigabit Ethernet Controller 100e' if=ens3 drv=e1000 unused=igb_uio,vfio-pci,uio_pci_generic *Active*
0000:00:05.0 '82540EM Gigabit Ethernet Controller 100e' if=ens4 drv=e1000 unused=igb_uio,vfio-pci,uio_pci_generic
0000:00:06.0 '82540EM Gigabit Ethernet Controller 100e' if=ens5 drv=e1000 unused=igb_uio,vfio-pci,uio_pci_generic *Active*
Install VPP
VPP is the open source version of the Vector Packet Processing technology from Cisco*, a high-performance packet-processing stack that can run on commodity CPUs. For this tutorial we will go with version 18.07. VPP installs its own DPDK version, which you can check via vppctl show dpdk version. To add the repository to CentOS, create: /etc/yum.repos.d/fdio-release.repo with the following input:
% cat > /etc/yum.repos.d/fdio-release.repo << EOF
[fdio-release]
name=fd.io release branch latest merge
baseurl=https://nexus.fd.io/content/repositories/fd.io.centos7/
enabled=1
gpgcheck=0
EOF
Now install VPP.
$ sudo yum install -y vpp vpp-plugins
# If you want to tweak the performance you may edit the /etc/vpp/startup.conf
# For the CPU part, corelist-workers can be set according to your available CPU cores ( if you have 4 CPUs you may set it to “2-3” )
# For the DPDK part, socket-mem can be increased according to your hugepage settings ( if you have 1600 2MB hugepages you may set it to “1024,1024” )
$ sudo systemctl restart vpp
$ sudo systemctl enable vpp
# List interfaces
$ sudo vppctl show int
[...]
# List NICs
$ sudo vppctl show hardware
[...]
# Show NIC PCI slots
$ sudo vppctl show pci
[...]
# If you want to modify the VPP startup parameters : /etc/vpp/startup.conf"
Bring up the network interface now handled by VPP:
# List interfaces
$ sudo vppctl show int
[...]
# Most probably your interface name will be
#       GigabitEthernet0/4/0 (if you are using a virtualized NIC)
#       TenGigabitEthernet3/0/1 (if you are working with the real hardware)
$ sudo vppctl set interface state GigabitEthernet0/4/0 up
Install Kata VPP Docker* Plugin
The Kata VPP Docker plugin is used to create the VPP virtual host (vhost) user interface, which is attached to the Kata Containers
# Install git if not already done
% yum install -y git
# Create the plugin directory
% mkdir -p /etc/docker/plugins
# Get VPP Docker plugin
% go get -d -u github.com/clearcontainers/vpp
% cd $GOPATH/src/github.com/clearcontainers/vpp
% go build
# Enable the Docker plugin
% cp vpp.json /etc/docker/plugins/vpp.json
# Restart Docker
% systemctl daemon-reload
% systemctl restart docker
# Start the plugin (this will block your terminal)
% ./vpp -alsologtostderr -logtostderr
Docker Runtime Configuration
We next create a file for configuring the default Docker runtime. The file contains the available runtimes. To use Docker via a remote device (which does not have access to the Docker socket) you need to redefine the sockets. This is already done in the example below. Using this example, the default runtime will be the Kata runtime.
% mkdir -p /etc/systemd/system/docker.service.d/
% cat > /etc/systemd/system/docker.service.d/kata-containers.conf << EOF
[Service]
ExecStart=
#ExecStart=/usr/bin/dockerd -H unix:///var/run/docker.sock -H tcp://0.0.0.0:2376 -D --default-runtime=runc
#ExecStart=/usr/bin/dockerd -H unix:///var/run/docker.sock -D --default-runtime=runc
#ExecStart=/usr/bin/dockerd -H unix:///var/run/docker.sock -D --add-runtime kata-runtime=/usr/bin/kata-runtime --default-runtime=kata-runtime
ExecStart=/usr/bin/dockerd -H unix:///var/run/docker.sock -H tcp://0.0.0.0:2376 -D --add-runtime kata-runtime=/usr/bin/kata-runtime --default-runtime=kata-runtime
EOF
To contact the Docker API via a remote machine, allow tcp connections through the firewall.
% firewall-cmd --zone=public --add-port=2376/tcp --permanent
success
% firewall-cmd --reload
success
After modifying the Docker runtime, restart Docker.
% systemctl daemon-reload
% systemctl restart docker
% systemctl enable docker
Disable Security-Enhanced Linux (SELinux)
If we do not disable SELinux for this setup, VPP will have problems creating the sockets. To avoid this, edit /etc/sysconfig/selinux.
% sed -i "s/SELINUX=Enforcing/SELINUX=disabled/" /etc/sysconfig/selinux
# to disable it right away without restarting execute
% setenforce 0
Optional - Create Docker Networks
At this stage, we can decide whether we want to create the necessary Docker networks manually or let Open Baton create them automatically.
% docker network create -d=vpp --ipam-driver=vpp --subnet=192.168.3.0/24 --gateway=192.168.3.1  vpp_net
% docker network create --subnet=192.168.10.0/24 --gateway=192.168.10.1  normal_net
If you choose to let Open Baton create the networks, beware because after each deployment the network will block the creation of a new network with the same CIDR (Classless Inter-Domain Routing). You will have to delete the network first in order to start another deployment.
Set Up Open Baton with Docker-Compose
In this setup, we will use the Intel Atom C3000 processor series box (simulated via VM or real hardware) to run Open Baton. We can easily get a working environment up and running by using a Docker-compose file. We will use default Docker runtime (runc) for this setup as we want to reserve the remaining resources for the Kata Containers.
Install Docker-Compose
We will stick with the file version 2.x – using version 3.x eliminates the ability to set memory limits and runtime values for default deployments.
% curl -L "https://github.com/docker/compose/releases/download/1.23.1/docker-compose-$(uname -s)-$(uname -m)" -o /usr/local/bin/docker-compose
% chmod +x /usr/local/bin/docker-compose
% export PATH=$PATH:/usr/local/bin
% echo "export PATH=\$PATH:/usr/local/bin" >> /etc/profile.d/path.sh
Use this yaml file to deploy Open Baton:
version: '2.3'
services:
  nfvo:
    image: openbaton/nfvo:6.0.1
    mem_limit: 512MB
    runtime: runc
    depends_on:
      - rabbitmq_broker
      - nfvo_database
    restart: always
    environment:
      - NFVO_RABBIT_BROKERIP=192.168.0.2
      - NFVO_QUOTA_CHECK=false
      - NFVO_PLUGIN_INSTALLATION-DIR=/dev/null
      - SPRING_RABBITMQ_HOST=192.168.20.6
      - SPRING_DATASOURCE_URL=jdbc:mysql://192.168.20.5:3306/openbaton
      - SPRING_DATASOURCE_DRIVER-CLASS-NAME=org.mariadb.jdbc.Driver
      - SPRING_JPA_DATABASE-PLATFORM=org.hibernate.dialect.MySQLDialect
      - SPRING_JPA_HIBERNATE_DDL-AUTO=update
    ports:
      - "8080:8080"
    networks:
      ob_net:
        ipv4_address: 192.168.20.2
  vnfm-docker-go:
    image: openbaton/vnfm-docker-go:6.0.1
    mem_limit: 256MB
    runtime: runc
    depends_on:
      - nfvo
    restart: always
    environment:
      - BROKER_IP=192.168.20.6
    networks:
      ob_net:
       ipv4_address: 192.168.20.3
    volumes:
      - /var/run/docker.sock:/var/run/docker.sock:rw
  driver-docker-go:
    image: openbaton/driver-docker-go:6.0.1
    mem_limit: 256MB
    runtime: runc
    depends_on:
      - nfvo
    restart: always
    environment:
      - BROKER_IP=192.168.20.6
    networks:
      ob_net:
       ipv4_address: 192.168.20.4
    volumes:
      - /var/run/docker.sock:/var/run/docker.sock:rw
  rabbitmq_broker:
    image: rabbitmq:3-management-alpine
    mem_limit: 512MB
    runtime: runc
    hostname: openbaton-rabbitmq
    environment:
      - RABBITMQ_DEFAULT_USER=admin
      - RABBITMQ_DEFAULT_PASS=openbaton
    ports:
      - "5672:5672"
      - "15672:15672"
    networks:
      ob_net:
        ipv4_address: 192.168.20.6
  nfvo_database:
    image: mysql/mysql-server:5.7.20
    mem_limit: 512MB
    runtime: runc
    environment:
      - MYSQL_RANDOM_ROOT_PASSWORD=true
      - MYSQL_DATABASE=openbaton
      - MYSQL_USER=admin
      - MYSQL_PASSWORD=changeme
    networks:
      ob_net:
        ipv4_address: 192.168.20.5
networks:
  ob_net:
    driver: bridge
    ipam:
     config:
       - subnet: 192.168.20.0/24
         gateway: 192.168.20.1
If you saved the content in a file (e.g., OpenBaton.yaml), start it up by using the following command:
# You may have to load KVM kernel modules first
% modprobe kvm
# To do so persistent :
% echo "kvm" >> /etc/modules-load.d/obkatadpdkenv.conf
# Make the dashboard available from “outside” of the VM
% firewall-cmd --zone=public --add-port=8080/tcp --permanent
success
% firewall-cmd --reload
success
# Bring up Open Baton
% COMPOSE_HTTP_TIMEOUT=240 docker-compose -f OpenBaton.yaml up -d
If you are new to Open Baton, reading the documentation is a good starting point. However, the basic workflow is covered here. Once the machines are deployed, it will take a few minutes for Open Baton to be set up. When it’s done, you’ll be able to access the dashboard via your browser: 192.168.0.2:8080. The default credentials are admin with the password openbaton. We will use the dashboard from a remote machine.
Register a Point of Presence
To deploy our VNFs to our infrastructure we need to tell Open Baton where and how to contact it. This is done by registering a Point of Presence (PoP), which in this case is our newly created Kata environment. Note that we use the local Docker socket. Alternatively, you can also insert the URL of your environment if you enabled the remote API. Or you can either copy and paste the JSON definition of PoP (see below) or enter it manually in the form.
{
  "name": "silicombox",
  "authUrl": "unix:///var/run/docker.sock",
  "tenant": "1.38",
  "type": "docker"
}

Below is the page for registering a PoP.
Prepare Docker* Image
Use any Docker image for your VNFs. You can create an original image or use a preexisting one. For this tutorial, we'll create our own Docker image using a Dockerfile with alpine as a base image, which we’ll install, then start an Iperf Server. Execute the following commands directly in the CLI of your virtual machine:
$ mkdir ~/dockerfiledir
$ cd  ~/dockerfiledir
$ cat << EOF > Dockerfile
FROM alpine:latest
RUN apk add --no-cache iperf
ENTRYPOINT iperf -s & iperf -u -s
EOF
$ sudo docker build -t ob-tutorial-iperf:latest -f Dockerfile . -m 256MB
Onboard VNFDs and NSD
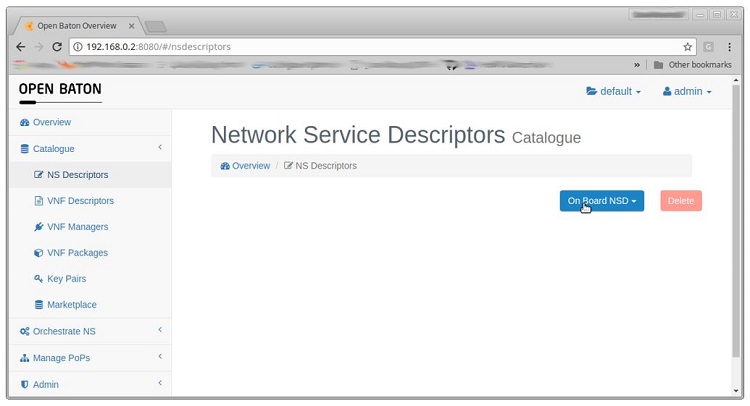
Next, we upload our VNFDs. As this tutorial involves a very basic use case, it will work with what we have available on the Docker images. This means there are no lifecycle scripts to be executed; simply upload a basic name server daemon (NSD). To do this, we navigate to the NS Descriptors tab contained in the Catalogue drop-down menu in the left bar.
You may use this json file representing our NSD:
{
   "name":"Iperf-Servers",
   "vendor":"Intel-FOKUS",
   "version":"1.0",
   "vnfd":[
      {
         "name":"Iperf-Server-Normal",
         "vendor":"Intel-FOKUS",
         "version":"1.0",
         "lifecycle_event":[],
         "configurations":{
               "configurationParameters":[{
                     "confKey":"publish",
                     "value":"5001"
                                   }],
               "name":"iperf-configuration"
         },
         "virtual_link":[
            {
               "name":"normal_net"
            }
         ],
         "vdu":[
            {
               "vm_image":[
                  "ob-tutorial-iperf:latest"
               ],
               "scale_in_out":1,
               "vnfc":[
                  {
                     "connection_point":[
                        {
                           "virtual_link_reference":"normal_net",
                           "fixedIp":"192.168.10.2"
                        }
                     ]
                  }
               ]
            }
         ],
         "deployment_flavour":[
            {
               "flavour_key":"m1.small"
            }
         ],
         "type":"server",
         "endpoint":"docker"
      },
      {
         "name":"Iperf-Server-DPDK",
         "vendor":"Intel-FOKUS",
         "version":"1.0",
         "lifecycle_event":[],
         "virtual_link":[
            {
               "name":"vpp_net"
            }
         ],
         "vdu":[
            {
               "vm_image":[
                  "ob-tutorial-iperf:latest"
               ],
               "scale_in_out":1,
               "vnfc":[
                  {
                     "connection_point":[
                        {
                           "virtual_link_reference":"vpp_net",
                           "fixedIp":"192.168.3.2"
                        }
                     ]
                  }
               ]
            }
         ],
         "deployment_flavour":[
            {
               "flavour_key":"m1.small"
            }
         ],
         "type":"server",
         "endpoint":"docker"
      }
   ],
   "vld":[
      {
         "name":"vpp_net",
         "cidr":"192.168.3.0\/24",
         "metadata": {
             "driver": "vpp",
             "ipam-driver": "vpp"
             }
      },
      {
         "name":"normal_net",
         "cidr":"192.168.10.0\/24"
      }
   ]
}
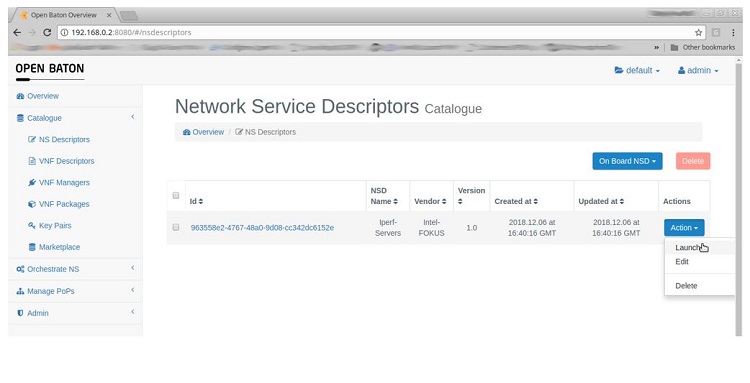
Now you have uploaded the tutorial NSD, which consists of two Iperf Servers which will be deployed in two separate networks. One will be deployed using the VPP DPDK network (vpp_net); the other will use the default Docker bridge (normal_net).
Deploy the Network Service
Now that we have saved our NSD, we can deploy it. Again, we have to navigate to the NS Descriptors tab and select our just onboarded NSD Iperf-Servers.
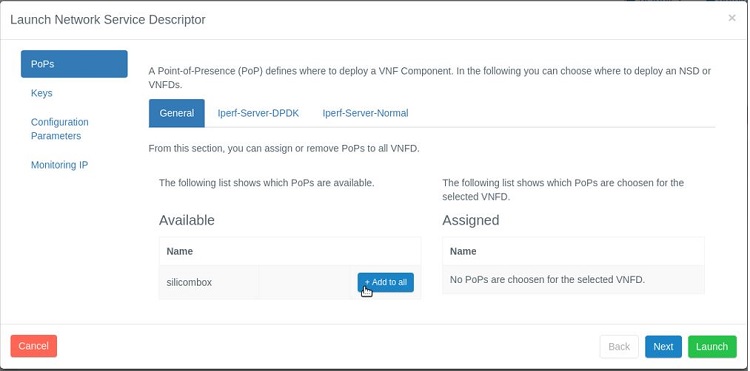
We choose to deploy it on our infrastructure which we have named silicombox, thus we add this PoP to both of our VNFDs (Iperf-Server-DPDK and Iperf-Server-Normal). Afterwards, we can launch our NSD.
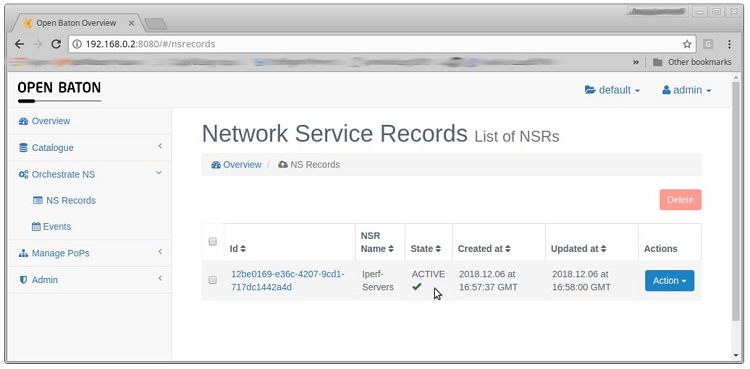
Now that the NSR is deployed navigate to the NS Records tab, which you’ll find inside the Orchestrate NS drop-down menu. Here you can see all your deployed Network Services, so-called Network Service Records (NSRs), and the execution of the different life cycles of your NSR and VNFRs. After a short time, we should see our NSR Iperf-Servers in ACTIVE state.
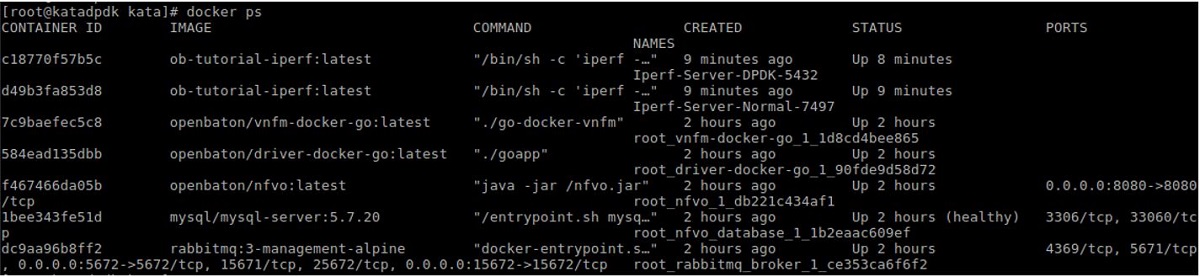
Using the Docker CLI, you can see that your NSR is deployed, in addition to Open Baton.
Via the following command you can check the logs of the running service to see further details (e.g. throughput, packet loss).
# Check docker for the container id’s
$ sudo docker ps
# Access the logs with the appropriate container id of whichever Iperf server
$ sudo docker logs c18770f57b5c
# Or tail the log to see it in realtime
$ sudo docker logs -f c18770f57b5c
How to Use the Network Service
Since we have deployed two Iperf Servers, we can now use an Iperf Client to test the networks. Depending on your setup, you can use another machine, such as your workstation, or a VM connected to the networks to do so. To reach machines behind a NAT, on our workstation, we add a route to the isolated machine to enable us to reach the Kata Containers.
# Access normal_net via bridge interface of of VM
# (execute on your workstation!!!)
$ sudo ip route replace 192.168.10.0/24 via 192.168.1.2
If we work with a VM setup, we further need to set the correct route on the host machine to guide Kata Container traffic to the correct VM network.
We must also add the DPDK interface to the bridge of the Kata Container interface in VPP. Otherwise, the Iperf Server running in the DPDK network will not be able to reach outside the machine.
# List interfaces
$ sudo vppctl show int
# You will now see that there is another interface besides your DPDK NIC (VirtualEthernet0/0/0)
# The interface also got a layer 2 bridge assigned, you can check for bridges via :
$ sudo vppctl show bridge
# Most probably your bridge will be the id=1
# And check the bridge details via :
$ sudo vppctl show bridge 1 detail

# Now we need to add our DPDK NIC to this bridge aswell
#       GigabitEthernet0/4/0 (if you are using a virtualized NIC)
#       TenGigabitEthernet3/0/1 (if you are working with the real hardware)
$ sudo vppctl set interface l2 bridge GigabitEthernet0/4/0 1
Now both VNFs should be reachable via your workstation, which needs to be connected to the bridge and the DPDK network. Using the Iperf Client we can start testing both networks.
# (execute on your workstation!)
# install iperf
$ sudo apt-get install -y iperf
# connect to “normal” instance in TCP mode
$ iperf -c 192.168.10.2
# connect to “normal” instance in UDP mode
$ iperf -u -c 192.168.10.2
# connect via DPDK in TCP mode
$ iperf -c 192.168.3.2
# connect via DPDK in UDP mode
$ iperf -u -c 192.168.3.2
If you experience connectivity issues using Iperf in UDP mode, check the iptables on your machine hosting the Kata environment.
# Set iptable rule to allow UDP connections on port 5001 for the Iperf server running on 192.168.10.2
$ sudo iptables -t nat -A DOCKER -p udp --dport 5001 -j DNAT --to-destination 192.168.10.2:5001
$ sudo iptables -A DOCKER -j ACCEPT -p udp --destination 192.168.10.2 --dport 5001
We ran our hardware-based experiments to compare both network types using two Intel Atom C3000 processor series kits connected via gigabit switches. The experiments showed that the VPP DPDK network exhibits increased packet throughput in handling small UDP packets.
This VM setup won’t show these differences due to the fact that this virtual environment is simulating the ethernet parts and doesn’t provide the capabilities to be seen with real hardware.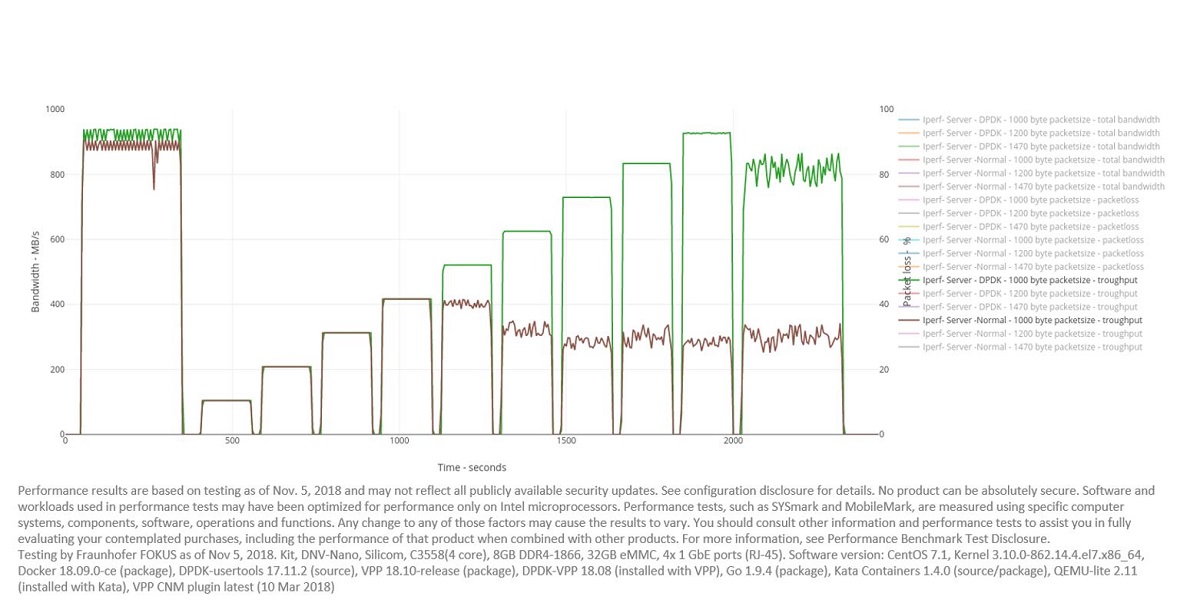
Conclusion
We have set up a playground around Open Baton NFV MANO, Kata Containers, and DPDK. We are able to deploy VNFs onto our infrastructure, which can make use of the DPDK-enabled boost in packet throughput. By running the Iperf use case, using small UDP packets, we can verify the performance advantage of using the VPP-DPDK network compared to the default network.
Because we're using a very basic setup for the configuration of VPP, DPDK and Kata Containers, the next step is to adjust the setup to further increase performance. This presents a good starting point to learn more about DPDK since we have a running setup which we can directly benchmark to evaluate any changes in configuration.
To get farther into the topic of NFV, we can write our own network functions using Open Baton and deploy them on our Kata Container DPDK enabled infrastructure.
Resources
VPP - Vector Packet Processing