Overview
Video Analytics refers to transforming video streams into insights through video processing, inference, and analytics operations. Video Analytics is used in business domains such as video surveillance, healthcare, retail, entertainment, and industrial. The algorithms used for video analytics perform object detection, classification, identification, counting, and tracking on the input video stream.
This use case features interoperable containerized microservices for developing and deploying optimized video analytics pipelines built using Intel® DL Streamer as an inferencing backend. The pre-built container images provided by the package allow developers to replace the deep learning models and pipelines used in the container with their deep learning models and pipelines. You can deploy the microservices independently (as explained here) or with the Intel® Edge Insights for Industrial (EII) software stack to perform video analytics on the edge devices.
Developers can save development and deployment time using the pre-built Docker* image and configuring the video analytics pipelines in the well-known JSON format.
Select Configure & Download to download the software package of the Edge Video Analytics microservice.
- Time to Complete: 45 minutes
- Programming Language: Python* 3
- Available Software:
- Edge Video Analytics Microservice
- Deep Learning Streamer (Intel® DL Streamer) Pipeline Server
Target System Requirements
- 8th Generation Intel® Core processor onwards with Intel® HD Graphics or Intel® Xeon® processor
- Minimum 16 GB RAM
- Minimum 128 GB and Recommended 256 GB Storage
- Ubuntu* 20.04 LTS and Ubuntu 22.04 LTS
How It Works
Edge Video Analytics Microservice
This is a Python* microservice used for deploying optimized video analytics pipelines and is provided as a Docker image in the package. The pipelines run by the microservice are defined in GStreamer* using the Intel® DL Streamer Pipeline Server for inferencing. The Docker image uses Intel® DL Streamer Pipeline Server as a library. You can start the microservice in either of the two modes – Edge Insights Industrial (EII) to deploy with the EII software stack or Edge Video Analytics (EVA) to deploy independently of the EII stack.
- Edge Insights for Industrial (EII) Mode: Supports EII Configuration Manager for pipeline execution and EII Message Bus for publishing inference results, making it compatible with the Edge Insights for Industrial software stack.
- Edge Video Analytics (EVA) Mode: Provides the same RESTful APIs as Intel® DL Streamer Pipeline Server to discover, start, stop, customize, and monitor pipeline execution and supports MQTT and Kafka message brokers for publishing the inference results. This document explains the EVA mode. For the REST API definition, refer to the RESTful Microservice interface.

Edge Video Analytics Microservice Resources
The following configuration files, scripts, and tools used with the Edge Video Analytics Microservice are included in the Edge Video Analytics Resources zip file:
- The docker-compose.yml file configures, creates, and starts containers for Edge Video Analytics Microservice and MQTT broker.
- The pipelines and model_list folders contain the pipeline and model definition files in the Edge Video Analytics Microservice Docker image. You can modify and use these files with the Edge Video Analytics Microservice Docker image by volume mounting.
- The tools/model_downloader tool downloads a model from openvinotoolkit/open_model_zoo.
- The mosquitto folder includes a file for configuring the MQTT broker required to view the inference results.
GST-UDF-LOADER Element
The gst-udf-loader GStreamer plugin supports the loading and execution of Python and native (C++) UDFs. UDFs are user-defined functions that enable you to add any pre-processing or post-processing logic in the pipeline defined by EVAM.
Container Engines and Orchestration
The package uses Docker and Docker Compose for automated container management.
- Docker is a container framework widely used in enterprise environments. Docker allows applications and their dependencies to be packaged together and run as a self-contained unit.
- Docker Compose is a tool for defining and running multi-container Docker Applications.
Get Started
Step 1: Install the Microservice
Select Configure & Download to download the microservice and then follow the steps below to install it.
- Open a new terminal, go to the downloaded folder, and unzip the downloaded package:
unzip video_analytics.zip - Go to the video_analytics/ directory:
cd video_analytics
- Change permission of the executable edgesoftware file:
chmod 755 edgesoftware
- Install the microservice:
sudo ./edgesoftware install
- When prompted for the product key, enter the Product Key mentioned in the email you received from Intel confirming your download.
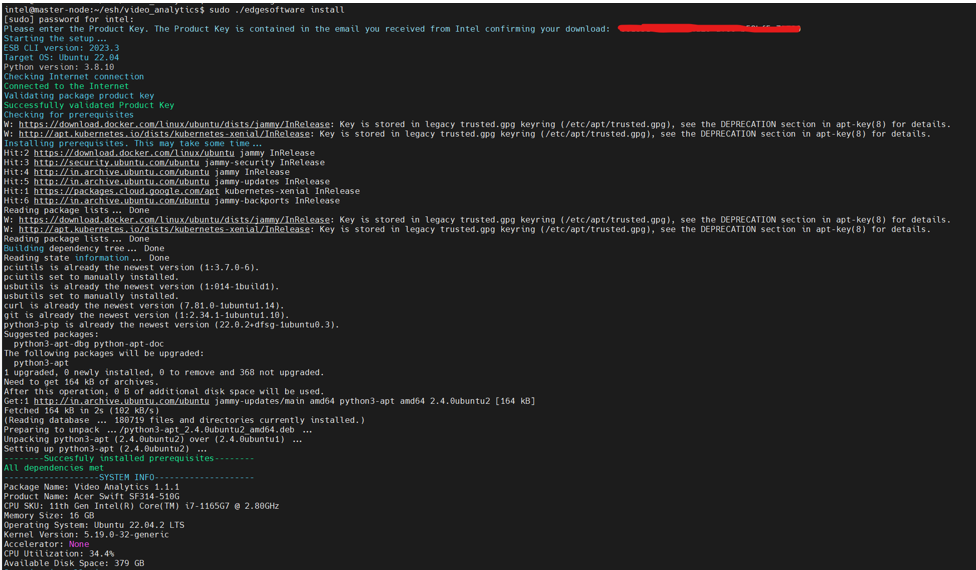
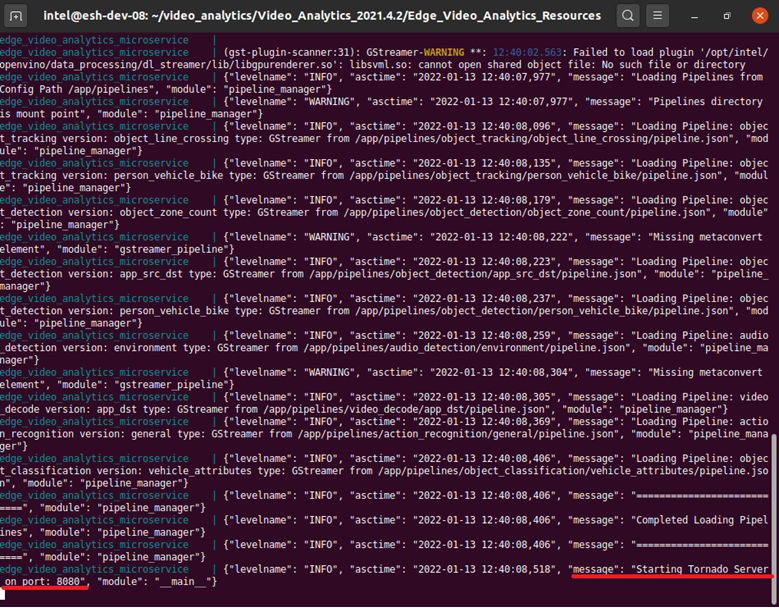
- When the installation is complete, check for the “Installation of package complete” message and the installation status for each module.
- To verify the installation, list the downloaded Docker images:
sudo docker imagesIf the installation was successful, you will see results like the following:

NOTE: Installation failure logs are at: /var/log/esb-cli/video_analytics_<Version>, where <version> is the version of the downloaded Edge Video Analytics Microservice.
Step 2: Run the Edge Video Analytics Microservice
In this step, you will run the Edge Video Analytics Microservice with the sample object detection, object classification, object tracking, face detection, emotion recognition, action recognition, and ambient audio detection pipelines already included in the Docker image.
- Add file permissions:
- Go to the working directory Edge_Video_Analytics_Resources:
cd video_analytics/Video_Analytics_<version>/Edge_Video_Analytics_Resources/
- Add file permissions to run the scripts:
sudo chmod +x docker/run.sh
sudo chmod +x tools/model_downloader/model_downloader.sh
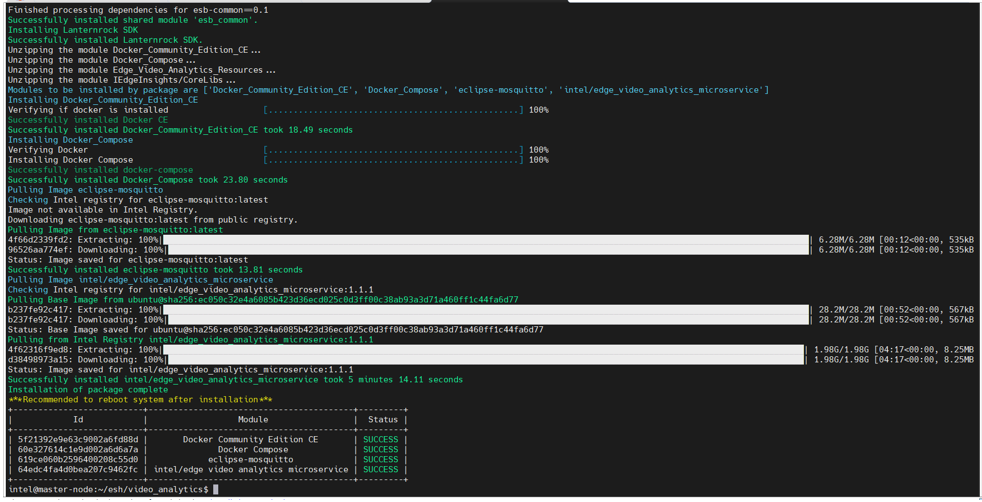
- Download models:
- Download the required models from the Open Model Zoo to the working directory:
sudo ./tools/model_downloader/model_downloader.sh --model-list models_list/models.list.yml
- Open the models_list/models.list.yml file to view the list of models.
- Go to the models directory to check if the download is successful:
NOTE: The model list might be changed or updated.
- Start the application:
sudo docker-compose up
- Check for a success message in the terminal.
-
Open a new terminal and check whether the containers are running:
sudo docker ps -–format 'table{{.Image}}\t{{.Status}}\t{{.Names}}'You should see two Docker containers edge_video_analytics_microservice and eclipse-mosquitto with the status Up.
-
Get the list of models and pipelines available in the container using REST request:
- Open a new terminal.
-
Get the list of models available in the microservice:
curl --location -X GET 'http://localhost:8080/models' -
Get the list of pipelines available in the microservice. Pipelines are displayed as a name/version tuple. The name reflects the action, and version provides more details of that action.
curl --location -X GET 'http://localhost:8080/pipelines'NOTE: If these steps fail due to proxy issues, refer to the Troubleshooting section.
-
Send a REST request to run the object detection pipeline:
-
Use the following sample cURL command and replace the <SYSTEM_IP_ADDRESS> field with your system IP address:
curl --location -X POST 'http://localhost:8080/pipelines/object_detection/person_vehicle_bike' \
--header 'Content-Type: application/json' \
--data-raw '{
  "source": {
    "uri": "file:///home/pipeline-server/resources/classroom.mp4",
    "type": "uri"
  },
  "destination": {
    "metadata": {
      "type": "mqtt",
      "host": "<SYSTEM_IP_ADDRESS>:1883",
      "topic": "vaserving"
    },
    "frame": {
      "type": "rtsp",
      "path": "vasserving"
    }
  }
}'
To know about the POST REST request format, refer to Customizing Video Analytics Pipeline Requests.
NOTE: For EVAM versions lower than 0.7.2, use "uri": "file:///home/pipeline-server/resources/classroom.mp4" as the work directory is different.
-
Open a new terminal and run the modified cURL command. The REST request will return a pipeline instance ID, which you can use to query the state of the pipeline. For the first run, the request will return the pipeline instance (for example, a6d67224eacc11ec9f360242c0a86003) and subsequent requests will return with incremented numbers.
-
Check the results:
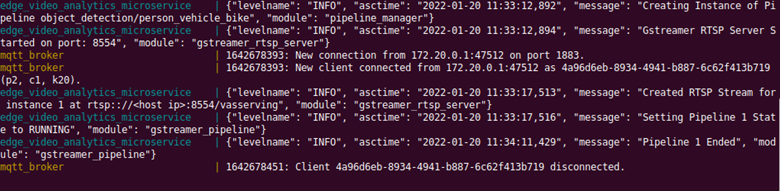
The original terminal window that showed the microservices logs will now show the logs of the newly sent request with the pipeline instance, state, and the RTSP stream link. The pipeline states will show Queued, Running, and Completed.
-
Check the state of the pipeline by sending GET requests using the pipeline instance ID:
curl --location -X GET 'http://localhost:8080/pipelines/object_detection/person_vehicle_bike/<Instance ID>/status'Where <Instance ID> is the pipeline instance.
The response received from the GET request is similar to the following:{ "avg_fps": 27.014388149183596, "elapsed_time": 2.2934277057647705, "id": a6d67224eacc11ec9f360242c0a86003, "start_time": 1641468940.5196402, "state": "RUNNING" }NOTE: If the pipeline has already ended, then the state will be shown as "COMPLETED".
-
Open the output RTSP stream in VLC player to view the inferencing results overlaid on the input video after replacing <SYSTEM_IP_ADDRESS> in the following URL with your system IP address: rtsp:// <SYSTEM_IP_ADDRESS>:8554/vasserving
Note that the pipeline should be in the RUNNING state to view the output video. If the pipeline has already ended, restart with the cURL command and view the video.

Figure 8. Inferencing Results
-
Use an alternate method to send REST requests:
You can also send the REST request through the Postman application using the same curl commands as in the previous steps. Do the following to install the Postman application:
-
Go to Postman Downloads.
-
Extract the installation file to a desired location.
-
After extraction, double-click the application and sign in with your existing account or create a new account to sign in.
Tutorials
Tutorial 1: Run Object Detection Pipeline on GPU
This tutorial will demonstrate how to change the inference device to run the inference on GPU. You will re-run the same object_detection pipeline, but this time, you will use the integrated GPU for detection inference by setting the detection-device parameter.
- Complete the steps in the Get Started section.
- On your target device, check the output of the following command and get the device group:
stat -c '%g' /dev/dri/render* - Add the device group to the docker-compose.yml file:
group_add: - 109 - Create the REST request by replacing the <SYSTEM_IP_ADDRESS> in the following cURL command with the IP address of your system. Note the parameters section in the REST body.
curl --location -X POST 'http://localhost:8080/pipelines/object_detection/person_vehicle_bike' \
--header 'Content-Type: application/json' \
--data-raw '{
  "source": {
      "uri": "file:///home/pipeline-server/resources/classroom.mp4",
      "type": "uri"
  },
  "destination": {
      "metadata": {
        "type": "mqtt",
        "host": "<SYSTEM_IP_ADDRESS>:1883",
        "topic": "vaserving"
      },
    "frame": {
      "type": "rtsp",
      "path": "vasserving"
    }
  },
    "parameters": {
        "detection-device": "GPU"
   }
}'
NOTE:
GPU inference plug-in dynamically builds OpenCL kernels when it is first loaded resulting in a ~30s delay before the inference results are produced.
Additional configuration might be needed to run inference on GPU depending on the hardware. Refer to the Configurations for Intel® Processor Graphics (GPU) with OpenVINO to configure Intel Graphics Driver on the system (you might need to reboot the system). -
Open a new terminal and run the curl command. The REST request will return a pipeline instance ID (for example, a6d67224eacc11ec9f360242c0a86003), which you can use to query the state of the pipeline.
- Check the results explained in the Run the Edge Video Analytics Microservice section.
Tutorial 2: Run Edge Video Analytics Microservice with USB Camera Input
In this tutorial, you will change the input source of the object detection pipeline to a USB camera.
- Complete the steps in the Get Started section.
- On Ubuntu, list all available video devices:
ls /dev/video* - Create the cURL request to use the video device as a source. For example, if the output of the command is /dev/video0, then make the following changes to the cURL command:
curl --location -X POST 'http://localhost:8080/pipelines/object_detection/person_vehicle_bike' \ --header 'Content-Type: application/json' \ --data-raw '{ "source": { "device": "/dev/video0", "type": "webcam" }, "destination": { "metadata": { "type": "mqtt", "host": "<SYSTEM_IP_ADDRESS>:1883", "topic": "vaserving" }, "frame": { "type": "rtsp", "path": "vasserving" } } }' - Open a new terminal and run the curl command. The REST request will return a pipeline instance ID (for example, a6d67224eacc11ec9f360242c0a86003), which you can use to query the state of the pipeline.
- Check the results explained in the Run the Edge Video Analytics Microservice section.
NOTE: Make sure that the correct device node is used in the device source parameter.
Tutorial 3: Run New Pipeline with New Model in Edge Video Analytics Microservice
In this tutorial, you will create a new pipeline based on the person_detection pipeline using the model person-detection-retail-0013. The pipeline and model folders will be volume mounted to the edge video analytics microservice without the need to rebuild the Docker image. You can follow the same steps for creating any new pipeline.
- Complete the steps in the Get Started section.
- Download a new model. To download a new model from Open Model Zoo, add the model details in the Edge_Video_Analytics_Resources/models_list/models.list.yml file.
For person-detection-retail-0013, add an entry to the end of the models.list.yml file as shown below.- model: person-detection-retail-0013 alias: object_detection version: person_detection precision: [FP16,FP32] -
Then, run the following commands in a new terminal to download the models:
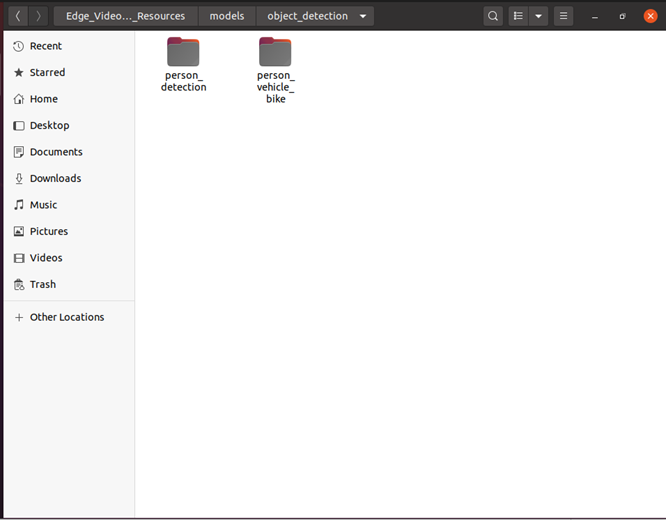
cd video_analytics/Video_Analytics_<version>/Edge_Video_Analytics_Resources/ # Where <version> is the Package version downloaded sudo ./tools/model_downloader/model_downloader.sh --model-list models_list/models.list.yml - After the command executes, the downloaded model person-detection should be available in the models/object_detection directory.
If you are not using the models from the Open Model Zoo, copy your models directly to the models directory.
-
Create a new pipeline. You will create a new pipeline under pipelines/object_detection. Since you are basing it on the existing person_vehicle_bike pipeline, of the person_vehicle_bike folder, rename it to person_detection, and then update the pipeline.json file to use the new model.
In the same terminal (from path Edge_Video_Analytics_Resources), execute the command:sudo cp -r pipelines/object_detection/person_vehicle_bike/ pipelines/object_detection/person_detection -
Open the newly copied pipelines/object_detection/person_detection/pipeline.json file. In the template section, add the following lines, which specify the model path as models/object_detection/person_detection to use the model person-detection-retail-0013 for object detection.
Define the template as:"template": [ "uridecodebin name=source", " ! gvadetect model={models[object_detection][person_detection][network]} name=detection", " ! gvametaconvert name=metaconvert ! gvametapublish name=destination", " ! appsink name=appsink" ],Define the description as:
"description": "Person Detection based on person-detection-retail-0013",To know about pipeline template and to define your own pipeline, refer to Defining Media Analytics Pipelines.
-
Run the microservice with the added Model and Pipeline. Start the application:
sudo docker-compose up -
This step will volume mount the models and pipelines directories. In a separate terminal, check whether the containers are running:
sudo docker ps -
Check the new pipeline and model. Open a new terminal and get the list of available models:
curl --location -X GET 'http://localhost:8080/models' -
Get the list of available pipelines. Pipelines are displayed as a name/version tuple. The name reflects the action and version supplies more details of that action.
curl --location -X GET 'http://localhost:8080/pipelines'You should see the newly added pipeline and model in the lists.
-
Run pipeline for object_detection/person_detection Open a new terminal and enter the following cURL command. This command is for the object_detection/person_detection:
curl --location -X POST 'http://localhost:8080/pipelines/object_detection/person_detection' \
--header 'Content-Type: application/json' \
--data-raw '{
  "source": {
      "uri": "file:///home/pipeline-server/resources/classroom.mp4",
      "type": "uri"
  },
  "destination": {
      "metadata": {
        "type": "mqtt",
        "host": "<SYSTEM_IP_ADDRESS>:1883",
        "topic": "vaserving"
      },
    "frame": {
      "type": "rtsp",
      "path": "vasserving"
    }
  }
}'
Where <SYSTEM_IP_ADDRESS> is the IP address of the system.
The above cURL command returns the pipeline instance. To get the status, replace <pipeline instance> in the following command with the returned pipeline instance:curl --location --request GET 'http://localhost:8080/pipelines/object_detection/person_detection/<pipeline instance>/status'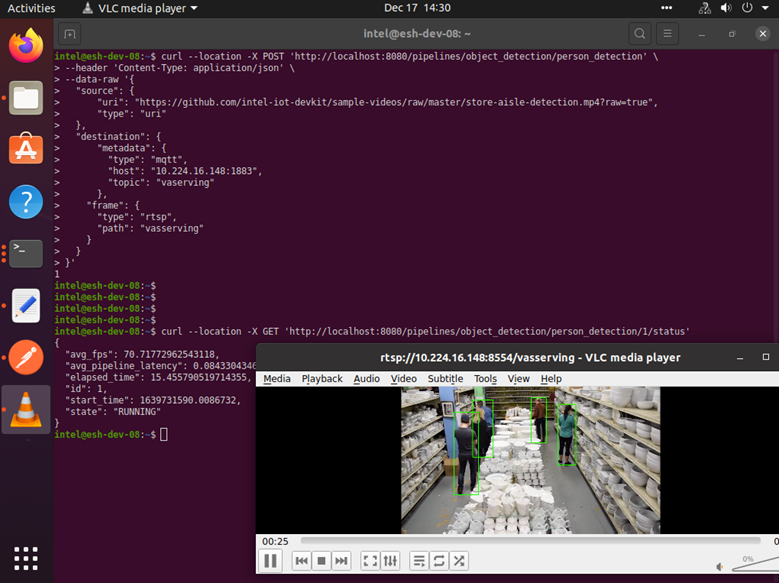
Figure 10. Run Pipeline for Person Detection -
The microservice logs will show that the object_detection/person_detection pipeline instance was created, the pipeline state changed to RUNNING and ended.
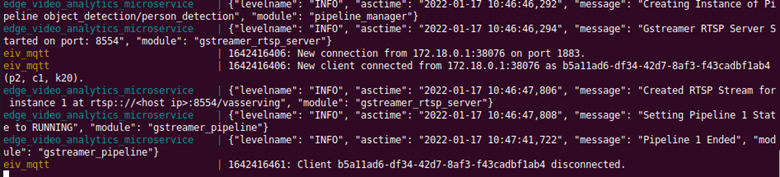
Figure 11. Pipeline Logs
Tutorial 4: Install Edge Video Analytics Helm Chart
NOTE:
This tutorial is supported from release 2022.1 onwards.
This tutorial assumes you have a Kubernetes cluster available.
In this tutorial you will deploy the Edge Video Analytics Microservice on a Kubernetes cluster using helm charts. The helm chart packages Edge Video Analytics Microservice and MQTT broker for a sample deployment. To download the helm chart, use the customized download option.
- Complete all the steps in the Get Started section. When the installation is complete, you will see the message “Installation of package complete” and the installation status for each module.

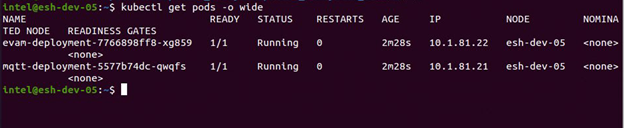
- Copy the models, pipelines, and resources folder to /opt/intel/evam/ on the Kubernetes worker nodes.
- After completing the above prerequisites, go to the evam-chart-<VERSION> working directory and install the chart:
helm install evam ./chart/
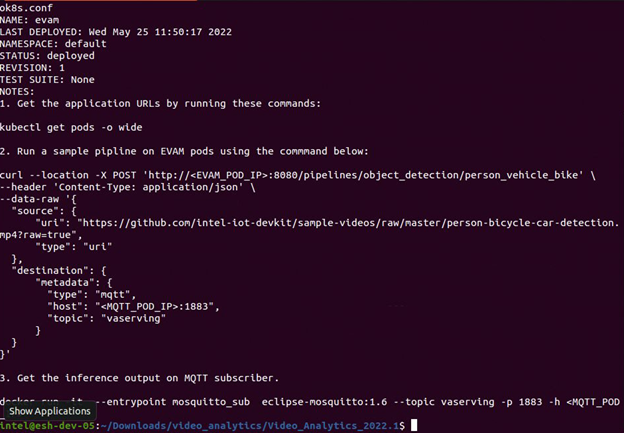
- Update the pipeline request command to trigger a pipeline. Replace EVAM_POD_IP and MQTT_POD_IP with the IP addresses retrieved in step 4.
curl --location -X POST 'http://<EVAM_POD_IP>:8080/pipelines/object_detection/person_vehicle_bike' \
--header 'Content-Type: application/json' \
--data-raw '{
  "source": {
      "uri": "file:///home/pipeline-server/resources/person-bicycle-car-detection.mp4",
      "type": "uri"
  },
  "destination": {
      "metadata": {
        "type": "mqtt",
        "host": "<MQTT_POD_IP>:1883",
        "topic": "vaserving"
      }
  }
}'
NOTE:
If you are working behind a proxy network, the Github* URL for video file ingestion might not work. Hence, download the video file and add the file to the resources directory in /opt/intel/evam for volume mounting inside the kubernetes pod.
If you are working behind a proxy network, export the IP address of evam and mqtt pods to no_proxy environment variable:
export no_proxy=$no_proxy,<EVAM_POD_IP>,<MQTT_POD_IP
- Get the inference output on MQTT subscriber:
docker run -it --entrypoint mosquitto_sub eclipse-mosquitto:latest --topic vaserving -p 1883 -h <MQTT_POD_IP>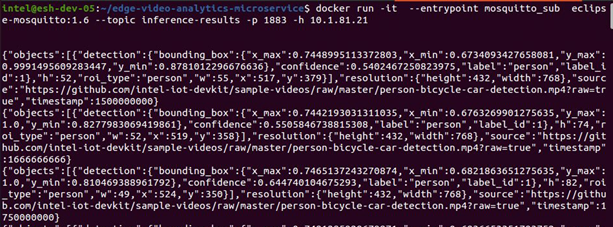
Figure 15: Inference Output
Summary and Next Steps
This guide taught you how to perform video analytics for your use case using the Edge Video Analytics Microservice.
Learn More
To continue learning, see the following guides and software resources:
- GitHub
- Docker Image
- Helm Charts (Overview)
- Microservice Endpoints
- Customizing Video Analytics Pipeline Requests
- Defining Media Analytics Pipelines
- Intel® Edge Software Device Qualification (Intel® ESDQ) for Video Analytics
Troubleshooting
- Make sure you have an active internet connection during the full installation. If you lose Internet connectivity at any time, the installation might fail.
- If installation fails while downloading or while pulling the images from the Intel registry, re-run the installation and provide the Product Key:
sudo ./edgesoftware install

- Make sure you are using a fresh Ubuntu* installation. Earlier software, especially Docker and Docker Compose, can cause issues.
-
In a proxy environment, if a single user proxy is set (that is, in .bashrc file), then some of the component installation might fail or the installation might stall. Make sure you have set the proxy in /etc/environment.
-
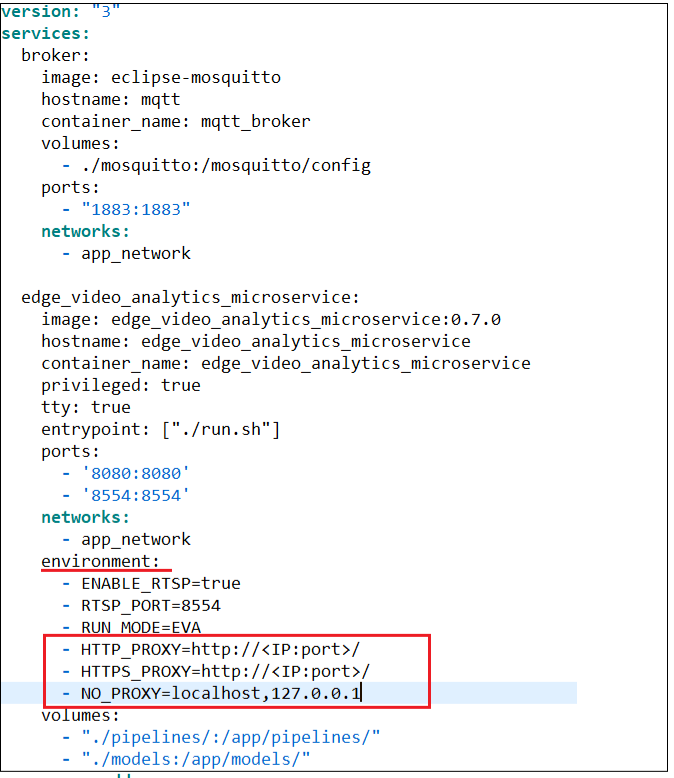
If your system is in a proxy network, add the proxy details in the environment section of the docker-compose.yml file.
HTTP_PROXY=http://<IP:port>/
HTTPS_PROXY=http://<IP:port>//
NO_PROXY=localhost,127.0.0.1
Enter the proxy details in docker-compose.yml as shown below:
-
If proxy details are missing, the steps to get the required source video file for running the pipelines and installing the required packages inside the container might fail.
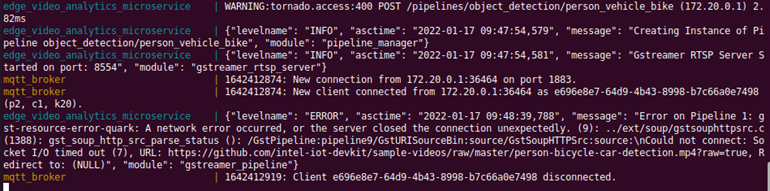
Figure 17. Proxy Missing
Run the command sudo -E docker-compose up (Refer to step 7 of Install Edge Video Analytics Microservice). - In the custom mode, Helm CLI installation might fail if the target device is behind a proxy. To fix the issue, update the snap proxy details:
-
sudo snap set system proxy.http=http://<IP:port>// sudo snap set system proxy.https=http://<IP:port>// -
Stop or remove the containers if you see conflict errors.
To remove the edge_video_analytics_microservice and mqtt_broker, use either of the following options:-
Run the following commands:
sudo docker stop edge_video_analytics_microservice mqtt_broker sudo docker rm edge_video_analytics_microservice mqtt_broker -
Go to video_analytics/Video_Analytics_<VERSION>/Edge_Video_Analytics_Resources and run the following command:
sudo docker-compose down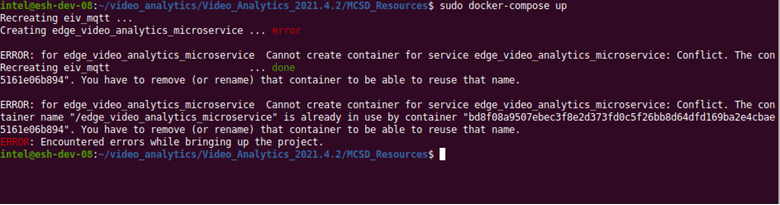
Figure 18. Remove Containers
-
Support Forum
If you're unable to resolve your issues, contact the Support Forum.