This tutorial shows how to use the Visual Quality Inspection AI Reference Kit to build computer vision solutions. The reference kit provides links to various datasets that illustrate the concept of visually inspecting damaged products in the manufacturing process. You could play around with any manufacturing defects, but we will focus on pill quality in this tutorial. In this dataset, consumer over-the-counter medical supplements are classified into “good” or “bad” categories. We will be using this dataset to transfer learn a pretrained VGG-16 model to create an automated pill quality control tool.
VGG-16 is a convolutional neural network that is 16 layers deep. It was one of the best-performing architectures in the ILSVRC 2014. It was the runner-up in the classification task, with a top-five classification error of 7.32% (only behind GoogleNet with a classification error of 6.66%). It was also the winner of the localization task, with a 25.32% localization error.
However, it is very slow to train from scratch. The size of the VGG-16 trained ImageNet weights is 528 MB. So, it takes quite a lot of disk space and bandwidth, which makes it inefficient. 138 million parameters lead to an exploding gradients problem. Therefore, we leverage the Intel® Extension for PyTorch* running on an AWS* EC2 m6i.4xlarge instance (3rd Generation 2.9 GHz Intel® Xeon® Platinum 8375C processors) to transfer learn the pretrained VGGNet classification architecture on the pill dataset.
Intel Extension for PyTorch contains optimizations to boost PyTorch* performance on Intel hardware (Figure 1). It includes a Python* API that allows users to take advantage of these optimizations by just modifying two or three lines of code. Most of the optimizations in Intel Extension for PyTorch will eventually be included in stock PyTorch releases.
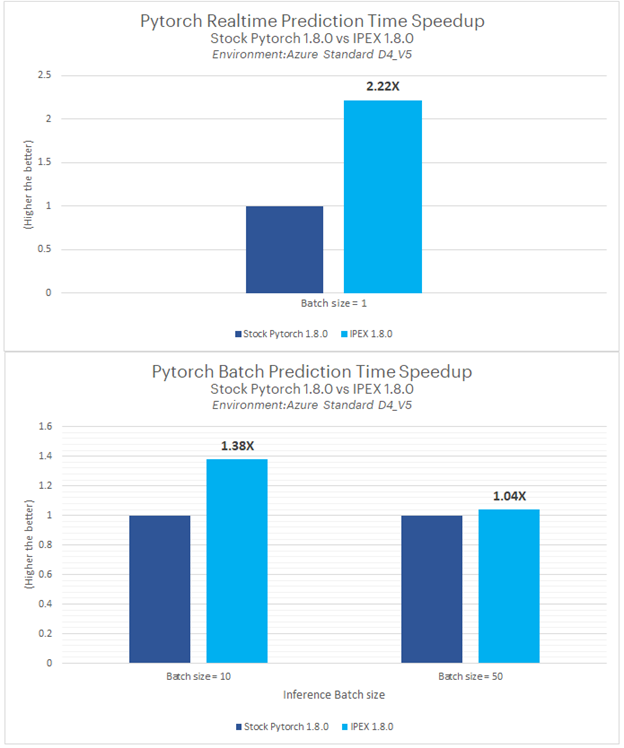
Figure 1. Intel Extension for PyTorch speedup in prediction time compared to stock PyTorch*. This comparison was done with v1.8.0, but the latest version at the time of publication is v1.12.0.
3rd Generation Intel Xeon processors natively support low-precision BFloat16 with Intel® Advanced Vector Extensions (Intel® AVX-512), and future generations will support mixed-precision with Intel® Advanced Matrix Extensions (Intel® AMX). With Intel AMX, you’ll be able to train with half-precision while maintaining the network accuracy achieved with single precision.
Intel Extension for PyTorch transparently supports the fusion of frequently used operator patterns, like Conv2D+ReLU, Linear+ReLU, etc. to optimize performance even further with TorchScript. It also optimizes operators and implements several customized operators. A few ATen operators are replaced by their optimized counterparts in Intel Extension for PyTorch via the ATen registration mechanism. Moreover, some customized operators are implemented for several popular topologies. For instance, ROIAlign and NMS are defined in Mask R-CNN. Intel Extension for PyTorch also optimizes these customized operators to improve the performance of these topologies.
Exploratory Data Analysis
Quality control in the pharmaceutical industry is a very critical component. Let’s look at the different aspects of acceptable (Figure 2) and defective (Figure 3) pills. Some of the defects to look for are color, contamination, cracks, faulty imprints, the wrong pill type, and scratches.
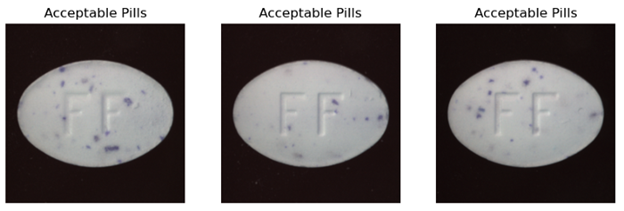
Figure 2. Examples of good/acceptable pills
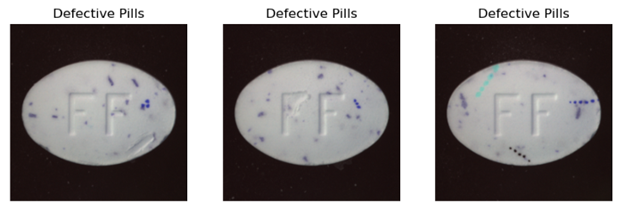
Figure 3. Examples of bad/defective pills
A difference analysis of average acceptable and defective pills indicates a defect in the upper-right of the pills and what appears to be discoloration on the right side of the pill (Figure 4). This could indicate an issue with the manufacturing process that damages the right side of some pills.
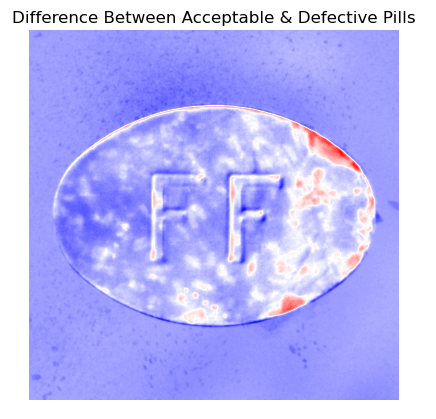
Figure 4. Result of taking the difference between the average acceptable and average defective pills
Our Custom VGG-16 Model Definition
We will define a custom multiclass classification model with a VGG-16 feature extractor, pretrained on ImageNet, and a custom classification head. Parameters for the first convolutional blocks are frozen to allow for transfer learning. This function returns class scores when in training mode, class probabilities, and a normalized feature map when in evaluation mode.
If this is your first time seeing a PyTorch model training schema, you’ll notice some boilerplate code needs to be written. PyTorch models typically require the following components:
- Data preparation: Extend the PyTorch Dataset class for data loading and customization. This is useful for extracting images from folders, their respective labels, and other necessary metadata.
- Data loading: PyTorch also provides the DataLoader class to help navigate your Dataset class during the training and evaluation of your model. This function is a generator responsible for serving data to your model during training and inference.
- Model definition: Defining a PyTorch model involves defining a class that extends the Module class. The constructor (__init__) is responsible for determining the layers of the model, and the forward() function defines how to forward propagate the input data through the defined layers of the model.
- Training function: You will be required to define a loss function and an optimization algorithm for the training component.
The code snippet below represents this example’s model definition (Figure 5). The constructor defines the VGG-16 model we are extending and the custom layers we add to the existing architecture. The “_freeze_params” method freezes (prevents alteration to layer’s weights for transfer learning) the shallow layers of the VGG-16 model by setting requires_grad to False. The forward() method applies weights and moves data through the model.
class CustomVGG(nn.Module):

    def __init__(self, n_classes=2):
        super().__init__()
        self.feature_extractor = models.vgg16(pretrained=True).features[:-1]
        self.classification_head = nn.Sequential(
            nn.MaxPool2d(kernel_size=2, stride=2),
            nn.AvgPool2d(
              kernel_size=(INPUT_IMG_SIZE[0] // 2 ** 5, INPUT_IMG_SIZE[1] // 2 ** 5)
            ),
            nn.Flatten(),
            nn.Linear(
                in_features=self.feature_extractor[-2].out_channels,
                out_features=n_classes,
            ),
        )
        # self._freeze_params()

    def _freeze_params(self):
        for param in self.feature_extractor[:23].parameters():
            param.requires_grad = False

    def forward(self, x_in):
        """
        forward
        """
        feature_maps = self.feature_extractor(x_in)
        scores = self.classification_head(feature_maps)

        if self.training:
            return scores

        probs = nn.functional.softmax(scores, dim=-1)

        weights = self.classification_head[3].weight
        weights = (
            weights.unsqueeze(-1)
            .unsqueeze(-1)
            .unsqueeze(0)
            .repeat(
                (
                    x_in.size(0),
                    1,
                    1,
                    INPUT_IMG_SIZE[0] // 2 ** 4,
                    INPUT_IMG_SIZE[0] // 2 ** 4,
                )
            )
        )
        feature_maps = feature_maps.unsqueeze(1).repeat((1, probs.size(1), 1, 1, 1))
        location = torch.mul(weights, feature_maps).sum(axis=2)
        location = F.interpolate(location, size=INPUT_IMG_SIZE, mode="bilinear")

        maxs, _ = location.max(dim=-1, keepdim=True)
        maxs, _ = maxs.max(dim=-2, keepdim=True)
        mins, _ = location.min(dim=-1, keepdim=True)
        mins, _ = mins.min(dim=-2, keepdim=True)
        norm_location = (location - mins) / (maxs - mins)

        return probs, norm_location
Figure 5. Custom VGG-16 model class
Transfer Learning with Intel Extension for PyTorch
As previously discussed, Intel Extension for PyTorch is used to transfer learn the pretrained VGGNet classification model on the pill dataset. Line 11 in the code snippet below shows the call to the Intel Extension for PyTorch optimize method that applies various optimizations to our model (Figure 6). See the official documentation to learn more about applying Intel Extension for PyTorch to models.
# model training starts

# Model Training
# Intitalization of DL architecture along with optimizer and loss function
model = CustomVGG()
class_weight = torch.tensor(class_weight).type(torch.FloatTensor).to(DEVICE)
criterion = nn.CrossEntropyLoss(weight=class_weight)
optimizer = optim.Adam(model.parameters(), lr=LR)

# Intel Extension for PyTorch Optimization
model, optimizer = ipex.optimize(model=model, optimizer=optimizer, dtype=torch.float32)

# Training Module
start_time = time.time()
trained_model = train(train_loader, model=model, optimizer=optimizer, criterion=criterion, epochs=EPOCHS,
    device=DEVICE, target_accuracy=TARGET_TRAINING_ACCURACY)
train_time = time.time()-start_time

# Saving hdf5 PyTorch Model
model_path = f"{subset_name}.h5"
torch.save(trained_model, model_path)
Figure 6. Model training
Let’s evaluate the architecture of our trained model and see the total trained parameters (Figure 7). When models are optimized using Intel Extension for PyTorch, the prefix “_IPEX” is appended to appropriate layers. This is a good way to verify that Intel Extension for PyTorch has been implemented.
from torchsummary import summary
summary(trained_model, (3, 224, 224))
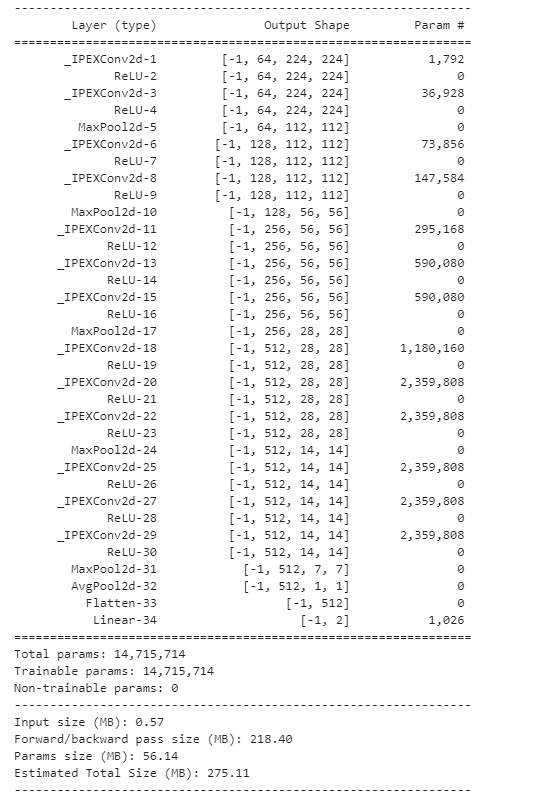
Figure 7. Architecture of the Intel Extension for PyTorch model
Predictions on the hold-out test data show that our model determines that 2/3 of the pictures are “bad” pills (Figure 8). Bounding boxes and heatmaps highlight the most prominent defects found on the pill. As expected, we see problems with the “FF” imprint, chipping, and discoloration.
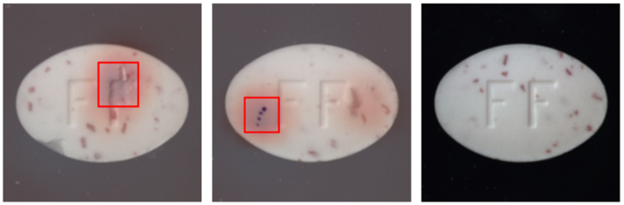
Figure 8. Predictions on three test images from the pill dataset. Red bounding boxes surround defects. A heatmap is overlaid and shows concentrations of critical defects.
Conclusions
With just a few additions to our code, we optimized a custom VGG-16 binary classifier on Intel hardware. Our ability to transfer learn efficiently allows us to take a pretrained Torch VGG-16 model, transfer learn (tune) with images from our pill dataset, and turn it into an efficient classification tool for pharmaceutical quality control.