Overview
Deploy sensor fusion technology for loss detection at self-checkout and enable a more seamless experience. Use machine learning to connect different sensors such as point-of-sale systems, weight scale sensors, cameras, and RFIDs to accurately detect checkout items.
Select Configure & Download to download the reference implementation and the software listed below.
- Time to Complete: Approximately 30-45 minutes
- Programming Language: Google Go* programming language, Python*
- Available Software:
- Docker*
- Docker Compose
- Google Go* programming language version 1.18 or greater
- Git software
- GNU* Make
- Intel® Deep Learning Streamer (Intel® DL Streamer)
- GitHub Source Code
Recommended Hardware
The hardware below is recommended for use with this reference implementation. See Recommended Hardware for other suggestions.
- 8th generation Intel® Core™ processor with 16 GB of RAM or greater
Target System Requirements
- Ubuntu* 20.04 LTS
- Disk Space needed: 10G
How It Works
Sensor fusion, also called basket reconciliation, is the root of the detection system. Different sensor devices trigger events, such as detecting an RFID tag or specific food type.
The EdgeX framework publishes these events to the main application as an event message, and through the microservices assembles the information to correlate events to the detected products.
The data is then reconciled to make sure that it matches what is actually being purchased.
The high-level diagram below shows the sensors and services used with the Real Time Sensor Fusion for Loss Detection at Checkout Reference Design. The diagram shows the sensors and services, and how they communicate through EdgeX. Intel provides the services outlined in green, and you must obtain EdgeX and the sensors and services in pink.


Any objects that cannot be reconciled could mean the purchase is suspicious. A point-of-sale system integrates with either the EdgeX REST or MQTT device services to send the events. The Scaled Devices Service provided is specifically for a CAS USB scale and is a good starting point for integrating other USB scales. Alternatively, the scale events can be sent to the EdgeX REST or MQTT device service. The object detection model (based on the Intel® Distribution of OpenVINO™ toolkit) used by the Intel® Deep Learning Streamer Pipeline Server API is an example for object detection. For a robust production-ready solution, you must provide an improved object detection model.
Get Started
Step 1: Install the Reference Implementation
Select Configure & Download to download the reference implementation and then follow the steps below to install it.
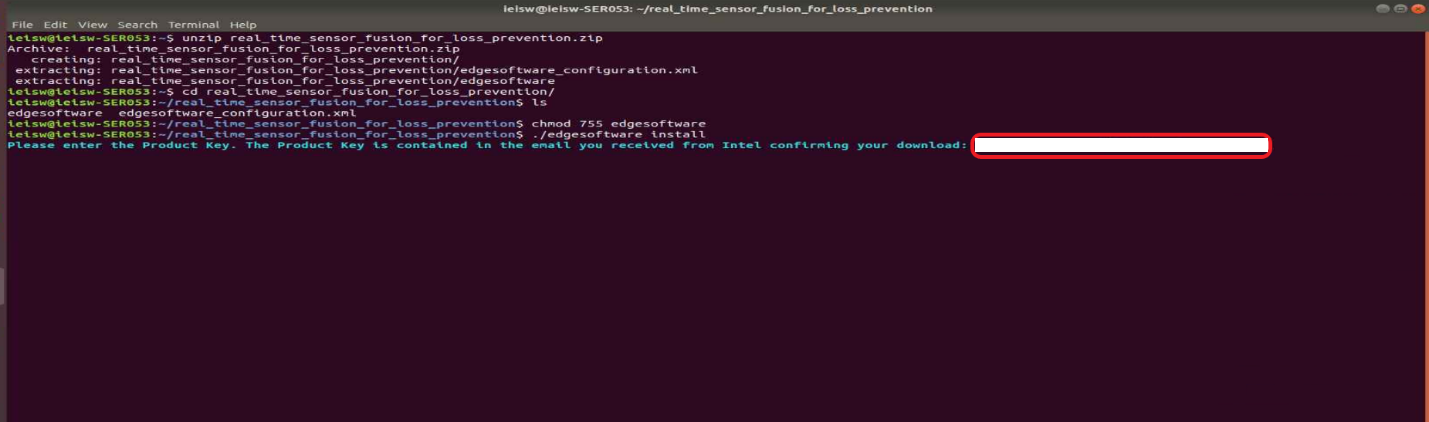
1. Open a new terminal and navigate to the download folder to unzip the RI package:
unzip real_time_sensor_fusion_for_loss_prevention.zip
2. Navigate to the real_time_sensor_fusion_for_loss_prevention/ directory:
cd real_time_sensor_fusion_for_loss_prevention/
3. Change permission of the executable edgesoftware file:
chmod 755 edgesoftware
4. Run the command below to install the RI:
./edgesoftware install
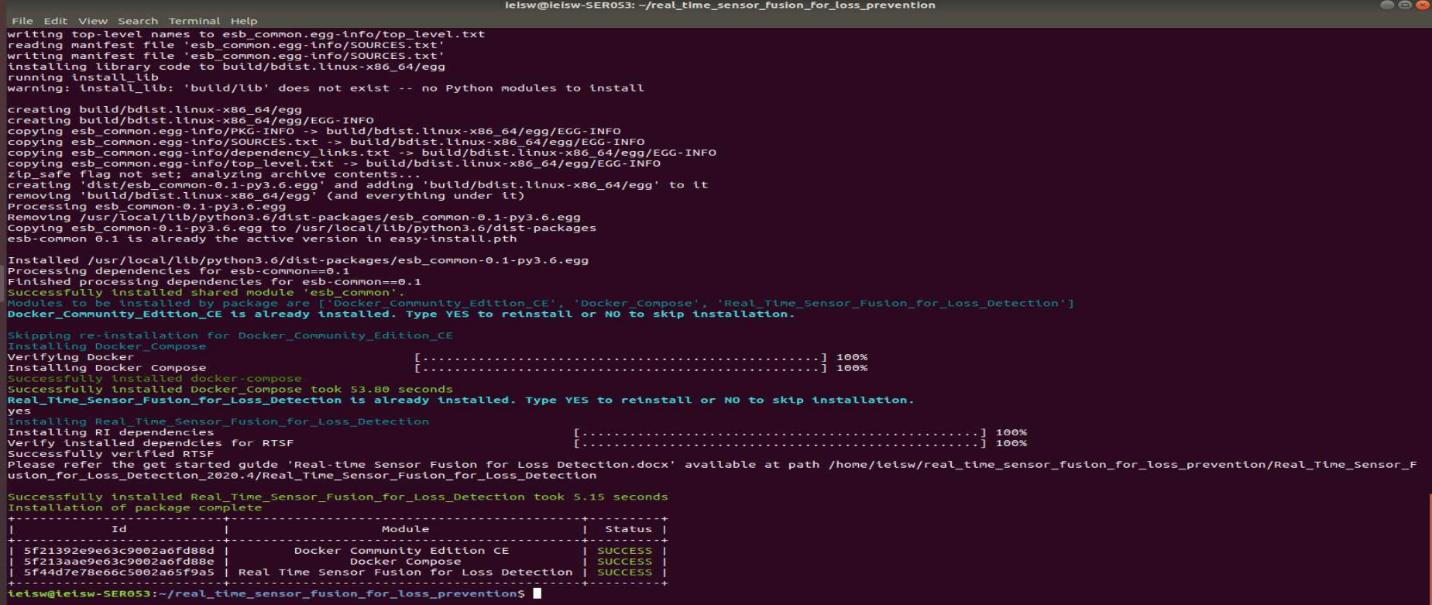
5. During the installation, you will be prompted for the Product Key. The Product Key is contained in the email you received from Intel confirming your download.
6. When the installation is complete, you see the message “Installation of package complete” and the installation status for each module.
Step 2: Set up the Reference Implementation
The Real Time Sensor Fusion for Loss Detection Reference Implementation is already available in the target hardware at:
$HOME/rtsf-at-checkout-reference-design
1. Check the reference design. The retail recipe has already built the provided component services and created local docker images. Make sure the command was successful.
===Check for Success===
Check for the built Docker images by running the command below:
sudo docker images
Inspect the list:
rtsf-at-checkout/event-reconciler
rtsf-at-checkout/device-scale
rtsf-at-checkout/product-lookup
rtsf-at-checkout/loss-detector
rtsf-at-checkout/cv-region-of-interest
If all the above Docker image files to do not appear:
- Look through the console output for errors as sometimes dependencies fail to resolve and must be run again.
- Address any obvious issues.
- Build the Docker images again by running the following command:
sudo make docker
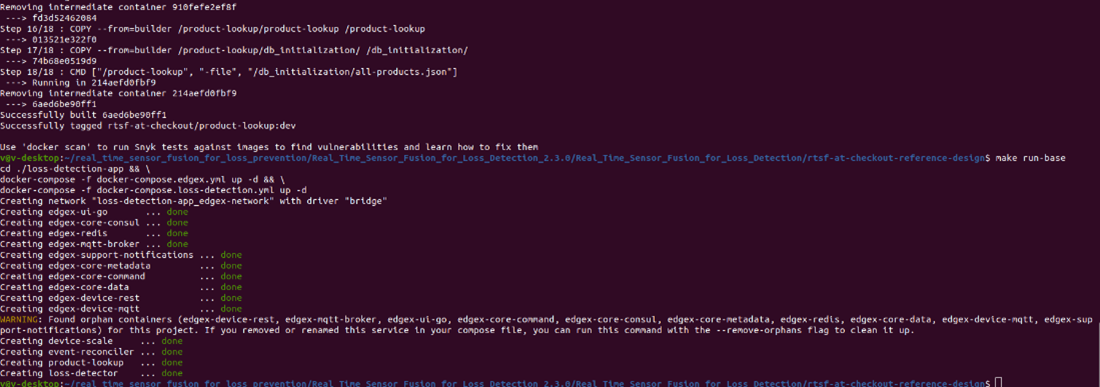
Step 3: Start the Reference Design Suite
1. Use docker-compose to start the RI suite by running:
sudo make run-base
This command starts the EdgeX Device Services and then starts all the Loss Detection Services.
==Check for Success===
Make sure the command was successful. To do so, run:
sudo docker ps --format 'table{{.Image}}\t{{.Status}}'
Check for the following docker images and Up status:
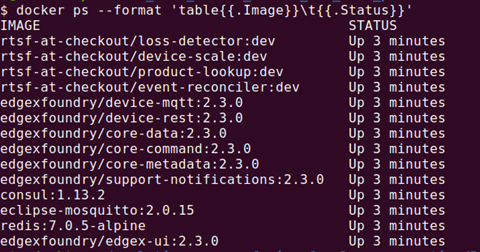
All of the core components of RTSF at Checkout are up and running, and you are ready to begin going through simulating data using Intel-provided Event Simulator.
Run the Application
- Install Postman. Postman will be used to send RestAPI request for the simulated data.
- Open the docker logs in a terminal window. This lets you make sure checkout events are processed correctly. To open the docker logs:
docker logs -f event-reconciler - Open Postman.
- Send an HTTP GET request to http://localhost:59986/api/v2/ping to test the device-rest operation. This makes sure the service is online.
-
Success: You see a pong message returned.
-
Failure: If you get a Response Status Code 404 or get no response, make sure you correctly built and ran device-rest, according to the instructions in step 3 of Getting Started. Do not continue until you successfully receive a pong message.
-
-
Initiate a transaction.
basket-open send a POST request to http://localhost:59986/api/v2/resource/pos-rest/basket-open with body: { "lane_id":"1", "basket_id": "abc-012345-def", "customer_id": "joe5", "employee_id": "mary1", "event_time":15736013930000 } -
Scan an item.
scanned-item send a POST request to http://localhost:59986/api/v2/resource/pos-rest/scanned-item with body: { "lane_id":"1", "basket_id": "abc-012345-def", "product_id": "00000000571111", "product_id_type": "UPC", "product_name": "Trail Mix", "quantity": 1, "quantity_unit": "EA", "unit_price": 5.99, "customer_id": "joe5", "employee_id": "mary1", "event_time":15736013940000 } - Prepare for payment.
payment-start send a POST request to http://localhost:59986/api/v2/resource/pos-rest/payment-start with body: { "lane_id":"1", "basket_id": "abc-012345-def", "customer_id": "joe5", "employee_id": "mary1", "event_time":15736013950000 } - Payment successful.
payment-success send a POST request to http://localhost:59986/api/v2/resource/pos-rest/payment-success with body: { "lane_id":"1", "basket_id": "abc-012345-def", "customer_id": "joe5", "employee_id": "mary1", "event_time":15736013960000 } - Transaction is closed.
basket-close send a POST request to http://localhost:59986/api/v2/resource/pos-rest/basket-close with body:
{
    "lane_id":"1",
    "basket_id": "abc-012345-def",
    "customer_id": "joe5",
    "employee_id": "mary1",
    "event_time":15736013970000
}
Summary and Next Steps
You have successfully created a simulated scenario with the POS. Next, you can use Postman Collections to explore more complicated scenarios.
Learn More
To continue learning, see the following guides and software resources:
- Real-time Sensor Fusion at Checkout Get Started Guide
- EdgeX Foundry Documentation
- GitHub for Intel Deep Learning Streamer Pipeline Server
Troubleshooting
For troubleshooting tips, refer to:
https://intel-iot-devkit.github.io/rtsf-at-checkout-reference-design/troubleshooting/
Support Forum
If you're unable to resolve your issues, contact the Support Forum.