Introduction
A frequent request for the Intel® Neural Compute Stick 2 (Intel® NCS 2) is to be able to pair it with any of the many single board computers (SBCs) available in the market. The Intel® Distribution of the OpenVINO™ toolkit provides a binary installation that supports a fair number of development and target platforms, providing tools and an API for the Intel® NCS 2. But many users that are prototyping with the Intel® NCS 2 want to pick their favorite SBC platform in order to get as close to their final system requirements as possible. To address the needs of these developers, Intel has open-sourced the OpenVINO™ toolkit inference engine API and the Intel® Movidius™ Myriad™ VPU plug-in. Keep reading to learn how to use the open source distribution of the OpenVINO™ toolkit and the Intel® Movidius™ Myriad™ VPU plug-in to get up and running on your platform of choice.
Each SBC target platform in the market will have unique challenges when building the code depending on hardware, operating system, and available components. It would be impossible to anticipate all the idiosyncrasies with these platforms, so this article will focus on the general case and try to point out any known possible problem areas. Focus here will also be on native compilation on the target platform rather than cross compilation. For users that are interested in cross compilation, the build process and the general steps below will still apply.
Note: The original Intel® Movidius™ Neural Compute Stick is also compatible with the OpenVINO™ toolkit and that device can be used instead of the Intel® Neural Compute Stick 2 throughout this article.
Code Repository
Before building the source code, the git repository must be cloned to get the code to your local build system. If git is not installed on the build machine, you will need to install it. If your system has apt (advanced packaging tool) support you can install it with this command:
sudo apt install gitAfter git is installed, you can clone the git repository using the following command:
git clone https://github.com/opencv/dldt.git
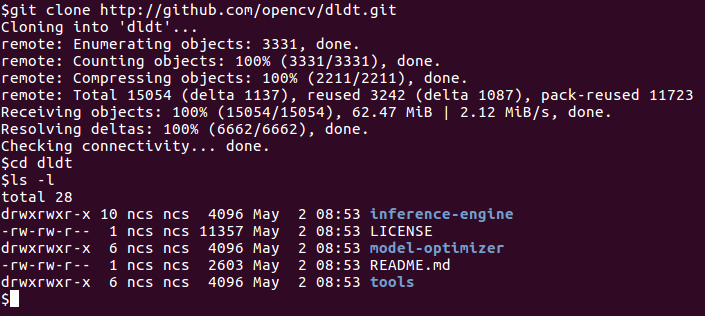
The image to the right shows the contents of the dldt directory after cloning.
There are three directories at the top level: inference-engine, model-optimizer, and tools. The inference-engine directory contains the components that will need to be built to use the Intel® NCS 2 device.
Note: The repository will default to the latest release branch. At the writing of this article that is the "2019" branch.
What's Relevant in the Repository
The inference-engine provides the API used to initiate neural network inferences and retrieve the results of those inferences. In addition to the API, the inference engine directory also includes plugins for different hardware targets such as CPU, GPU, and the MYRIAD VPU. When the API is called it will rely on the plug-ins to execute inferences on these hardware targets.For execution on the Intel® NCS 2 (or the original Intel® Movidius™ NCS) the inference engine needs to call the MYRIAD VPU plug-in. Therefore, the bare minimum which will need to be built to use an Intel® NCS 2 is the inference engine API and the MYRIAD plug-in. The other plug-ins in the repository will not be needed and depending on your platform may not apply.
For more information on the inference engine, you can explore the Inference Engine Developer Guide that's documented as part of the Intel® Distribution of the OpenVINO™ toolkit.
Setting Up to Build
To prepare the system for building, the build tools, the git submodules, and the dependencies need to be on the build system. Each of these are explained in this section.
Build Tools
To build the code cmake and gcc must be installed on your system. Also, Python* 2.7, or above, is needed if the Python wrappers will be enabled. Version requirements for these tools may change, but as of this writing, cmake 3.5 and gcc 4.8 are required.
If cmake is not installed you can install it via the package manager for your system. For example, in Ubuntu the following command installs the latest cmake:
sudo apt install cmakeIf there is no pre-built cmake package for your platform, or none at the required version level, you can build cmake from source instead. The instructions to build cmake from source may differ from release to release, but for cmake 3.14.3 the following commands can be used as a guide.
wget https://github.com/Kitware/CMake/releases/download/v3.14.3/cmake-3.14.3.tar.gz
tar xvf cmake-3.14.3.tar.gz
cd cmake-3.14.3
./bootstrap
make
sudo make install
After building and installing cmake, any open terminals may need to be closed and re-opened to use the newly installed cmake.
Git Submodules
The following commands will download the code for the git submodules that are required to build the inference engine.
cd <directory where cloned>/dldt/inference-engine
git submodule init
git submodule update --recursive
Dependencies
After updating the git submodules, all the source code for the build is on the system, however there are a number of other build dependencies that need to be available during the build. There is a script to install these build dependencies in the inference-engine directory named install_dependencies.sh. This script is validated for Ubuntu* and CentOS* so it may need to be modified depending on the platform.
If the script doesn't work straightaway on your system there may be some trial work required to get the necessary components Below are the packages (Ubuntu package names) that are installed by the install_dependencies.sh script as of this writing. To avoid typing the apt-get command for each package it's possible to cut and paste relevant lines from the install_dependencies.sh script. If apt is not available or packages are not available, some research may be required to determine how to get the equivalent components installed on your system. If apt is supported then you can likely install them via:
sudo apt-get install <package name>Where <package name> is each of the following apt packages:
| build-essential | cmake | curl | wget | libssl-dev | ca-certificates |
| git | libboost-regex-dev | gcc-multilib* | g++-multilib* | libgtk2.0-dev | pkg-config |
| unzip | automake | libtool | autoconf | libcairo2-dev | libpango1.0-dev |
| libglib2.0-dev | libswscale-dev | libavcodec-dev | libavformat-dev | libgstreamer1.0-0 | gstreamer1.0-plugins-base |
| libusb-1.0-0-dev | libopenblas-dev | libpng12-dev** |
* Not required when building on Raspberry Pi* 3
** libpng12-dev renamed to libpng-dev in Ubuntu 18
In addition to the above packages ffmpeg maybe needed if audio or video streams will be processed by OpenCV. See the ffmpeg website for information on this software.
If one or more of the packages above can't be found or fails to install its worthwhile to attempt to build before going through the trouble of tracking down a replacement. Not all packages will be required for all build scenarios.
Note: As the code in the repository is updated for new releases, the inference-engine build instructions will be updated to match so be sure to check there in the future.
Building
After all the build tools and dependencies are installed, the inference engine and Intel® Movidius™ Myriad™ VPU plugin can be built by executing the following commands which will use cmake to create Makefiles and then build via make and with those Makefiles.
cd <directory where cloned>/dldt/inference-engine
mkdir build
cd build
cmake -DCMAKE_BUILD_TYPE=Release \
      -DENABLE_MKL_DNN=OFF \
      -DENABLE_CLDNN=OFF \
      -DENABLE_GNA=OFF \
      -DENABLE_SSE42=OFF \
      -DTHREADING=SEQ  \
      ..
make
Note: OpenCV is downloaded as part of the cmake process for officially supported build environments. If OpenCV did not get installed on the build system it may need to be installed. How to get it installed may vary from platform to platform and could require building from source. See the opencv installation instructions for more information. Alternatively, the file <directory where cloned>/dldt/inference-engine/cmake/check_features.cmake could be modified to recognize the particular OS on the build system and it will be downloaded as part of cmake. This works best if the OS is one that is binary compatible with the officially supported OS's. Look for the error message "Cannot detect Linux OS via reading /etc/*release" and add the build system's OS Name to the conditional statement.
CMake/make Options
The -DENABLE_MKL_DNN=OFF and -DENABLE_CLDNN=OFF options for cmake in the above command prevents attempting to build the CPU and GPU plugins respectively. These plugins only apply to x86 platforms. If building for a platform that can support these plugins the OFF can be changed to ON in the cmake command.
The -DENABLE_GNA=OFF option prevents attempting to build the GNA plugin which applies to the Intel® Speech Enabling Developer Kit, the Amazon Alexa* Premium Far-Field Developer Kit, Pentium® Silver J5005 processor, Intel® Celeron® processor J4005, Intel® Core™ i3 processor 8121U, and others.
The -DENABLE_SSE42=OFF option prevents attempting to build for Streaming SIMD Extensions 4.2 which likely aren't available for most SBC platforms.
The -DTHREADING=SEQ option builds without threading. Other possible values are OMP which will build with OpenMP* threading and the default value of TBB which is to build with Intel® Threading Building Blocks (Intel®TBB).
Note: Python API wrappers aren't covered in this article, but look at the -DENABLE_PYTHON=ON option in the inference engine build instructions for more information.
The make command above can also take a -j<number of jobs> parameter to speed up the build via parallelization. Typically the number of cores on the build machine is a good value to use with the -j option. For example with a build system that has 4 CPU cores, a good place to start would be -j4. When building on a lower performance system such as Raspberry P,i omitting the -j option seems to be the most reliable.
Verifying the Build
After successfully completing the inference engine build, the result should be verified to make sure everything is working. When building on the same platform that will be the deployment platform, this is relatively straight forward. If there is a separate system on which the software will be deployed then the Deploying section below should be followed to get the required components on the system prior to verifying.
To verify that the Intel® NCS 2 device and the OpenVINO™ toolkit is working correctly, the following items need to be considered. Each item is discussed below in more detail.
- A program that uses the OpenVINO™ toolkit inference engine API.
- A trained Neural Network in the OpenVINO™ toolkit Intermediate Representation (IR) format.
- Input for the Neural Network.
- Linux* USB driver configuration for the Intel® NCS 2 device.
OpenVINO™ Toolkit Program: benchmark_app
When the inference engine was built via cmake/make some sample applications were built as well. All the build samples can be found in the <directory where cloned>/dldt/inference-engine/bin/<arch>/Release directory. For the purpose of verifying the build, the benchmark_app in this directory can be used. To see the possible arguments to this application the following command can be used from within the Release directory:
./benchmark_app -h
Running the command above will show that the following options, among others, which are relevant to verifying the build with an Intel® NCS 2 device.
| Argument | Description |
| -i "<path>" | Is the path to an image file or directory. |
| -m "<path>" | Is the path to the trained model's .xml file. This is one of the two files created when a trained model is converted to the IR format. There is an assumption that the other file, the .bin file exists in the same directory as this xml file. |
| -pp "<path>" | Is the path to the directory that contains the inference engine plugins. This is where the Myriad plugin is located on the file system. The Myriad plugin is the libmyriadPlugin.so shared object library. After the build completes this is in the .../Release/lib directory. |
| -d "<device>" | Specifies the target device on which to run the inference. To verify the Intel® NCS 2 device pass -d MYRIAD |
| -api "<sync|async>" | Specifies if the Inference Engine API to call should be synchronous or asynchronous. The best performance will be seen when passing "async". |
Trained Neural Network
There are a few ways a trained neural network in IR format can be obtained:
- Run the model optimizer to convert a trained network in one of the supported frameworks to IR.
- Use the model downloader tool from the open_model_zoo repository
- Download the IR files from download.01.org directly
Downloading directly from download.01.org is the simplest. The following commands will create a directory in the current user's home directory and then download an age and gender recognition network that is already in IR format.
cd ~
mkdir models
cd models
wget https://download.01.org/opencv/2019/open_model_zoo/R1/models_bin/age-gender-recognition-retail-0013/FP16/age-gender-recognition-retail-0013.xml
wget https://download.01.org/opencv/2019/open_model_zoo/R1/models_bin/age-gender-recognition-retail-0013/FP16/age-gender-recognition-retail-0013.bin
Note: After the above commands are successfully executed the following files will be on the system: ~/models/age-gender-recognition-retail-0013.xml, and ~/models/age-gender-recognition-retail-0013.bin. These files will be passed to the benchmark_app when executed below.
Note: The Intel® NCS 2 device requires IR models that are optimized for the 16 bit floating point format known as FP16. The open model zoo also contains models in FP32 and Int8 depending on the specific model.
Input for the Neural Network
The final item required to verify the build is input for the neural network. For the age/gender network that was downloaded, the input should be an image that is 62 pixels wide and 62 pixels high with three channels of color. This article includes an attached sample input file (president_reagan_62x62.png) that can be downloaded below which is already in an acceptable format. This image is provided via the CC0 license. Download this image and place it in the home directory on the system to be verified.
Configure the Linux* USB Driver
To configure the Linux USB driver so that it recognizes the Intel® NCS 2 device, the attached file named 97-myriad-usbboot.rules_.txt should be downloaded to the system in the home directory, then the steps below can be followed.
If the current user is not a member of the users group then run this command and log out and back in.
sudo usermod -a -G users "$(whoami)"While in a terminal logged in as a user that is a member of the users group run the following commands:
cd ~
sudo cp 97-myriad-usbboot.rules_.txt /etc/udev/rules.d/97-myriad-usbboot.rules
sudo udevadm control --reload-rules
sudo udevadm trigger
sudo ldconfig
The USB driver is configured after the above commands have executed successfully.
Running benchmark_app
If the benchmark_app, the age/gender network, and the input image are on the system as suggested above, the following commands can be issued to test the Intel® NCS 2 with the newly built OpenVINO™ toolkit inference engine. The Intel® NCS 2 device must be plugged into a USB port on your system before running the application.
cd <directory where cloned>/dldt/inference-engine/bin/<arch>/ReleaseNote: <arch> will be different depending on the build platform's architecture. For example, on an Intel® x86 64 bit platform <arch> will be intel64 and on a Raspberry Pi 3 <arch> will be armv7l. See the file <directory where cloned>dldt/inference-engine/CMakeLists.txt file and the variable referenced as ${ARCH_FOLDER} to see how <arch> will be set.
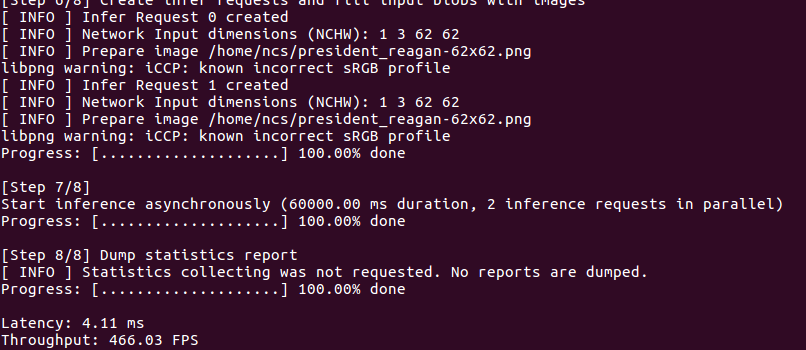
./benchmark_app -i ~/president_reagan-62x62.png -m ~/models/age-gender-recognition-retail-0013.xml -pp ./lib -api async -d MYRIAD After the command above successfully executes the terminal will display something similar to the image at the right. Note that the frames per second (FPS) for the network with the sample input image is displayed as the last line of output.
Note: If the benchmark_app outputs an excessive amount of text, then the logging level should be adjusted. To adjust the logging level, edit the file inference-engine/samples/benchmark_app/main.cpp. Look for "LOG_INFO" and change it to "LOG_WARNING" and then rebuild the inference-engine.
Deploying
After the build has been verified, its possible to deploy the built application onto another system that has a much leaner software footprint. The following considerations for a deployment system must be addressed for successful deployment.
- The Linux USB driver must be configured to recognize the Intel® NCS 2 device.
- The application binary must be on the system.
- All shared object libraries the application depends on must be available.
- The MYRIAD plugin shared object library must be available.
- All shared object libraries the MYRIAD plugin depends on must be available.
- The Intel® NCS 2 firmware must be available.
- The neural network in IR format must be available.
- Any Input images must be available.
To deploy the benchmark_app that was used to verify the build, each of the above considerations can be handled with the following steps. Different build and deployment hardware and operating systems will have different challenges, but the same basic steps can be used.
The Linux USB driver must be configured to recognize the device: For this simply follow the instructions from above in the article for the deployment system.
The application binary must be on the system: Copy the benchmark_app program on the build machine from <directory where cloned>/dldt/inference-engine/bin/<arch>/Release to a new directory ~/benchmark on the deployment machine. Make sure the binary is executable, use chmod +x .~/benchmark/benchmark_app to accomplish this.
All shared object libraries the application depends on must be available: To determine the libraries the application depends on execute the following command from the ~/benchmark directory.
ldd benchmark_app
The output will be similar to the following image
For this application, the missing libraries (indicated with
=> not found) are libinference_engine.so and libformat_reader.so. Both of these files can be copied from build machine directory <directory where cloned>/dldt/inference-engine/bin/<arch>/Release/lib to the deployment machine ~/benchmark/lib directory.
To make sure that all dependencies that these two shared libraries have are also available, run ldd on these libraries as well. For the libformat_reader.so, ldd indicates that three OpenCV libraries are also not found on the deployment system. These are: opencv_imgcodecs, opencv_imgproc and opencv_core. All the OpenCV libraries are from version 4.1. Find the missing OpenCV libraries on the build system (use the locate command) and copy them to the deployment system in the ~/benchmark/opencv directory.
The MYRIAD plugin shared object library must be available: The myriad plugin filename is libmyriadPlugin.so and it can be copied from the build machine in this directory: <directory where cloned>/dldt/inference-engine/bin/<arch>/Release/lib to the deployment machine in ~/benchmark/lib.
All shared object libraries the MYRIAD plugin depends on must be available: For the MYRIAD plugin library dependencies, the ldd is used again.
ldd libmyriadPlugin.so
The results will be similar to the image here.
Note that only the libinference_engine.so library is not found in this image. The libusb-1.0.so.0 library had been previously installed so it is found.
The device firmware must be available: The Intel® Movidius™ NCS and Intel® NCS 2 firmware are the files MvNCAPI-ma2450.mvcmd and MvNCAPI-ma2480.mvcmd files respectively. These files are downloaded onto the build system during the build process and can be copied from the build system here <directory where cloned>/dldt/inference-engine/bin/<arch>/Release/lib to the deployment system ~/benchmark/lib directory.
The neural network in IR format must be available: The neural network files (age-gender-recognition-retail-0013.xml and age-gender-recognition-retail-0013.bin) used to verify the build were on the build system in ~/models directory. These files can be copied to the deployment system in the ~/benchmark directory.
Any Input images must be available: The image file ~/president_reagan-62x62.png on the build machine can be copied to the deployment machine in the ~/benchmark directory.
After the above steps were followed for this example, the directory structure for the deployment system looks like the list that follows, with comments in parenthesis.
- ~/benchmark_app (top level directory to keep all the deployment files in one place)
- benchmark_app (the application)
- age-gender-recognition-retail-0013.xml (One of the neural network IR files)
- age-gender-recognition-retail-0013.bin (The other neural network IR file)
- president_regan-62x62.png (Input image)
- lib (directory to keep libraries required by the app)
- libinference_engine.so (The inference engine library)
- libmyriadPlugin.so (The MYRIAD Plugin)
- libformat_reader.so (Inferencen engine library dependency.)
- MvNCAPI-ma2450.mvcmd (Intel® Movidius™ NCS firmware)
- MvNCAPI-ma2480.mvcmd (Intel® NCS 2 firmware)
- opencv (directory to store required OpenCV libraries.)
- libopencv_core.so (OpenCV core softlink to libopencv_core.so.4.1)
- libopencv_core.so.4.1 (OpenCV core softlink to libopencv_core.so.4.1.0)
- libopencv_core.so.4.1.0 (OpenCV core actual library)
- libopencv_imgcodecs.so (OpenCV imgcodecs softlink to libopencv_imgcodecs .so.4.1)
- libopencv_imgcodecs.so.4.1 (OpenCV imgcodecs softlink to libopencv_imgcodecs.so.4.1.0)
- libopencv_imgcodecs.so.4.1.0 (OpenCV imgcodecs actual library)
- libopencv_imgproc.so (OpenCV imgproc softlink to libopencv_imgproc.so.4.1)
- libopencv_imgproc.so.4.1 (OpenCV imgproc softlink to libopencv_imgproc.so.4.1.0)
- libopencv_imgproc.so.4.1.0 (OpenCV imgproc actual library)
- libusb (Directory to store the libusb libraries. Only needed if not already installed)
- libusb-1.0.so.0 (usb-1.0 softlink to libusb-1.0.so.0.1.0)
- libusb-1.0.so.0.1.0 (actual usb-1.0 library)
After the deployment system has a directory structure similar to this the LD_LIBRARY_PATH environment variable must be modified so that the sub-directories of ~/benchmark are included when searching for dynamically loaded shared object libraries. This can be done with the following command:
export LD_LIBRARY_PATH=~/benchmark/lib:~/benchmark/opencv:~/benchmark/libusb:$LD_LIBRARY_PATHFinally, once the deployment machine has the application and its dependencies ready, this command line can be issued from the terminal in the ~/benchmark directory to verify the application has been deployed successfully.
./benchmark_app -i ./president_reagan-62x62.png -m ./age-gender-recognition-retail-0013.xml -pp ./lib -api async -d MYRIADConclusion
Hopefully, developers that have made it through the above sections are armed with the information needed to enable deployment of applications using the Intel® NCS 2 on many platforms that are not officially supported by the Intel® Distribution of the OpenVINO™ toolkit. Each deployment platform will have its own challenges, but the concepts here can be extrapolated for the multitude of single board computers available in the market.
Learn More
- Intel® Neural Compute Stick 2
- Get Started with Intel® Neural Compute Stick 2 (Intel® NCS 2)
- Check out the ncappzoo github repository, it contains numerous sample apps for the Intel® NCS 2
- Explore the Intel® Distribution of OpenVINO™ toolkit
- Get Started with the Intel® Distribution of OpenVINO™ Toolkit
- Transitioning from Intel® Movidius™ Neural Compute SDK to Intel® Distribution of OpenVINO™ toolkit

