Introduction
KVM/Qemu Virtualization is the foundational technology and the major use scenario in cloud environment. This guide is targeted towards cloud administrators or users who deploy KVM/Qemu solutions and want to achieve best performance results on 3rd Generation Intel® Xeon® Scalable processor based platforms. This guide assumes that the audience has general knowledge of the Linux* Operating System and KVM/Qemu based virtualization. This guide aims to help the reader to get the best virtualization performance on 3rd Generation Intel Xeon Scalable processor based platforms. However, please note that we rely on the users to carefully consider these settings for their specific scenarios.
Hardware Tuning
Hardware configuration and settings play an important role regarding performance. 3rd Gen Intel Xeon Scalable processors support up to 40 cores, up to 6TB of system memory, and up to 8 memory channels per socket. In general, the more CPU cores and the more memory in the system, the more virtual machines the system can support. CPU frequency is another critical factor to consider. The faster the frequency, the shorter time it takes to execute a typical workload. Please use historical data to estimate peak time requirements, for example, how many concurrent virtual machines and virtual CPUs the system commits to meet the service level agreements (SLA). This will help users to determine the number of CPU cores the system requires.
BIOS Setting
Besides the CPU core number and the size of the System Memory, the following BIOS settings also have impacts on the virtual machine performance. Please note that these BIOS setting are trying to achieve best performance, it may cost more power. It may be desirable to adjust some of the settings for balanced performance results according to actual requirements and workloads.
| Configuration Item | Recommended Value |
| Advanced/Processor Configuration/Intel® Virtualization Technology | Enabled |
| Advanced/PCI Configuration/Integrated IO Configuration/Intel® VT for Directed I/O | Enabled |
| Advanced/Processor Configuration/Intel® Hyper-Threading Tech | Enabled |
| Advanced/Memory Configuration/Memory RAS and Performance Configuration/NUMA optimized | Enabled |
| Advanced/Power & Performance/CPU Power and Performance Policy | Performance |
| Advanced/Power & Performance/CPU P State Control/CPU P State Control/Enhanced Intel SpeedStep® Tech | Enabled |
| Advanced/Power & Performance/CPU P State Control/CPU P State Control/Intel® Turbo Boost Technology | Enabled |
| Advanced/Power & Performance/CPU P State Control/CPU P State Control/Energy Efficient Turbo | Disabled |
| Advanced/Power & Performance/Hardware P States | Native Mode |
| Advanced/Power & Performance/CPU C State Control/C1E | Disabled |
| Advanced/Power & Performance/CPU C State Control/Processor C6 | Disabled |
Software Tuning
The KVM/Qemu Virtualization Architecture
The following picture shows the KVM/Qemu Virtualization architecture based on 3rd Generation Intel Xeon platform.
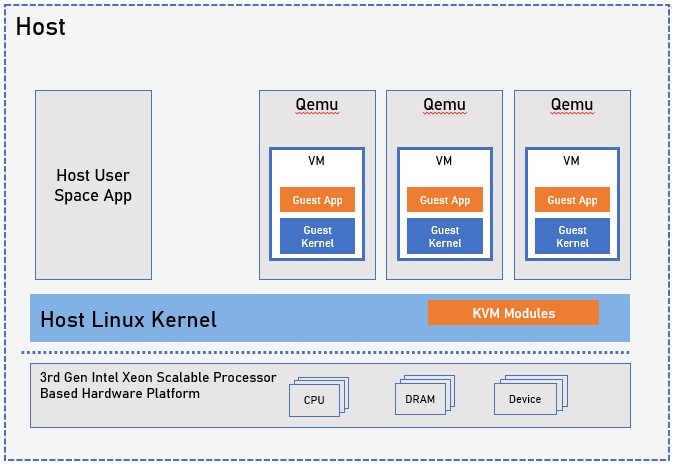
3rd Generation Intel Xeon Scalable processor provides latest Intel® Virtualization Technology for IA-32, Intel® 64 and Intel® Architecture (Intel® VT-x) and Intel® Virtualization Technology for Directed I/O (Intel® VT-d) hardware virtualization technologies. KVM is a Linux kernel module which acts as the kernel part of the hypervisor for the VMs. Each VM is run within a separate Qemu, which is a host user mode process. It is the user land part of the hypervisor for the VM.
This guide, if not mentioned specifically, assumes using Linux 5.12 and Qemu* 6.0.0.
Linux Kernel & KVM Tuning
There are many aspects in the Linux Kernel and KVM kernel module that can be tuned to achieve best performance.
NUMA Affinity
In NUMA system, the CPU accessing different memory portion may have different cost. When it accesses memory that doesn’t locate within its own NUMA node, aka, remote memory, data must be transferred over the NUMA connection, which will need extra time cost than accessing local memory.
To achieve best performance, it is critical to run virtual machine with the correct CPU affinity, memory affinity and IRQ affinity, especially for memory intensive workloads.
Identify System NUMA Configuration
We can use numactl to identify system NUMA configuration. Here is an example:
$ numactl -H

available: 2 nodes (0-1)

node 0 cpus: 0 1 2 3 4 5 6 7 8 9 10 11 12 13 14 15 16 17 18 19 20 21 22 23 24 25 26 27 28 29 30 31 32 33 34 35 72 73 74 75 76 77 78 79 80 81 82 83 84 85 86 87 88 89 90 91 92 93 94 95 96 97 98 99 100 101 102 103 104 105 106 107

node 0 size: 128530 MB

node 0 free: 70019 MB

node 1 cpus: 36 37 38 39 40 41 42 43 44 45 46 47 48 49 50 51 52 53 54 55 56 57 58 59 60 61 62 63 64 65 66 67 68 69 70 71 108 109 110 111 112 113 114 115 116 117 118 119 120 121 122 123 124 125 126 127 128 129 130 131 132 133 134 135 136 137 138 139 140 141 142 143

node 1 size: 129002 MB

node 1 free: 5288 MB

node distances:

node 0 1

0: 10 20

1: 20 10
Automatic NUMA Balancing vs. Manual NUMA Configuration
Automatic NUMA Balancing is a Linux Kernel feature that tries to dynamically move application process closer to the memory they access. It is enabled by default. In virtualization environment, automatic NUMA balancing is usually preferrable if there is no passthrough device assigned to the Virtual Machine (VM). Otherwise, manual NUMA specification may achieve better performance. This is because the VM memory is usually pinned by VFIO driver when there is passthrough devices assigned to the VM, thus VM memory cannot be moved across NUMA nodes.
Specify NUMA Node to Run VM
Using numactl can specify which NUMA node we want to run a VM.
Its option “--membind=<node>” or “-m <node>” will specify to only allocate memory for the VM from specified <node>.
Option “--cpunodebind=<node>” or “-N <node>” will specify to only execute the VM on the CPUs of node <node>
The following example runs a virtual machine at NUMA node 0:
# numactl -N 0 -m 0 qemu-system-x86_64 --enable-kvm -M q35 -smp 4 -m 4G -hda vm.img -vnc :2
IRQ Affinity
PCI/PCIe devices are also usually located at a specific NUMA node. Binding the IRQs of these devices to the same NUMA node of the virtual machine usually achieves the best performance. If possible, it is desirable to firstly identify which NUMA node a device is located and then binding the virtual machine to the same NUMA node.
The Linux command lstopo can be used to identify which NUMA node a device is located.
On the other hand, for PCI/PCIe devices, its NUMA node can also be identified by command (using 0000:31:00.0 as example):
# cat /sys/bus/pci/devices/0000\:31\:00.0/numa_node
Most NIC devices can identify its NUMA node by this way. For SSD, Non-Volatile Memory Express* (NVMe*) or other storage device, its NUMA node can be identified by its host controller.
Processor Frequency
3rd Generation Intel Xeon Scalable processor can be operating at different clock frequency configurations, which is referred to as CPU P-State. Linux Kernel supports CPU performance scaling by the CPUFreq subsystem which include a scaling governor. There are 3 possible settings for the governor.
| Settings | |
| Performance | The CPUfreq governor "performance" sets the CPU statically to the highest frequency within the borders of scaling_min_freq and scaling_max_freq |
| Powersave | The CPUfreq governor "powersave" sets the CPU statically to the lowest frequency within the borders of scaling_min_freq and scaling_max_freq |
| Ondemand | The CPUfreq governor "ondemand" sets the CPU frequency depending on the current system load |
By default, Linux distribution may set the governor to “ondemand” or “powersave”. To achieve best performance, it is preferrable to set the governor to “performance”.
Using the following commands can set the governor to “performance”:
# cat /sys/devices/system/cpu/cpu*/cpufreq/scaling_governor

ondemand

ondemand

ondemand

...

# echo "performance" | tee /sys/devices/system/cpu/cpu*/cpufreq/scaling_governor

# cat /sys/devices/system/cpu/cpu*/cpufreq/scaling_governor

performance

performance

performance

...
Enable Huge Page
3rd Generation Intel Xeon Scalable processor is capable of using large page size such as 2MB or 1GB pages. For memory access intensive VM workloads, huge page can reduce TLB (Translation Lookaside Buffer) miss significantly, which in turn improves performance significantly.
Static Huge Page
Using the following commands to statically reserve 8 huge pages with 1G page-size at run time and run virtual machine on the huge page.
# echo 8 > /sys/devices/system/node/node0/hugepages/hugepages-1048576kB/nr_hugepages

# mkdir /dev/hugepage1G

# mount -t hugetlbfs -o pagesize=1G none /dev/hugepage1G

# numactl -N 0 -m 0 qemu-system-x86_64 --enable-kvm -M q35 -smp 4 -m 4G \

-mem-path /dev/hugepage1G -hda vm.img -vnc :2
For reserving 2MB page-size huge pages, just use the following commands:
# echo 2000 > /sys/devices/system/node/node0/hugepages/hugepages-2048kB/nr_hugepages

# mkdir /dev/hugepage2M

# mount -t hugetlbfs -o pagesize=2M none /dev/hugepage2M

# numactl -N 0 -m 0 qemu-system-x86_64 --enable-kvm -M q35 -smp 4 -m 4G \

-mem-path /dev/hugepage2M -hda vm.img -vnc :2
Transparent Huge Page
Static huge page needs to be reserved explicitly, which is not very flexible. Linux kernel also support transparent huge page, with which kernel can dynamically create, allocate, and reclaim huge pages.
Transparent huge page is usually enabled by default, but it can also be enabled by the following command:
# echo always > /sys/kernel/mm/transparent_hugepage/enabled
There is no specific configuration needed on KVM or Qemu. By default, KVM will automatically use transparent huge page if possible.
Avoid Entering CPU C State
When Linux kernel finds a CPU is idle, it may put the CPU into C state, which saves power. Since recovering from deep C state is time consuming, which may increase workload latency. In some scenarios, it is preferrable to disable C state to achieve best performance. Using “idle=poll” kernel’s command line instructs it to use no op instruction, instead of entering C states when CPU is idle.
Pause Loop Exiting (PLE)
Pause Loop Exiting (PLE) is a hardware mechanism to cause a VMExit to a vCPU when it is busy waiting for a spinlock whose owner vCPU has been scheduled out, so that CPU time can be saved. In some scenarios, this behavior may also cause latency issue, so we may also want to disable PLE.
Using the following commands to disable PLE:
# rmmod kvm_intel

# modprobe kvm_intel ple_gap=0 ple_window=0
Enable Kernel Samepage Merging (KSM)
Kernel Samepage Merging (KSM) is a memory-saving de-duplication feature of Linux kernel since 2.6.32. KSM can be used with KVM to make multiple virtual machines share their memory pages with the same physical memory pages.
KSM daemon “ksmd” periodically scans those areas of memory pages, looking for pages of identical content, and try to merge them. The behavior of “ksmd” can be configured using sysfs interface in “/sys/kernel/mm/ksm”. Major controls include:
| Controls | |
| run | set to 0 to stop ksmd from running but keep merged pages, set to 1 to run ksmd, set to 2 to stop ksmd and unmerge all pages currently merged, but leave mergeable areas registered for next run |
| pages_to_scan | how many pages to scan before ksmd goes to sleep |
| sleep_millisecs | How many milliseconds ksmd should sleep before next scan |
| max_page_sharing | Maximum sharing allowed for each KSM page. |
More details please refer to Linux kernel documentation.
It is also possible to use “ksmtuned” service to fine tune the kernel ksm behavior at run time. Most Linux distributions include “ksmtuned” package.
Please note, there are 2 qemu command line options to control the KSM behavior. One is for the “-machine” option. Use following command line to specify global KSM behavior for this virtual machine (default is on):
-machine mem-merge=on|off…
Another one is for the memory-backend object specification. Use following command line to specify backend memory KSM behavior:
-object memory-backend-file,id=id,merge=on|off…

-object memory-backend-ram,id=id,merge=on|off…

-object memory-backend-memfd,id=id,merge=on|off…
This can be used for overriding global KSM setting of this virtual machine.
Tuning KVM Halt Polling
KVM Halt Polling is a KVM feature that can be used to reduce the virtual machine latency. When the virtual machine decides to block or sleep due to any reason, the host can poll for some period before giving up the physical CPU to the scheduler, to see if the wakeup conditions can be true immediately again.
Usually it is actual workload dependent regarding to whether there will be performance gain by leveraging this mechanism. Latency advantage can be achieved when the virtual machine can be run again very quickly by at least saving the time going through the kernel scheduler (usually a few micro-seconds), especially if a workload has the characteristic that the time spent on halt polling is small and the time saved due to no-invoking of the scheduler is noticeable. On the other hand, since it increases CPU consumption to provide better responsiveness and lower latency, it may be counterproductive for some throughput workload where CPU resource is tight. So usually experiments need to be done to derive an optimal value of this polling time.
Use the following command to see and set the current poll time configuration:
# cat /sys/module/kvm/parameters/halt_poll_ns

# echo 50000 > /sys/module/kvm/parameter/halt_poll_ns
It is also possible to fine tune the halt poll behavior, for example, tuning other Halt Polling parameters like “halt_poll_ns_grow”. See Linux kernel documentation for more details.
Using Exitless Local APIC Timer
Currently VMExits are required for emulated local apic timer due to both programming timer in guest and fire of emulated timer on the same physical CPU that vCPU residents. This causes a lot performance jitter for KVM/Qemu virtualization. With recent Linux kernel, it is possible to offload the timer injection to other housekeeping physical CPU via posted interrupt, with which no vmexit is required for virtual machine. This is especially beneficial to dedicated CPU scenario. It can be enabled by specifying housekeeping CPUs.
Housekeeping work is the periodic and routine work that run in the Linux kernel background, such as unbound timer callback execution, unbound workqueue execution, rcu grace periods tracking, etc. Use “nohz_full” kernel command line option to specify non-housekeeping CPUs, that is, those physical CPUs that are moved away all their housekeeping work. An example is:
nohz_full=1-35,73-107,37-71,109-143
Usually it is recommended to specify one housekeeping CPU for each NUMA node. For large systems, If the CPUs, memory, and caches are further partitioned, more housekeeping CPUs may be needed.
Qemu Tuning
Hints about host resource overcommit
When VM has dedicated physical CPUs or memory, some optimization can be tuned to improve performance.
Disable MWAIT/HTL/PAUSE VMExit for Better Latency
On Intel® Server Platform, it is possible to expose some host CPU power management capabilities to a virtual machine. In this way the virtual machine can manage to enable low power CPU states on idle, so that other CPUs/vCPUs can get turbo boost on demand. Meanwhile, without MWWAIT/HTL/PAUSE VMExit, the dedicated vCPU can have better latency for some workloads since it will not go through hypervisor idle handling. Please note this increases latency for other processes using the same host CPU in unpredictable way.
By default, this feature is disabled. Use the following Qemu command line option to enable virtual machine management of power state:
--overcommit cpu-pm=on
Locking Qemu and Guest Memory
When host memory is not overcommitted, it is possible to lock Qemu and guest memory to reduce worst-case latency, thus reduce jitter for guest.
By default, this feature is disabled. Use the following Qemu command line option to lock memory:
--overcommit mem-lock=on
Qemu Device Model Tuning
There are 2 usage models for virtual machine to access devices.
| Usage models | |
| Passthrough Device | Physical devices are assigned directly to guest, device drivers in the virtual machine accesses the hardware directly with low overhead. Since device bars can be accessed by guest driver via memory-mapped IO, IRQs can be injected into running virtual machine directly without vmexit by posted interrupt, passthrough device can usually achieve bare-metal level performance |
| Device Emulation | Device emulation with backend physical device is another popular approach for virtual machine accessing hardware. A virtual interface is exposed to virtual machine, while backend driver in host multiplex virtual machine access to physical devices. Virtio is the most dominating virtual device interface standard in the industry. It can be further divided to virtio-blk for block device and virtio-net for network adaptor |
There are not many general parameters to be tuned when passthrough devices are employed. This guide will focus on the tuning of virtio-net and virtio-blk devices.
Tuning virtio-net & vhost-net
Virtio-net is the main virtual ethernet network interface for virtual machine in KVM/Qemu environment. Its functionality is described next. A frontend driver sits in the virtual machine kernel. Then guest workload issues network packets into the frontend device/driver via the virtqueues, which is shared ring buffer between frontend and backend. Then a backend driver is implemented as a user land driver in Qemu. Finally, it receives network packets from the virtqueues and transfers them to the physical network.
Enable vhost-net
User land Qemu virtio-net driver has some disadvantages. Context switch between kernel and Qemu is needed to handle packets. This is an expensive operation, causes a lot of processing time and packet process latency. Vhost-net is a kernel acceleration module for virtio-net, which offloads the virtio-net data plane handling from user land to kernel. It leverages Linux ioeventfd mechanism, any guest access to the virtqueue memory mapped notification address will directly invoke vhost-net worker thread to handle the packets. Meanwhile, Linux kernel irqfd mechanism is also leveraged so that IRQs can be injected into guest by any thread on host. These asynchronous mechanisms improve virtio-net performance a lot.
Use “vhost=on” in the “-netdev tap” Qemu command line option to enable vhost-net, like the following example
-netdev tap,id=nic0,vhost=on,script=$IFUP_SCRIPT,downscript=no \

-device virtio-net-pci,mq=on,netdev=nic0,mac=$MAC
Enable Multiqueue
As the number of vCPUs increases, it is desirable to enable multi-queue virtio-net to boost performance of network packet handling. One vCPU can be dedicated to one virtqueue so that the overall parallelism and throughput can be improved significantly.
Use “queues=<num>” in the “-netdev tap” Qemu command line option to specify the number of queues, and use “mq=on” in the “-device virtio-net-pci” command line option to expose multi-queue to guest, like the following example:
-netdev tap,id=nic0,vhost=on,queues=4,script=$IFUP_SCRIPT,downscript=no \

-device virtio-net-pci,mq=on,packed=on,netdev=nic0,mac=$MAC
Enable packed virtqueues
Traditionally Virtio shares split queue between host and virtual machine. Packed virtqueues is an alternative compact virtqueue layout that is both read and written by both host and guest, which is more efficient regarding to performance.
Use “packed=on” in “-device virtio-net-pci” Qemu command line to enable packed virtqueues.
-netdev tap,id=nic0,vhost=on,queues=4,script=$IFUP_SCRIPT,downscript=no \

-device virtio-net-pci,mq=on,packed=on,netdev=nic0,mac=$MAC
Enable Zero Copy Transmission
To enable transmission zero copy in Linux kernel vhost-net driver, use the following commands:
# modprobe -r vhost_net

# modprobe vhost_net experimental_zcopytx=1
And the following to verify it has been set successfully:
# cat /sys/modules/vhost_net/parameters/experimental_zcopytx
Enable Queue Polling
Vhost-net is also possible to enable Queue Polling for better performance. The basic idea is to busy wait for a while after all packets has been handled to see if there is any new packet arriving.
Use “poll-us=<poll-time>” to specify microseconds to poll in “-netdev tap” Qemu command line:
-netdev tap,id=nic0,vhost=on,poll-us=50000,queues=4,script=$IFUP_SCRIPT,downscript=no \

-device virtio-net-pci,mq=on,packed=on,netdev=nic0,mac=$MAC
Tuning Virtio-blk
The Virtio storage device presents a virtual block device interface to the virtual machine. It is commonly deployed storage device that provides good performance in virtualization environment. There are 2 categories of virtio storage devices, one is virtio-blk, the other is virtio-scsi. Usually if no large number of disks or full SCSI support is needed, virtio-blk is preferred in performance-critical use scenarios. This guide focus on the tuning of virtio-blk.
Cache Modes
Virtio-blk can have different cache modes regarding to leveraging host cache or not. Use “cache=none”, “cache=writethrough”, “cache=writeback”, “cache=directsync” or “cache=unsafe” in “-drive” Qemu command line to specify desired cache mode.
| Cache Mode | Description |
| writethrough | Use O_DSYNC semantics to access hardware, writes only complete when data committed to storage device |
| none | Use O_DIRECT semantics to access hardware, host page cache is bypassed |
| writeback | No O_DSYNC or O_DIRECT is assumed, so host page cache is used |
| unsafe | Similar with “writeback”, meanwhile ignore flush commands from virtual machine |
| directsync | Both O_DSYNC and O_DIRECT are assumed. Host cache is bypassed, writes only complete when data committed to storage device |
Choosing different cache mode may result in huge performance difference. High end system usually uses “cache=none” to avoid extra data copying.
IO Mode
When Qemu virtio-blk handles requests, it can employ different IO mode. The Qemu block drive option “aio=native” leverages Linux native libaio asynchronous block IO mechanism to issue the requests to Linux kernel. The option “aio=io_uring” leverages the new Linux io_uring block IO API to issue the requests. While the option “aio=threads” spawns a pool of Qemu threads to handle requests.
Generally speaking, “aio=native” has better performance than “aio=threads”, because of the asynchronous nature of the native aio mechanism. However, when CPU bandwidth is the bottleneck of the requests handling, “aio=threads” can spread the requests to different Qemu threads to increase the process parallelism, which improves throughput.
Hardware storage device, such as SSD and NVMe devices, usually have fixed hardware queue depth to accommodate user IO requests. Linux native aio mechanism blocks when the requests from user land exceeds the hardware queue depth, it busy-waits the underlying hardware storage device until previous requests completed so that leave room for new requests. This may waste CPU time. A general suggestion is to issue only number of requests equal to the hardware queue depth, and meanwhile keep the queue depth full.
Linux io_uring mechanism has a kernel thread to receive requests from user land. When the requests issued from user land exceeds the hardware queue depth, the kernel thread tries to keep it in its cache, so the user land application doesn’t need to block, thus saving time for more data processing for the application. In general, “aio=io_uring” can have better performance than “aio=native” if the extra kernel thread cost is not considered.
Enable Multi-queue
Multi-queue virtio-blk enables concurrent handling of different virtqueues by different vCPUs. It improves parallelism of request processing, especially when full kernel multi-queue block driver is also enabled.
Usually specifying the same number of virtqueues as the underlying hardware queue can provide the best performance. Use “num-queues=<num>” in “-device virtio-blk-pci” Qemu command line to specify the queue number.
-drive if=none,id=drive0,file=$blk_dev,format=raw,cache=none,aio=native \

-device virtio-blk-pci,num-queues=4,drive=drive0 \
Enable packed virtqueues
Traditionally Virtio shares split queue between host and virtual machine. Packed virtqueues is an alternative compact virtqueue layout that is read and written by both host and guest, which is more efficient regarding to performance.
Use “packed=on” in “-device virtio-blk-pci” Qemu command line to enable packed virtqueues.
-drive if=none,id=drive0,file=$blk_dev,format=raw,cache=none,aio=native \

-device virtio-blk-pci,packed=on,num-queues=4,drive=drive0 \
Enable IOthread
With IOthread feature enabled, a dedicated thread will be created to handle virtio-blk queues. This thread decouples from the Qemu’s global mutex for IO handling. It also allows to pin the IO handling of devices to different CPU on appropriate NUMA node. Both improves parallelism of IO handling.
Use “-object iothread” to create an iothread, and use “iothread=<iothread id>” in “virtio-blk-pci” Qemu command line to enable iothread for virtio-blk.
-object iothread,id=iothread0 \

-drive if=none,id=drive0,file=$blk_dev,format=raw,cache=none,aio=native \

-device virtio-blk-pci,packed=on,iothread=iothread0,num-queues=4,drive=drive0 \
Guest Kernel Tuning
There are also some parameters in virtual machine kernel that can be tuned to achieve better performance.
Enable Guest Halt Polling
Guest Halt Polling is a guest side mechanism to improve the vCPU halt handling for better performance. Halting a vCPU involves vmexit to host and may also involve halting the physical CPU, which imposes a latency penalty. When Guest Halt Polling is enabled, the vCPU will busy wait for a period in case a task in virtual machine becomes schedulable.
Compared with host side polling, it also has the benefit that the POLL flag is set during polling so that other vCPUs will avoid sending IPIs when performing wakeup. This will save the time of IPI handling. On the other hand, since it doesn’t invoke vmexit, it may waste host CPU time if there are runnable tasks on the host side.
A global fixed guest_halt_poll_ns value can be configured to indicate the maximum amount of polling time.
# echo 50000 > /sys/module/haltpoll/parameters/guest_halt_poll_ns
It is also possible to fine tune the halt poll behavior, see Linux kernel documentation for more details.
Please note, to enable Guest Halt Polling, the kernel command line of the virtual machine must not include “idle=xxx”. Otherwise Guest Halt Polling will be masked.
Request Queue Affinity for Multiqueue Block Device
When multi-queue is enabled for the block device, it is important to set up proper queue parameters to achieve best performance. For each block device, there is a directory in the “sysfs” tree, aka “/sys/block/xxx/queue/”, for parameters of this block device.
Request Queue Affinity (“rq_affinity”) is one of the parameters that can be tuned. When it is set to ‘1’, the block layer will send the I/O completion to the vCPU group that originally submitted the request. This can cause bottleneck in some use scenarios where only one vCPU to handle the request completions. In such cases, in order to maximize distribution of completion processing, this option can be set to ‘2’ to force the completion to run on the requesting vCPU.
# echo 2 > /sys/block/vdb/queue/rq_affinity
It is also possible to tune other parameters for the queue. Please refer to Linux kernel documentation for more details.
Using Intel® Optane™ Persistent Memory to Boost Performance
Intel® Optane™ persistent memory (PMem) is an innovative memory technology and is a new category between memory and storage. Intel® persistent memory is similar to DRAM in performance and can store data persistently like an SSD. Intel Optane PMem has three single capacities of 128GB, 256GB and 512GB, and up to 3TB capacity can be supported per processor per server, which is much larger than that of DDR, and at a lower price.
Intel persistent memory supports the following two modes:
- Memory Mode: the operating system views Intel persistent memory as the system’s primary memory, DRAM as the cache for Intel persistent memory. It does not require making any changes to your applications before they run in this large volatile memory pool.
- App-Direct Mode: Available for both DRAM Intel persistent memory. In this case, Intel PMem is a low latency, byte addressable memory pool, requiring your applications to manage hierarchical data storage, and thus making changes to your applications.
In KVM/Qemu virtualization environment, App-Direct Mode of Intel persistent memory can be used to present a NVDIMM to virtual machine for performance boost.
To enable Intel Optane PMem in Linux, the following kernel configuration need to be set:
| Linux Kernel Configuration |
| CONFIG_ND_PFN = m |
| CONFIG_NVDIMM_DAX = y |
| CONFIG_DEV_DAX_PMEM = m |
| CONFIG_FS_DAX_PMD = y |
| CONFIG_LIBNVDIMM = y |
| CONFIG_BLK_DEV_PMEM = m |
| CONFIG_ND_BLK = m |
| CONFIG_ND_CLAIM = y |
| CONFIG_ND_BTT = m |
| CONFIG_BTT=y |
| CONFIG_ND_PFN = m |
| CONFIG_NVDIMM_PFN = y |
| CONFIG_NVDIMM_DAX = y |
| CONFIG_DAX_DRIVER = y |
| CONFIG_DAX = y |
| CONFIG_DEV_DAX = m |
| CONFIG_DEV_DAX_PMEM = m |
| CONFIG_NVME = y |
| CONFIG_FS_DAX = y |
| CONFIG_FS_DAX_PMD = y |
App-Direct Mode Setting
1. Install ipmctl(1) and ndctl(1) package according to the Linux distribution.
2. Use the following command to check nvdimm informatiom
# ipmctl show -dimm
3. Configure Intel Optane PMem as App-Direct Mode
# ipmctl create -goal PersistentMemoryType=AppDirect
4. Reboot the server
# reboot
5. Check current mode
# ipmctl show -memoryresources
Setup App-Direct Mode NVDIMM for Virtual Machine
1. Configure Intel persistent memory into App Direct mode
2. Create a namespace with the devdax mode
# ndctl create-namespace -m dax -e namespace1.0 -f
3. Check the namespace, the individual devdax mode NVDIMM device can be seen as /dev/dax0.0, etc.
# ls /dev/dax*
4. Start VM by following QEMU command line:
-machine accel=kvm,nvdimm

-m 32G,slots=32,maxmem=1T

-object memory-backend-file,id=mem1,share,mem-path=/dev/dax0.0,size=100G,align=128M

-device nvdimm, memdev=mem1,id=nv1,label-size=128k
5. Login into the virtual machine, check if the nvdimm can be seen by the Guest
# ls /dev/pmem*
6. In virtual machine, filesystem such as ext4 can be created on PMEM backed block device and mount to the virtual machine.
# fdisk /dev/pmem*

# mkfs.ext4 /dev/pmem*1

# mount /dev/pmem*1 /mnt
Using Intel® QuickAssist Accelerator to Boost Performance
Intel® QuickAssist Technology (Intel® QAT) provides hardware acceleration to assist with the performance demands of securing and routing Internet traffic and other workloads, enhance security and compression performance in cloud, networking, big data, and storage applications.
Intel® QuickAssist Accelerator is a PCIe card that needs to be inserted into the PCIe slot in the server. Below is a picture of the Intel QuickAssist Accelerator card.
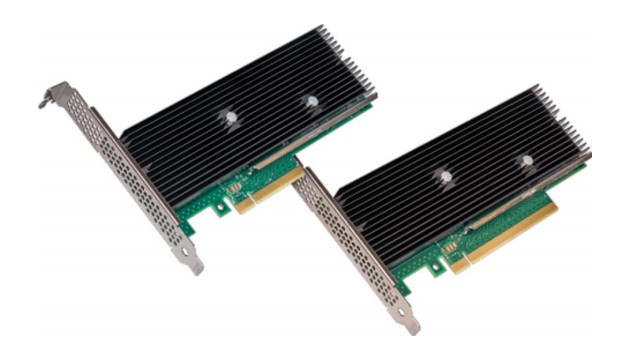
After the card is installed, BIOS settings need to be updated and set the PCIe link speed to Gen4 and X16 for highest possible performance.
Once Intel QAT is configured on host, the following commands can be used to passthrough QAT devices to virtual machine:
1. Create Virtual Functions (VF) for the QAT Physical Function
# echo $num_vfs > /sys/bus/pci/devices/$qat_pf_device_bdf/sriov_numvfs
2. Bind to vfio-pci driver
# echo –n $qat_vf_bdf > /sys/bus/pci/devices/$qat_vf_bdf/driver/unbind

# echo –n “qat_vf_vendor_id:qat_vf_device_id” > /sys/bus/pci/drivers/vfio-pci/new_id

# echo –n $qat_vf_bdf > /sys/bus/pci/drivers/vfio-pci/bind
3. Using following Qemu command line option to passthrough QAT to virtual machine
-device vfio-pci,host=$qat_vf_bdf
Additional Resources
- Using Intel® Virtualization Technology (Intel® VT) with Intel® QuickAssist Technology
- Linux Kernel Documentation
- Qemu Documentation
Feedback
We value your feedback. If you have comments (positive or negative) on this guide or are seeking something that is not part of this guide, please reach out and let us know what you think.
Notices & Disclaimers
Intel technologies may require enabled hardware, software or service activation.
No product or component can be absolutely secure.
Your costs and results may vary.
Code names are used by Intel to identify products, technologies, or services that are in development and not publicly available. These are not "commercial" names and not intended to function as trademarks
The products described may contain design defects or errors known as errata which may cause the product to deviate from published specifications. Current characterized errata are available on request.
© Intel Corporation. Intel, the Intel logo, and other Intel marks are trademarks of Intel Corporation or its subsidiaries. Other names and brands may be claimed as the property of others.