by Cristiano Ferreira (@cristianohh) and Mike Geig (@mikegeig)
Low, medium, and high. Standard fare for GPU settings, but why not CPU settings, too? Today the potential power of the CPU on your end users' machines can vary wildly. Typically, developers will define a CPU min-spec, implement the simulation and gameplay systems using that performance target, and then call it a day. This leaves the many potentially available cores and features built into modern mainstream CPUs sitting idle on the sideline. The new C# job system and entity component system from Unity* don't just allow you to easily leverage previously unused CPU resources, they will also help run all your game code more efficiently in general. Then you can use those extra CPU resources to add more scene dynamism and immersion. In this article, you'll see how to quickly get started learning these new features.
Unity is attacking two important performance problems for computing in game engines. The first problem under assault is inefficient data layout. Unity's Entity Component System (ECS) improves management of data storage for high-performance operations on those structures. The second problem is the lack of a high-performance job language and SIMD vectorization that can operate on that well-organized data. Unity's new C# job system, entity component system and Burst compiler technology leave those shortcomings in the dust.
The Unity entity component system and C# job system are two different things, but they go hand-in-hand. To get to know them, let's look at the current Unity workflow for creating an object in your scene, and then differentiate from there.
In the current Unity workflow, you:
- Create a GameObject.
- Add components to your game object that give your object desired properties:
- Rendering
- Collision
- Rigidbody physics
- Create and add MonoBehaviour scripts to your object to command and alter the states of these components at runtime.
Let's call this the Classic Unity workflow. There are some inherent drawbacks and performance considerations for this way of doing things. For one, data and processing are tightly coupled. This means that code reuse can happen less frequently as processing is tied to a very specific set of data. On top of this, the classic system is very dependent on reference types.
In the Classic GameObject and Components example shown below, the Bullet GameObject is dependent on the Transform, Renderer, Rigidbody, and Collider references. Objects being referenced in these performance-critical scripts exist scattered in heap memory. As a result of this, data is not transformed into a form that can be operated on by the faster SIMD vector units.
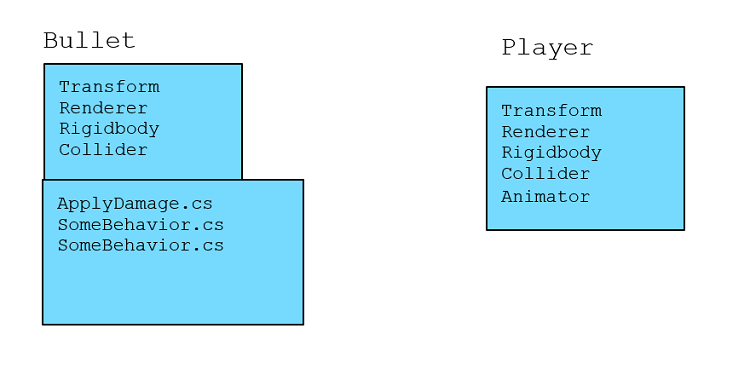
Figure 1. Classic gameobject and components lists.
Gaining Speed with Cache Prefetching
Accessing data from system memory is far slower than pulling data from a nearby cache. That is where prefetching comes in. Cache prefetching is when computer hardware predicts what data will be accessed next, and then preemptively pulls it from the original, slower memory into faster memory so that it is warmed and ready when it's needed. Using this, hardware gets a nice performance boost on predictive computations. If you are iterating over an array, the hardware prefetch unit can learn to pull swaths of data from system memory into the cache. When it comes time for the processor to operate on the next part of the array, the necessary data is sitting close by in the cache and ready to go. For tightly packed contiguous data, like you'd have in an array, it's easy for the hardware prefetcher to predict and get the right objects. When many different game objects are sparsely allocated in heap memory, it becomes impossible for the prefetcher to do its thing, forcing it to fetch useless data.
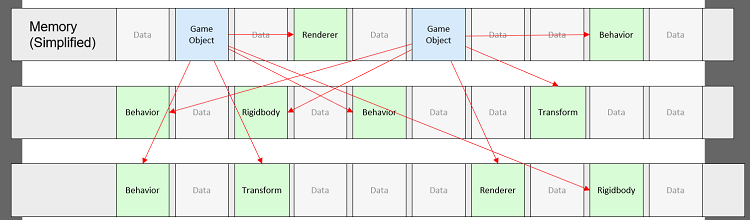
Figure 2. Scattered memory references between gameobjects, their behaviors, and their components.
The illustration above shows the random sporadic nature of this data storage method. With the scenario shown above, every single reference (arrows)—even if cached as a member variable—could potentially pull all the way from system memory. The Classic Unity GameObject scenario can get your game prototyped and running in a very short timeline, but it's hardly ideal for performance-critical simulations and games. To deepen the issue, each of those reference types contain a lot of extra data that might not need to be accessed. These unused members also take up valuable space in processor caches. If only a select few member variables of an existing component are needed, the rest can be considered wasted space, as shown in the Wasted Space illustration below:
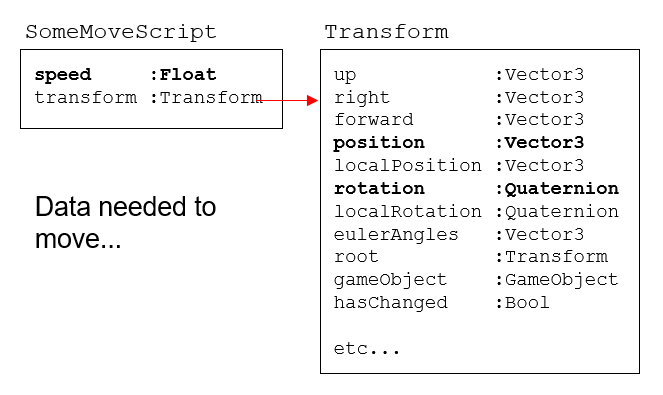
Figure 3. The items in bold indicate the members that are actually used for the movement operation; the rest is wasted space.
To move your GameObject, the script needs to access the position and rotation data members from the Transform component. When your hardware is fetching data from memory, the cache line is filled with much potentially useless data. Wouldn't it be nice if you could simply have an array of only position and rotation members for all of the GameObjects that are supposed to move? This will enable you to perform the generic operation in a fraction of the time.
Enter the Entity Component System
Unity's new entity component system helps eliminate inefficient object referencing. Instead of GameObjects with their own collection of components, let's consider an entity that only contains the data it needs to exist.
In the Entity Component System with Jobs Diagram below, notice that the Bullet entity has no Transform or Rigidbody component attached to it. The Bullet entity is just the raw data needed explicitly for your update routine to operate on. With this new system, you can decouple the processing completely from individual object types.

Figure 4. Entity component system with jobs diagram.
Of course, it's not just movement systems that benefit from this. Another common component in many games are more complex health systems set up across a wide variety of enemies and allies. These systems typically have little to no variation between object types, so they are another great candidate to leverage the new system. An entity is a handle used to index a collection of different data types that represent it (archetypes for ComponentDataGroups). Systems can filter and operate on all components with the required data without any help from the programmer; more on this later. The data is all efficiently organized in tightly packed contiguous arrays and filtered behind the scenes without the need to explicitly couple systems with entity types. The benefits of this system are immense. Not only does it improve access times with cache efficiency; it also allows advanced technologies (auto-vectorization / SIMD) available in modern CPUs that require this kind of data alignment to be used. This gives you performance by default with your games. You can do much more every frame or do the same thing in a much shorter amount of time. You'll also get a huge performance gain from the upcoming Burst compiler feature for free.
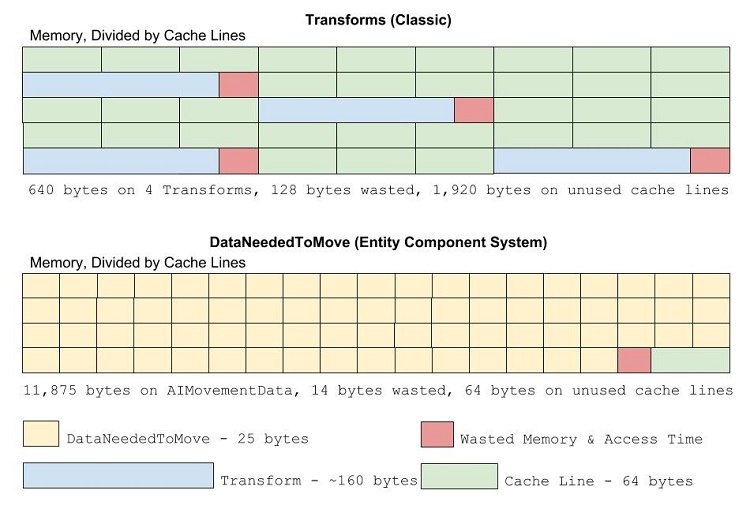
Figure 5. Note the fragmentation in cache line storage and wasted space generated by the classic system. See image below for data comparison.
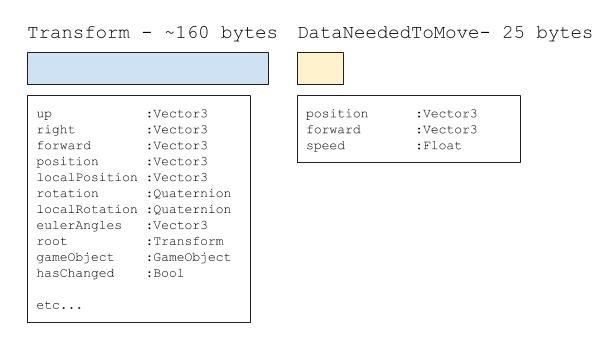
Figure 6. Compare the memory footprint associated with a single move operation with both accomplishing the same goal.
The Burst Compiler
The Burst compiler is the behind-the-scenes performance gain that results from the entity component system having organized your data more efficiently. Essentially, the burst compiler will optimize operations on code depending on the processor capabilities on your player's machine. For instance, instead of doing just 1 float operation at a time, maybe you can do 16, 32, or 64 by filling unused registers. The new compiler technology is employed on Unity's new math namespace and code within the C# job system (described below), relying on the fact that the system knows data has been set up the proper way with the entity component system. The current version for Intel CPUs supports Intel® Streaming SIMD Extensions 4 (Intel® SSE4), Intel® Advanced Vector Extensions 2 (Intel® AVX2), and Intel® Advanced Vector Extensions 512 (Intel® AVX-512) for float and integer. The system also supports different accuracy per method, applied transitively. For example, if you are using a cosine function inside your top-level method with a low accuracy, the whole method will use a low accuracy version of cosine as well. The system also provides for AOT (Ahead-of-Time) compilation with dynamic selection of proper optimized function based on the feature support of the processor currently running the game. Another benefit to this method of compilation is the future-proofing of your game. If a brand-new processor line comes out to market with some amazing new features to be leveraged, Unity can do all of the hard work for you behind the scenes. All it takes is an upgrade to the compiler to reap the benefits. The compiler is package-based and can be upgraded without requiring a Unity editor update. Since the Burst package will be updated at its own cadence, you will be able to take advantage of the latest hardware architectural improvements and features without having to wait for the code to be rolled into the next editor release.
The C# Job System
Most people who have worked with multi-threaded code and generic tasking systems know that writing thread-safe code is difficult. Race conditions can rear their ugly heads in extremely rare cases. If the programmer hasn't thought of them, the result can be potentially critical bugs. On top of that, context-switching is expensive, so learning how to balance workloads to function as efficiently as possible across cores is difficult. Finally, writing SIMD optimized code or SIMD intrinsics is an esoteric skill, sometimes best left to a compiler. The new Unity C# job system takes care of all of these hard problems for you so that you can use all of the available cores and SIMD vectorization in modern CPUs without the headache.
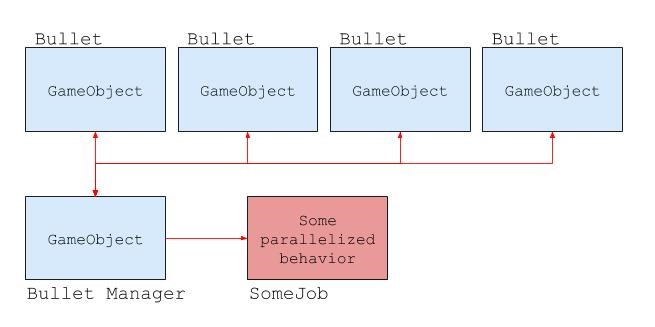
Figure 7. C# job system diagram.
Let's look at a simple bullet movement system, for example. Most game programmers have written a manager for some type of GameObject as shown above in the Bullet Manager. Typically, these managers pool a list of GameObjects and update the positions of all active bullets in the scene every frame. This is a good use for the C# job system. Because movement can be treated in isolation, it is well suited to be parallelized. With the C# job system, you can easily pull this functionality out and operate on different chunks of data on different cores in parallel. As the developer, you don't have to worry about managing this work distribution; you only need to focus entirely on your game-specific code. You'll see how to easily do this in a bit.
Combining These Two New Systems
Combing the entity component system and the C# job system gives you a force more powerful than the sum of its parts. Since the entity component system sets up your data in an efficient, tightly packed manor, the job system can split up the data arrays so that they can be efficiently operated on in parallel. Also, you get some major performance benefits from cache locality and coherency. The thin as-needed allocation and arrangement of data increases the chance that the data your job will need will be in shared memory before it's needed. The layout and job system combination beget predictable access patterns that give the hardware cues to make smart decisions behind the scene, giving you great performance.
"OK!" You are saying, "This is absolutely amazing, but how do I use this new system?"
To help get your feet wet, let's compare and contrast the code involved in a very simple game that uses the following programming systems:
- Classic System
- Classic System Using Jobs
- Entity Component System Using Jobs
Here's how the game works:
- The player hits the space bar and spawns a certain amount of ships in that frame.
- Each generated ship is set to a random X coordinate within the bounds of the screen.
- Each generated ship has a movement function that sends it toward the bottom of the screen.
- Each generated ship resets its position once the bottom bound is crossed.
Test Configuration:
- In this article, we will reference the Unity Profiler, a very powerful tool for isolating bottlenecks and viewing work distribution. See the Unity docs to learn more!
- Screen captures and data were taken using the Intel® Core™ i7-8700K processor and an NVIDIA GeForce* GTX 1080 graphics card.
1. Classic System
The Classic system checks each frame for spacebar input and triggers the AddShips() method. This method finds a random X/Z position between the left and right sides of the screen, sets the rotation of the ship to point downward, and spawns a ship prefab at that location.
void Update()
{
    if (Input.GetKeyDown("space"))
        AddShips(enemyShipIncremement);
}

void AddShips(int amount)
{
    for (int i = 0; i < amount; i++)
    {
        float xVal = Random.Range(leftBound, rightBound);
        float zVal = Random.Range(0f, 10f);

        Vector3 pos = new Vector3(xVal, 0f, zVal + topBound);
        Quaternion rot = Quaternion.Euler(0f, 180f, 0f);

        var obj = Instantiate(enemyShipPrefab, pos, rot) as GameObject;
    }
}
Code sample showing how to add ships using the classic system
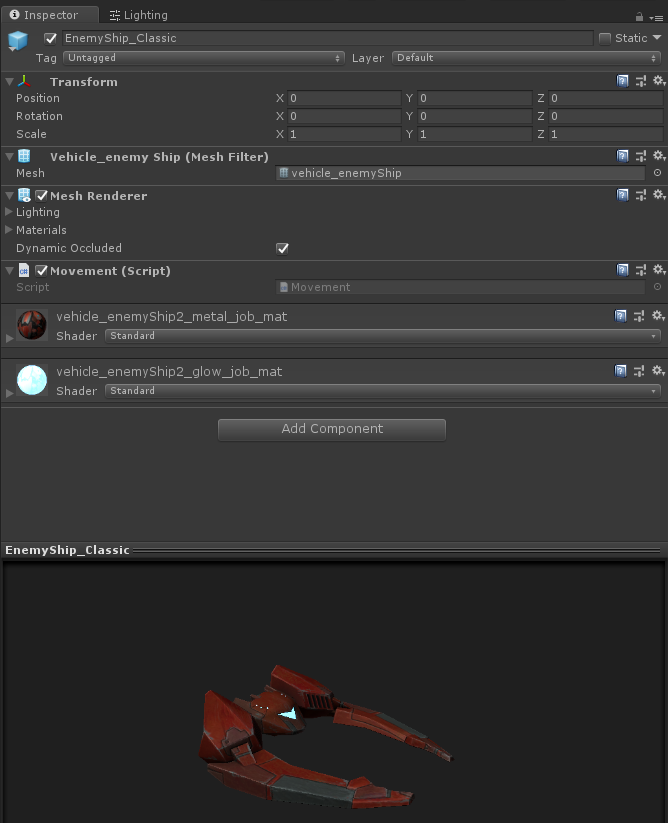
Figure 8. Classic ship prefab. (source: Unity.com Asset store battleships package).
The ship object spawned, along with each of its components, are created in heap memory. The movement script attached accesses the transform component every frame and updates the position, making sure to stay between the bottom and top bounds of the screen. Super simple!
using UnityEngine;

namespace Shooter.Classic
{
    public class Movement : MonoBehaviour
    {
        void Update()
        {
            Vector3 pos = transform.position;
            pos += transform.forward * GameManager.GM.enemySpeed * Time.deltaTime;

            if (pos.z < GameManager.GM.bottomBound)
                pos.z = GameManager.GM.topBound;

            transform.position = pos;
        }
    }
}
Code sample showing move behavior
The graphic below shows the profiler tracking 16,500 objects on the screen at once. Not bad, but we can do better! Keep on reading.
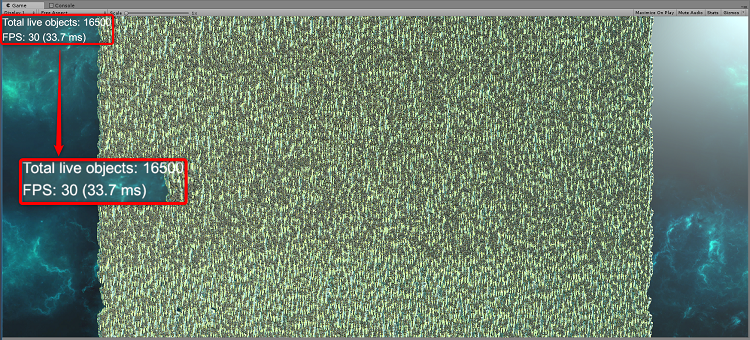
Figure 9. After some initializations, the profiler is already tracking 16,500 objects on the screen at 30 FPS.
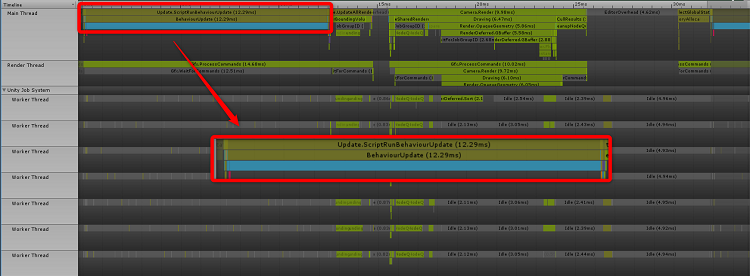
Figure 10. Classic performance visualization.
Looking at the BehaviorUpdate() method, you can see that it takes 8.67 milliseconds to complete the behavior update for all ships. Also note that this is all happening on the main thread.
In the C# job system, that work is split among all available cores.
2. Classic System Using Jobs
using Unity.Jobs;
using UnityEngine;
using UnityEngine.Jobs;

namespace Shooter.JobSystem
{
    [ComputeJobOptimization]
    public struct MovementJob : IJobParallelForTransform
    {
        public float moveSpeed;
        public float topBound;
        public float bottomBound;
        public float deltaTime;

        public void Execute(int index, TransformAccess transform)
        {
            Vector3 pos = transform.position;
            pos += moveSpeed * deltaTime * (transform.rotation * new Vector3(0f, 0f, 1f));

            if (pos.z < bottomBound)
                pos.z = topBound;

            transform.position = pos;
        }
    }
}
Sample code showing job movement implementation using the C# Job System
Our new MovementJob script is a struct that implements one of the IJob interface variants. This self-contained structure defines a task, or "job", and the data needed to complete that task. It is this structure that we will schedule with the Job System. For each ship's movement and bounds-checking calculations, you know you need the movement speed, the top bound, bottom bound, and the delta time values. The job has no concept of delta time, so that data must be provided explicitly. The calculation logic itself for the new position is the same as the classic system, although assigning that data back to the original transform must be updated via the TransformAccess parameter since reference types (such as Transform) don't work here. The basic requirements to create a job involve implementing one of the IJob interface variants, such as IJobParallelForTransform in the above example, and implementing the Execute method specific to your job. Once created, this job struct can simply be passed into the Job Scheduler. From there, all of the execution and resulting processing will be completed for you.
To learn more about how this job is structured, let's break down the interface it is using: IJob | ParallelFor | Transform. IJob is the basic interface that all IJob variants inherit from. A Parallel For Loop is a parallel pattern that essentially takes a typical single threaded for loop and splits the body of work into chunks based on index ranges to be operated on within different cores. Last but not least, the Transform keyword indicates that the Execute function to implement will contain the TransformAccess parameter to supply movement data to external Transform references. To conceptualize all of these, think of an array of 800 elements that you iterate over in a regular for loop. What if you had an 8-core system and each core could do the work for 100 entities automagically? A-ha! That's exactly what the system will do.
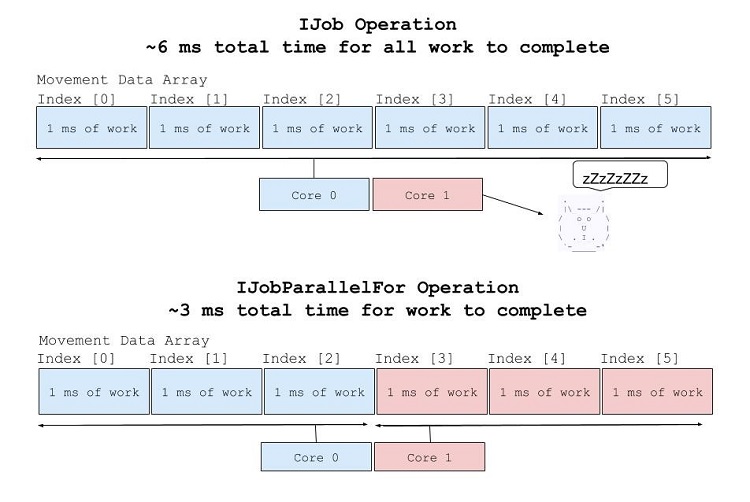
Figure 11. Using Jobs speeds up the iteration task significantly.
The Transform keyword on the end of the interface name simply gives us the TransformAccess parameter for our Execute method. For now, just know each ship's individual transform data is passed in for each Execute invocation. Now let's look at the AddShips() and Update() method in our game manager to see how this data is set every frame.
using UnityEngine;
using UnityEngine.Jobs;

namespace Shooter.JobSystem
{
    public class GameManager : MonoBehaviour
    {

        // ...
        // GameManager classic members
        // ...

        TransformAccessArray transforms;
        MovementJob moveJob;
        JobHandle moveHandle;


        // ...
        // GameManager code
        // ...
    }
}
Code sample showing required variables to set up and track jobs
Right away, you notice that you have some new variables that you need to keep track of:
- TransformAccessArray is the data container that will hold a modified reference to each ship's Transform (job-ready TransformAccess). The normal Transform data type isn't thread-safe, so this is a convenient helper type to set movement related data for your GameObjects.
- MovementJob is an instance of the job struct we just created. This is what we will be using to configure our job in the job system.
- JobHandle is the unique identifier for your job that you use to reference your job for various operations, such as verifying completion. You'll receive a handle to your job when you schedule it.
void Update()
{
    moveHandle.Complete();

    if (Input.GetKeyDown("space"))
        AddShips(enemyShipIncremement);

    moveJob = new MovementJob()
    {
        moveSpeed = enemySpeed,
        topBound = topBound,
        bottomBound = bottomBound,
        deltaTime = Time.deltaTime
    };

    moveHandle = moveJob.Schedule(transforms);

    JobHandle.ScheduleBatchedJobs();
}

void AddShips(int amount)
{
    moveHandle.Complete();

    transforms.capacity = transforms.length + amount;

    for (int i = 0; i < amount; i++)
    {
        float xVal = Random.Range(leftBound, rightBound);
        float zVal = Random.Range(0f, 10f);

        Vector3 pos = new Vector3(xVal, 0f, zVal + topBound);
        Quaternion rot = Quaternion.Euler(0f, 180f, 0f);

        var obj = Instantiate(enemyShipPrefab, pos, rot) as GameObject;

        transforms.Add(obj.transform);
    }
}
Code sample showing C# Job System + Classic Update() and AddShips() implementations
Now you need to keep track of our job and make sure that it completes and reschedules with fresh data each frame. The moveHandle.Complete() line above guarantees that the main thread doesn't continue execution until the scheduled job is complete. Using this job handle, the job can be prepared and dispatched again. Once moveHandle.Complete() returns, you can proceed to update our MovementJob with fresh data for the current frame and then schedule the job to run again. While this is a blocking operation, it prevents a job from being scheduled while the old one is still being performed. Also, it prevents us from adding new ships while the ships collection is still being iterated on. In a system with many jobs we may not want to use the Complete() method for that reason.
When you schedule MovementJob at the end of Update(), you also pass it the list of all the transforms to be updated from ships, accessed through the TransformAccessArray. When all jobs have completed setup and schedule, you can dispatch all jobs using the JobHandle.ScheduleBatchedJobs() method.
The AddShips() method is similar to the previous implementation with a few small exceptions. It double-checks that the job has completed in the event the method is called from somewhere else. That shouldn't happen, but better safe than sorry! Also, it saves off a reference to the newly spawned transforms in the TransformAccessArray member. Let's see how the work distribution and performance look.
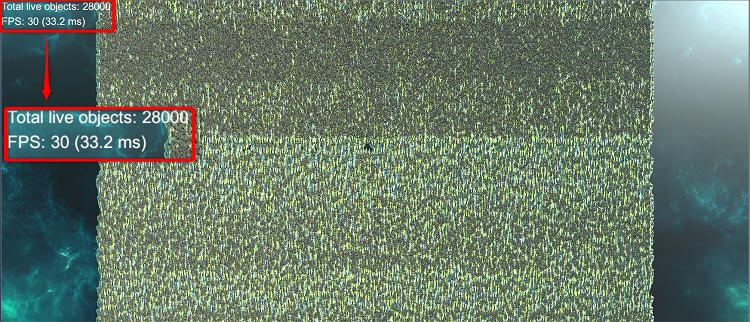
Figure 12. Using the C# Job System, we can nearly double the number of objects on the screen from the classic system in the same frame time (~33 ms).

Figure 13. C# job system + classic Profiler View.
Now you can see that the Movement and UpdateBoundingVolumes jobs are taking about 4 ms per frame. Much better! Also note that there are nearly double the number of ships on the screen as the classic system!
We can still do better, however. This current method is still limited by a few things:
- GameObject instantiation is a lengthy process involving system calls for memory allocation.
- Transforms are still allocated in a random location in the heap.
- Transforms still contain unused data, polluting cache lines and making memory access less efficient.
3. Entity Component System Using Jobs
This is where things get just a little bit more complex, but once you understand it you'll know it forever. Let's tackle this by looking at our new enemy ship prefab first:
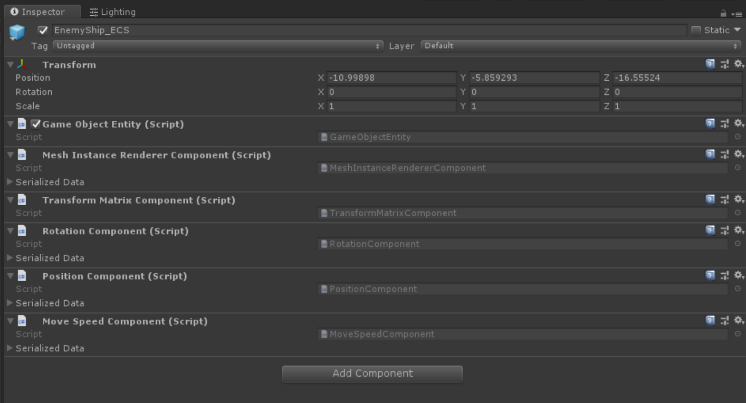
Figure 14. C# job system + Entity Component System ship prefab.
You'll probably notice a few new things. One, there are no built-in Unity components attached, aside from the Transform component (which isn't used). This prefab now represents a template that we will use to generate entities rather than a GameObject with components. The idea of a prefab doesn't exactly apply to the new system in the same way you are used to. You can look at it as a convenient container of data for your entity. This could all be done purely in script as well. You also now have a GameObjectEntity.cs script attached to the prefab. This required component signifies that this GameObject will be treated like an entity and use the new entity component system. You see that the object now also contains a RotationComponent, a PositionComponent, and a MoveSpeedComponent. Standard components such as position and rotation are built-in and don't need to be explicitly created, but MoveSpeed does. On top of that, we have a MeshInstanceRendererComponent, which exposes a public member a material reference that supports GPU instancing, which is required for the new entity component system. Let's see how these tie into the new system.
using System;
using Unity.Entities;

namespace Shooter.ECS
{
    [Serializable]
    public struct MoveSpeed : IComponentData
    {
        public float Value;
    }

    public class MoveSpeedComponent : ComponentDataWrapper<MoveSpeed> { }
}
Code sample showing how to set up MoveSpeed data (IComponentData) for the Entity Component System
When you open one of these data scripts, you see that each structure inherits from IComponentData. This flags the data as a type to be used and tracked by the entity component system and allows the data to be allocated and packed in a smart way behind the scenes while you get to focus purely on your gameplay code. The ComponentDataWrapper class allows you to expose this data to the inspector window of the prefab it's attached to. You can see that the data you've associated with this prefab represents only the parts of the Transform component required for basic movement (position and rotation) and the movement speed. This is a clue that you won't be using Transform components in this new workflow.
Let's now look at the new version of the GameplayManager script:
using Unity.Collections;
using Unity.Entities;
using Unity.Mathematics;
using Unity.Transforms;
using UnityEngine;

namespace Shooter.ECS
{
    public class GameManager : MonoBehaviour
    {
        EntityManager manager;


        void Start()
        {
            manager = World.Active.GetOrCreateManager<EntityManager>();
            AddShips(enemyShipCount);
        }

        void Update()
        {
            if (Input.GetKeyDown("space"))
                AddShips(enemyShipIncremement);
        }

        void AddShips(int amount)
        {
            NativeArray<Entity> entities = new NativeArray<Entity>(amount, Allocator.Temp);
            manager.Instantiate(enemyShipPrefab, entities);

            for (int i = 0; i < amount; i++)
            {
                float xVal = Random.Range(leftBound, rightBound);
                float zVal = Random.Range(0f, 10f);
                manager.SetComponentData(entities[i], new Position { Value = new float3(xVal, 0f, topBound + zVal) });
                manager.SetComponentData(entities[i], new Rotation { Value = new quaternion(0, 1, 0, 0) });
                manager.SetComponentData(entities[i], new MoveSpeed { Value = enemySpeed });
            }
            entities.Dispose();
        }
    }
}
Code sample showing C# Job System + Entity Component System Update() and AddShips() implementations
We've made a few changes to enable the entity component system to use the script. Notice you now have an EntityManager variable. You can think of this as your conduit for creating, updating, or destroying entities. You'll also notice the NativeArray<Entity> type constructed with the amount of ships to spawn. The manager's instantiate method takes a GameObject parameter and the NativeArray<Entity> setup that specifies how many entities to instantiate. The GameObject passed in must contain the previously mentioned GameObjectEntity script along with any needed component data. The EntityManager creates entities based off of the data components on the prefab while never actually creating or using any GameObjects.
After you create entities, iterate through all of them and set each new instance's starting data. This example sets the starting position, rotation, and movement speed. Once that's done, the new data containers, while secure and powerful, must be freed to prevent memory leaks. The movement system can now take over the show.
using Unity.Collections;
using Unity.Entities;
using Unity.Jobs;
using Unity.Mathematics;
using Unity.Transforms;
using UnityEngine;

namespace Shooter.ECS
{
    public class MovementSystem : JobComponentSystem
	{
        [ComputeJobOptimization]
        struct MovementJob : IJobProcessComponentData<Position, Rotation, MoveSpeed>
        {
            public float topBound;
            public float bottomBound;
            public float deltaTime;

            public void Execute(ref Position position, [ReadOnly] ref Rotation rotation, [ReadOnly] ref MoveSpeed speed)
            {
                float3 value = position.Value;

                value += deltaTime * speed.Value * math.forward(rotation.Value);

                if (value.z < bottomBound)
                    value.z = topBound;

                position.Value = value;
            }
        }

        protected override JobHandle OnUpdate(JobHandle inputDeps)
        {
            MovementJob moveJob = new MovementJob
            {
                topBound = GameManager.GM.topBound,
                bottomBound = GameManager.GM.bottomBound,
                deltaTime = Time.deltaTime
            };

            JobHandle moveHandle = moveJob.Schedule(this, 64, inputDeps);

            return moveHandle;
        }
    }
}
Code sample showing C# Job System + Entity Component MovementSystem implementation
Here's the meat and potatoes of the demo. Once entities are set up, you can isolate all relevant movement work to your new MovementSystem. Let's cover each new concept from the top of the sample code to the bottom.
The MovementSystem class inherits from JobComponentSystem. This base class gives you the callbacks you need to implement, such as OnUpdate(), to keep all of the system-related code self-contained. Instead of having an uber-GameplayManager.cs, you can perform system-specific updates in this neat package. The idea of JobComponentSystem is to keep all data and lifecycle management contained in one place.
<ECS/ECS_MovementJobStruct.cs>
The MovementJob structure encapsulates all information needed for your job, including the per-instance data, fed in via parameters in the Execute function, and per-job data via member variables that are refreshed via OnUpdate(). Notice that all per-instance data is marked with the [ReadOnly] attribute except the position parameter. That is because in this example we are only updating the position each frame. The rotation and movement speed of each ship entity is fixed for its lifetime. The actual Execute function contains the code that operates on all of the required data.
You may be wondering how all of the position, rotation, and movement speed data is being fed into the Execute function invocations. This happens automatically for you behind the scene. The entity component system is smart enough to automatically filter and inject data for all entities that contain the IComponentData types specified as template parameters to IJobProcessComponentData.
using Unity.Collections;
using Unity.Entities;
using Unity.Jobs;
using Unity.Mathematics;
using Unity.Transforms;
using UnityEngine;

namespace Shooter.ECS
{
    public class MovementSystem : JobComponentSystem
	{

        // ...
        // Movement Job
        // ...

        protected override JobHandle OnUpdate(JobHandle inputDeps)
        {
            MovementJob moveJob = new MovementJob
            {
                topBound = GameManager.GM.topBound,
                bottomBound = GameManager.GM.bottomBound,
                deltaTime = Time.deltaTime
            };

            JobHandle moveHandle = moveJob.Schedule(this, 64, inputDeps);

            return moveHandle;
        }
    }
}
Code sample showing C# Job System OnUpdate() method implementation
The OnUpdate() method below MovementJob is also new. This is a virtual function provided by JobComponentSystem so that you can more easily organize per-frame setup and scheduling within the same script. All it's doing here is:
- Setting up the MovementJob data to use freshly injected ComponentDataArrays (per-entity-instance data)
- Setting up per-frame data (time and bounds)
- Scheduling the job
Voila! Our job is set up and completely self-contained. The OnUpdate() function will not be called until you first Instantiate entities containing this specific group of data components. If you decided to add some asteroids with the same movement behavior, all you would need to do is add those three same Component scripts containing the data types on the representative GameObject that you instantiate. The important thing to know here is that the MovementSystem doesn't care what the entity is that it's operating on. It only cares if the entity contains the types of data it cares about. There are also mechanisms available to help control life cycle.
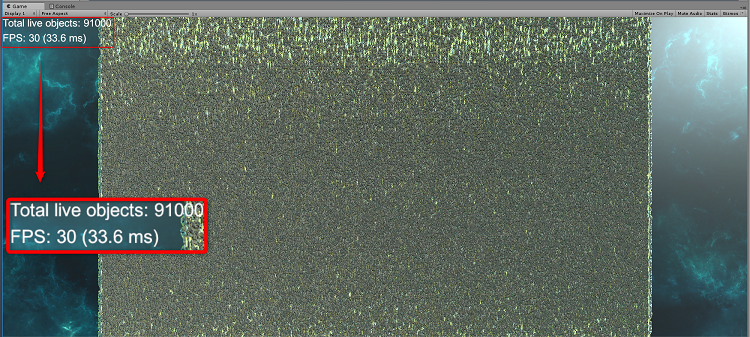
Figure 15. Running at the same frame time of ~33 ms, we can now have 91,000 objects on screen at once using the entity component system.
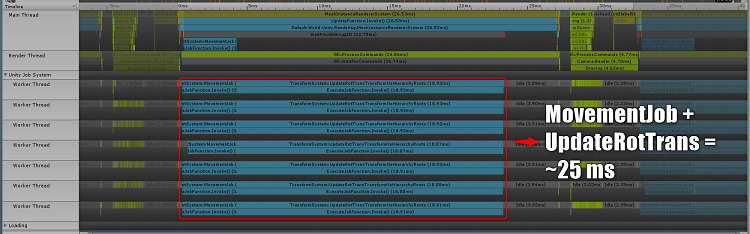
Figure 16. With no dependencies on classic systems, the entity component system can use the available CPU time to track and update more objects.
As you can see in the profiler window above, you've now lost the transform update method that was taking up quite a bit of time on the main thread in the C# job system and Classic combo section shown above. This is because we are completely bypassing the TransformArrayAccess conduit we had previously and directly updating position and rotation information in MovementJob and then explicitly constructing our own matrix for rendering. This means there is no need to write back to a traditional Transform component. Oh yeah, and we've forgotten about one tiny detail the Burst compiler.
Burst Compiler
Now, we'll take exactly the same scene, do absolutely nothing to the code beyond keeping the [ComputeJobOptimization] attribute above our job structure to allow the Burst compiler to pick up the job and we'll get all these benefits. Just make sure that the Use Burst Jobs setting is selected in the Jobs dropdown window shown below.
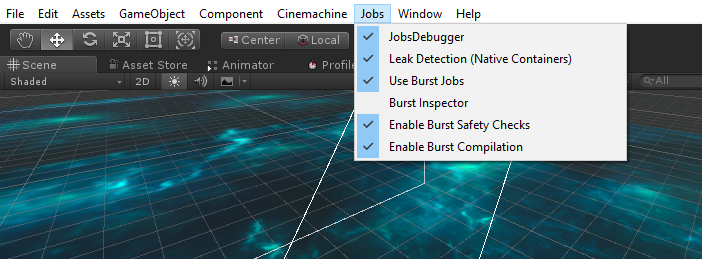
Figure 17. The dropdown allowing the use of Burst Jobs.

Figure 18. By simply allowing Burst Jobs to optimize jobs with the [ComputeJobOptimization] attribute, we go from 91,000 objects on screen at once up to 150,000 with much higher potential.
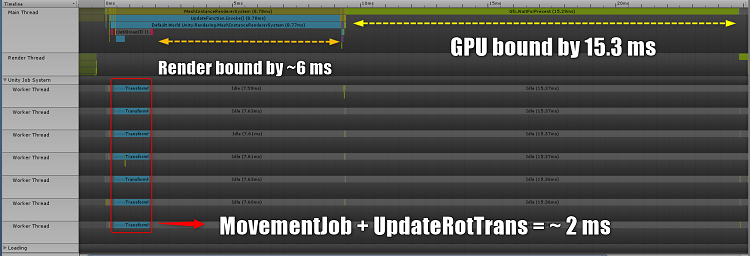
Figure 19. In this simple example, the total time to complete all MovementJob and UpdateRotTransTransform tasks went from 25 ms down to only 2 ms completion time. We can now see that the bottleneck has shifted from the CPU to the GPU, as the cost of rendering all of these tiny ships on the GPU now outweighs the cost of tracking, updating, and render command generation / dispatch on the CPU side.
As you can see from the screenshot, we've got 59,000 more entities on screen at the same exact frame rate. For FREE. That's because the Burst compiler was able to perform some arcane magic on the code in the Execute() function, leveraging new tightly packed data layout and the latest architecture enhancements available on modern CPUs behind the scenes. As mentioned above, this arcane magic actually takes the form of auto-vectorization, optimized scheduling, and better use of instruction-level parallelism to reduce data dependencies and stalls in the pipeline.
Conclusion
Take a few days to soak in all of these new concepts and they'll pay dividends on subsequent projects. The power saved through the powerful gains reaped in these new systems are a currency that can be spent or saved.
Table 1. Optimizations resulted in significant improvements, such as the number of objects supported on the screen and update costs.
| Classic | C# Job System + Classic | C# Job System + Entity Component System (Burst Off) | C# Job System + Entity Component System (Burst On) | |
|---|---|---|---|---|
| Total Frame Time | ~ 33 ms / frame | ~ 33 ms / frame | ~ 33 ms / frame | ~ 33 ms / frame |
| # Objects on Screen | 16,500 | 28,000 | 91,000 | 150,000+ |
| MovementJob Time Cost | ~ 2.5 ms / frame | ~ 4 ms / frame | ~ 4 ms / frame | ~ < 0.5 ms / frame |
| CPU Rendering Time Cost To Draw All Ships | 10 ms / frame | 18.76 ms / frame | 18.92 job to calculate rendering matrices + 3 ms Rendering Commands = 21.92 ms / frame | ~ 4.5 ms job to calculate rendering matrices + 4.27 ms Rendering Commands = 8.77 ms / frame |
| Time GPU bound | ~ 0 ms / frame | ~ 0 ms / frame | ~ 0 ms / frame | ~ 15.3 ms / frame |
If you're targeting a mobile platform and want to significantly reduce the battery consumption factor in player retention, just take the gains and save them. If you're making a high-end desktop experience catering to PCs, use those gains to do something special with cutting edge simulation or destruction tech to make your environments more dynamic, interactable, and immersive.
Resources
Unity Entity Component System Samples
Unity Entity Component System Forums
Unity Entity Component System Documentation
"