Background
This document provides context for the SR-IOV_DPDK_Hands-on_Lab project on the SDN-NFV-Hands-on-Samples GitHub repository. These files were used in two hands-on labs at the IEEE NFV SDN conference in Palo Alto, California on November 7, 2016. The first hands-on lab focused on configuring Single Root IO Virtualization (SR-IOV); the second described how to configure an NFV use case for Open vSwitch* (OvS) with Data Plane Development Kit (DPDK). Instructions on how to run the labs can be found in the presentations that we used — SR-IOV-HandsOn-IEEE.pdf and OVS-DPDK-Tutorial-IEEE.pdf respectively. Presentations were delivered on site and course attendees asked that we publish the scripts used during the presentation. We have modified the presentations to make the labs useful to those who weren't present at the event.
The virtual machines that attendees used during the lab were hosted on a remote cluster; the host machine hardware is no longer available, but a copy of the virtual machine can be downloaded here. (Note, the file is very large: 13GB.)
Introduction
This document and the accompanying script repository are for those who want to learn how to:
- Automate setting up SR-IOV interfaces with DPDK in a Linux* libvirt/KVM environment
- Use Open vSwitch* (OvS) and DPDK in a nested VM environment
- Provision that configuration into a cluster or datacenter
Files and scripts that were used to provision the labs onto the compute nodes and virtual machines are highly customized for the lab environment and may be of limited use to those who are interested solely in DPDK and SR-IOV. Nevertheless, I’ve published them in the repository for those who may be interested in the provisioning process. These scripts are not intended for use in a production environment.
Cluster Configuration
The training cluster had 14 hardware compute nodes, each with the following configuration:
- 64 GB RAM
- Intel® Xeon® CPU E5-2697 v2 at 2.70 GHz (48 CPUs: 2 socket, 12 core, hyper-threading on)
- 500 GB hard drive
- One Intel® Ethernet Controller XL710 (4x10 GB) for lab communication
- Additional 1 GB NIC for management and learner access
Additionally, each compute node had the following software configuration. In our training cluster, the compute nodes and Host VM systems were running Ubuntu* 16.04, and the nested Tenant and VNF VMs were running Fedora* 23. You may have to alter the instructions below to suit your Linux distribution. Distribution-agnostic steps to enable these features are (hopefully) listed in the accompanying SR-IOV and OvS + DPDK presentations, but here is the high-level overview:
- Virtualization switches enabled in the BIOS (for example, VT-d). Varies by machine and OEM.
- IOMMU enabled at kernel initialization. Typically, this involves two steps:
- Add intel_iommu=on to your kernel boot parameters. On Ubuntu 16.04, add that phrase to GRUB_CMDLINE_LINUX_DEFAULT in /etc/default/grub.
- Update grub.
- Nested virtualization enabled:
- #rmmod kvm-intel
- #echo 'options kvm-intel nested=y' >> /etc/modprobe.d/dist.conf
- #modprobe kvm-intel
- A macvtap bridge on eno1. See Scott Lowe's blog Using KVM with Libvirt and macvtap Interfaces for more information. This step isn’t necessary to run either the SR-IOV or the OvS DPDK labs; it was necessary to allow learners to SSH from the cluster jump server directly into their assigned Host, Tenant, and VNF VMs.) Disregard all references to the macvtap bridge if you're using the downloadable VM, but the configuration might be useful if you wish to set up the hardware configuration used at the hands-on labs.
- The following Ubuntu software packages are needed to run the various scripts in this package. The names of these packages will obviously vary based on distribution:
- libvirt-bin: Provides virsh
- virtinst: Provides virt-clone
- libguestfs-tools: Provides virt-sysprep and guestfish
- lshw: Provides lshw
- python-apt: Provides Python* wrapper for apt so Ansible* can use apt
- python-selinux: Allows Ansible to work with SELinux
- ansible: Provides all Ansible commands and infrastructure
- python-libvirt: Provides the Python wrapper to libvirt
- libpcap-dev: Required to run pktgen
- The following software was installed from tarball on either the compute node, or the VMs:
- qemu-2.6.0: Used on Host VM to launch nested Tenant VM and VNF VM
- pktgen-3.0.14: Used in both SR-IOV and OvS + DPDK lab
- openvswitch-2.6.0: Used in OvS + DPDK lab
- dpdk-16.07: Used in both SR-IOV and OvS + DPDK lab
- libhivex0_1.3.13-1build3_amd64.deb: Required for libguestfs-tools
- libhivex-bin_1.3.13-1build3_amd64.deb: Required for libguestfs-tools
Each compute node had four KVM virtual machines on it, and each virtual machine had two nested VMs in it. Because of this, the first level of VMs were named HostVM-## (where ## is a two-digit number from 00 to 55), and the nested VMs were called TenantVM-## and VNF-VM-## (where ## is a number from 00 to 55 corresponding to the ## of the Host VM). For more detailed information about the Host VM virtual hardware configuration, see the HostVM-Master.xml KVM domain definition file in the repository. For more information about the Tenant VM and VNF VM configuration, see the QEMU launch command line for them in start_Tenant-VM.sh and start_VNF-VM.sh.
Because there was only one Intel Ethernet Controller XL710 (total of 4x10GB ports) in each compute node, and the lab involved connecting port 0 to port 1 and port 2 to port 3 in loopback mode, only half of the virtual machines were used during the SR-IOV hands-on lab. Note that the Intel Ethernet Controller XL710 supports up to 64 virtual functions per port (256 total on the four-port card). However, because the original intent of the lab was to compare the performance of virtual and physical functions, I chose to enable only one virtual function per physical port. For arbitrary reasons, only the even-numbered Host VMs (for example, HostVM-00, HostVM-02, … HostVM-54) were used during the SR-IOV hands-on lab. All Host VM systems were used during the Open vSwitch + DPDK hands-on lab. See Figure 1.
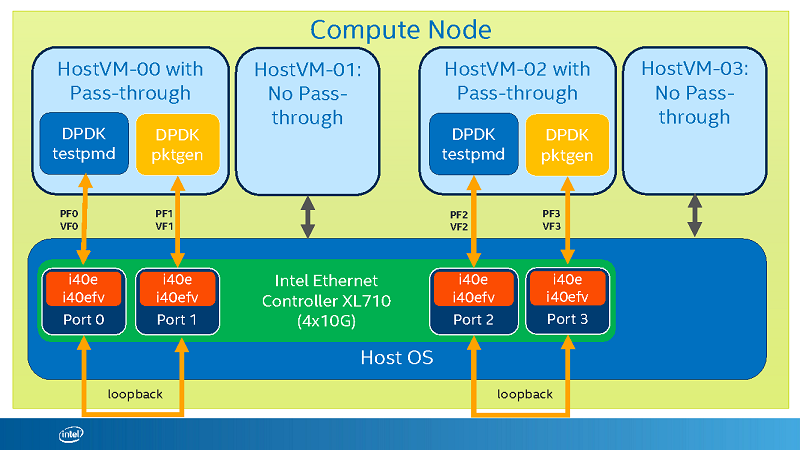
Figure 1: SR-IOV Hands-on: Compute Node Configuration
Quick Guide
The scripts and files in this repository can be classified into three groups. The first group is the files that were used at the IEEE NFV SDN conference for the SR-IOV Hands-on Lab. The second group was used at the same conference for the Open vSwitch + DPDK Hands-on Lab. The third classification of scripts and files is for everything that was necessary to provision these two labs across 14 compute nodes, 56 virtual machines, and 112 nested virtual machines. If you are reading this article, I suspect you are trying to learn how to do a specific task associated with these labs. Here is a quick guide that will help you find what you are looking for.
SR-IOV Hands-on Lab—Managing the Interfaces
Enabling an SR-IOV NIC in a KVM/libvirt virtual machine involves the following high-level tasks:
- Add a NIC that supports SR-IOV to a compute node that supports SR-IOV.
- Enable virtualization in the BIOS.
- Enable input output memory management unit (IOMMU) in the OS/VMM kernel.
- Initialize the NIC SR-IOV virtual functions.
- Create a libvirt network using the SR-IOV virtual functions.
- Insert an SR-IOV NIC into the VM and boot the VM.
- Shut down the VM and remove the SR-IOV NIC from the VM definition.
Tasks 1–3 were done prior to the lab. More details about these steps can be found in the SR-IOV-HandsOn-IEEE.pdf presentation. Tasks 4–7 were done live in the lab, and scripts to accomplish those steps are listed below together with an additional script to clean up previous runs through the lab.
Clean up Previous Runs Through the Lab
Initialize the NIC SR-IOV Virtual Functions
Create a libvirt Network Using the SR-IOV Virtual Functions
- cn_02_load_vfs_into_libvirt.sh
- load_vfs_into_libvirt.yaml
- 02_load_vfs_into_libvirt.sh
- sr-iov-networks
Insert an SR-IOV NIC into the VM and Boot the VM
Automating the insertion of the SR-IOV NICs and scaling this across the compute nodes and VMs was by far the biggest obstacle in preparing for the SR-IOV hands-on lab. Libvirt commands that I expected to work, and that would have easily been scripted, just didn’t work with SR-IOV resources. Hopefully, something here will make your life easier.
- cn_03_insert_vfs_into_vm.sh
- insert_sr-iov_nics.yaml
- insert_sr-iov_nics.py
- VMManager.py
- startGuestVMs.py
Shut Down the VM and Remove an SR-IOV NIC from the VM
- cn_04_remove_vf_from_vm.sh
- remove_sr-iov_nics.yaml
- remove_sr-iov_nics.py
- shutdownGuestVMs.py
- VMManager.py
SR-IOV Hands-on Lab—Learner Scripts
The SR-IOV lab had the following steps with numbered scripts that indicated the order in which they should be run. The learners ran these scripts inside the Host VM systems after the SR-IOV NICs had been inserted.
Free up Huge Page Resources for DPDK
Build DPDK and Start the Test Applications
OvS DPDK NFV Use Case Hands-on Lab
The DPDK hands-on lab had these high-level steps:
- Initialize Open vSwitch and DPDK on the Host VM and add flows.
- Start the nested VNF VM and initialize DPDK.
- Start the nested Tenant VM and pktgen in the Tenant VM.
- Edit iofwd.c and run testpmd in the VNF VM.
- Clean up the DPDK lab resources.
Initialize Open vSwitch and DPDK on the Host VM and add Flows
Start the Nested VNF VM and Initialize DPDK
Start the Nested Tenant VM and pktgen in the Tenant VM
Edit iofwd.c and run testpmd in the VNF VM
Clean up the DPDK Lab Resources
Description of Files in the Repository
What follows is a description of the files in the repository. Because the text here is taken from comments in the code, you can also consult the scripts directly. To give you a visual of how the files in the repository are organized, here is a screenshot of the root directory with all subfolders expanded:
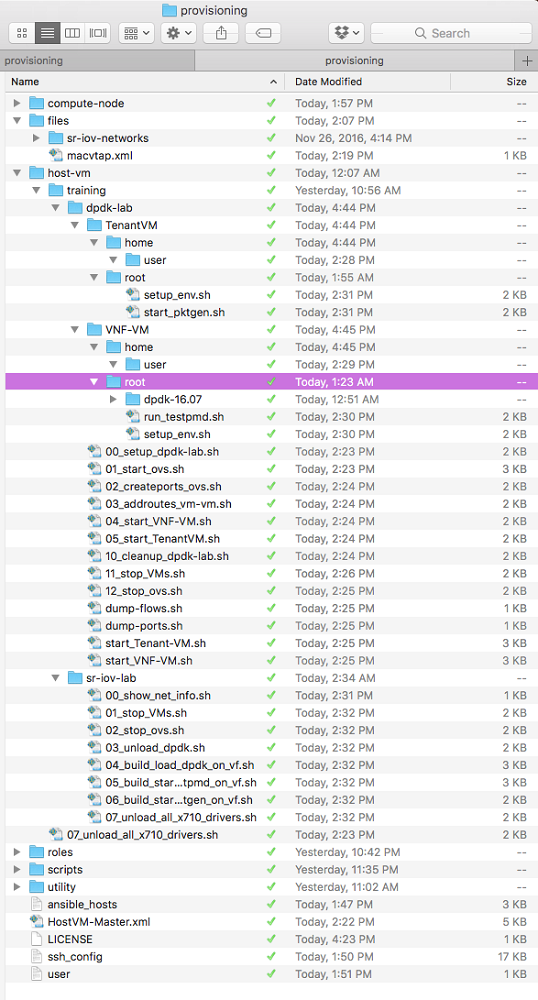
Provisioning Root Directory
The provisioning directory is the root directory for all files used in the SR-IOV and OvS DPDK Hands-on Labs.
- HostVM-Master.xml: This file is the KVM domain definition of the first-level virtual machine that was used in the lab. A few things to note about this machine:
- The guest expects to be allocated 12 GB of RAM from the compute node. If the compute node does not have sufficient memory, the VM will not initialize.
- The VM expects eight virtual CPUs, running in pass-through mode. Note the topology in the <cpu> tag. The default libvirt configuration is to map the eight CPUs from the compute node to eight sockets in the guest; however, this is not ideal for DPDK performance. With <topology sockets='1' cores='8' threads='1'/>, we have a virtual machine with eight cores in one socket, and no hyper-threading. Ideally, these resources would be directly mapped to underlying CPU hardware (that is, the VM would get eight cores from the same socket), but this was not true in our setup.
- The VM expects the image to be located at /var/lib/libvirt/images/HostVM-Master.qcow2.
- There are two non-SR-IOV NICs in each image.
- Source network: default. This NIC is attached to the default libvirt network/bridge. In the VM, this NIC is assigned the ens3 interface and obtains its IP address dynamically from the KVM VMM.
- Source network: macvtap-net. This NIC expects a network called macvtap-net to be active on the compute node. In the VM, it is assigned the ens8 interface, and its IP address is assigned statically. (See /etc/network/interfaces in the HostVM image and Scott Lowe’s blog on using macvtap with kvm. This NIC is not necessary for the lab to work, but it was necessary for communication within the lab cluster, and to allow users to directly communicate with the Host VM from the cluster jump server.). Disregard this network if you are working with the downloadable VM.
- No pass-through hostdev NICs are in the image by default. They are added by scripts.
- ansible_hosts: This file contains information about and the Ansible inventory of compute nodes and VMs in the cluster. For more information see see the Ansible documentation.
- user: This little file is very helpful (albeit insecure) when copied into the /etc/sudoers.d directory. It allows the user with the username ‘user’ to have sudo access without a password. In the SDN-NFV cluster, the primary user on all Host VM and nested Tenant VM and VNF VM instances was ‘user’.
- ssh_config: This file is a concatenation of information generated at the end of the cloneImages.sh script. Its contents were copied into the /etc/ssh/ssh_config file on the cluster jump server, and it allowed students to SSH directly into their assigned Host VM, Tenant VM and VNF VM directly from the jump server. The primary thing to note in this file is the static IP addresses associated with the Host VM images. These static IP addresses were assigned during the VM cloning process (see cloneImages.sh), and they were attached to the macvtap NIC in each Host VM instance. The Tenant VM and VNF VM IP addresses are the same for every instance. You will not use this script if you are working with the downloadable VM.
Compute-node
The compute-node directory contains scripts and files that were copied to and run on each compute node in the cluster.
- compute-node/00_cleanup_sr-iov.sh: This script shuts down the networks that are using SR-IOV and unloads the SR-IOV virtual functions (VF) from the compute node kernel. It assumes that the four ports on the Intel Ethernet Controller XL710 NIC have been assigned interfaces enp6s0f0-3 (PCI Bus 6, Slot 0, Function 0-3). To run it across all compute nodes, use the utility script found at utility/cn_00_cleanup_sr-iov.sh.
- compute-node/01_create_vfs.sh: This script automates the host device (compute node) OS parts of creating the SR-IOV NICs. It creates only one virtual function for each of the four ports on the Intel Ethernet Controller XL710 NIC. (Note that the Intel Ethernet Controller XL710 supports up to 64 virtual functions per port (256 total on the four-port card). However, because the original intent of the lab was to compare the performance of virtual and physical functions, I chose to enable only one virtual function per physical port.) It assumes that the four ports have been assigned interfaces enp6s0f0-3 (PCI Bus 6, Slot 0, Function 0-3). To run it across all compute nodes, use the utility script found at utility/cn_01_create_vf.sh.
- compute-node/02_load_vfs_into_libvirt.sh: This script creates pools of libvirt networks on the SR-IOV functions that have been defined in the previous step. It assumes that the XML files sr-iov-port0-3.xml are already present at $SR_IOV_NET_FILE_PATH. To run this script across all compute nodes, use the utility script found at utility/cn_02_load_vfs_into_libvirt.sh.
Host-vm
The host-vm directory contains the scripts that were intended to be run on the 56 first-level guest machines in the cluster. The moniker Host VM is an oxymoron, but came from the fact that originally these VMs were hosts to the nested VNF VMs and Tenant VMs used in the DPDK hands-on lab. Most of the scripts in this directory and in its subdirectories were designed to be run by the learners during the lab.
- host-vm/07_unload_all_x710_drivers.sh: This script verifies that the caller is root, and then unloads from the kernel all drivers for the Intel Ethernet Controller XL710 virtual function (both kernel and DPDK) in the Host VM. It also unmounts the huge pages that DPDK was using. This script can be called during the lab by each learner, or the instructor can call it on each Host VM by using the provisioning-master/utility/hvm_07_unload_all_x710_drivers.sh on the Ansible controller.
host-vm/training
The training directory contains two subfolders: dpdk-lab and sr-iov-lab.
host-vm/training/dpdk-lab
The dpdk-lab folder contains all of the scripts and files used during the DPDK hands-on lab with the exception of the Tenant and VNF VM images, which were located at /home/usr/vm-images, and are not included with this package. However, the scripts that were used in the nested Tenant and VNF VMs are included in the Tenant VM and VNF VM sub-folders, respectively.
- host-vm/training/dpdk-lab/00_setup_dpdk-lab.sh: This script is optional and runs the following scripts, simplifying the DPDK lab setup:
- 01_start_ovs.sh
- 02_createports_ovs.sh
- 03_addroutes_vm-vm.sh
- 04_start_VNF-VM.sh
- 05_start_TenantVM.sh
- host-vm/training/dpdk-lab/01_start_ovs.sh: This script cleans up any existing Open vSwitch processes and resources, and then launches Open vSwitch with DPDK using one 1-GB huge page.
- host-vm/training/dpdk-lab/02_createports_ovs.sh: This script creates the Open vSwitch bridge br0 and adds four DPDK enabled vhost-user ports to the bridge.
- host-vm/training/dpdk-lab/03_addroutes_vm-vm.sh: This script clears any existing flows, sets traffic flows in the following pattern, and then dumps the flows for debugging purposes:
- In port 2, out port 3
- In port 3, out port 2
- In port 1, out port 4
- In port 4, out port 1
- host-vm/training/dpdk-lab/04_start_VNF-VM.sh: This script launches the VNF VM using the start_VNF-VM.sh script in a background screen and then prints the IP address of the nested VM to stdout.
- host-vm/training/dpdk-lab/05_start_TenantVM.sh: This script launches the Tenant VM using the start_Tenant-VM.sh script in a background screen and then prints the IP address of the nested VM to stdout.
- host-vm/training/dpdk-lab/10_cleanup_dpdk-lab.sh: This script is optional and runs the following scripts to clean up the dpdk-lab and free its resources:
- 11_stop_VMs.sh
- 12_stop_ovs.sh
- host-vm/training/dpdk-lab/11_stop_VMs.sh: This script starts an SSH session into the nested VNF and Tenant VMs and runs the 'shutdown -h now' command to shut them down gracefully. Note: This script may not be run as root.
- host-vm/training/dpdk-lab/12_stop_ovs.sh: This script kills all Open vSwitch processes and cleans up all databases and shared memory. It then removes all dpdk drivers from the kernel and inserts i40e and ixgbe drivers into the kernel. Finally, it unmounts the 1 GB huge pages at /mnt/huge.
- host-vm/training/dpdk-lab/dump-flows.sh: Displays the Open vSwitch flows on br0 every 1 second.
- host-vm/training/dpdk-lab/dump_ports.sh: Displays the Open vSwitch ports on br0 every 1 second.
- host-vm/training/dpdk-lab/start_Tenant-VM.sh: This script launches the Tenant VM using the Fedora 23 image found at /home/usr/vm-images/Fed23_TenantVM.img. The image is launched with 4 GB of RAM on 4-1 GB huge pages from the Host VM. It has three NICs, two of which use the DPDK-enabled vhostuser ports from Open vSwitch, and the remaining NIC is attached to a Tun/Tap bridge interface and assigned the static IP address 192.168.120.11 by the OS upon boot.
- host-vm/training/dpdk-lab/start_VNF-VM.sh: This script launches the Tenant VM using the Fedora 23 image found at /home/usr/vm-images/Fed23_VNFVM.img. The image is launched with 4 GB of RAM on 4-1 GB huge pages from the Host VM. It has three NICs, two of which use the DPDK-enabled vhostuser ports from Open vSwitch, and the remaining NIC is attached to a Tun/Tap bridge interface and assigned the static IP address 192.168.120.10 by the OS upon boot.
While the nested Tenant and VNF VM images are not included with this distribution, the key files from the DPDK hands-on lab are. The files of interest from the Tenant VM are located in the Tenant VM folder, and the files of interest from the VNF VM are located in the VNF VM folder.
- host-vm/training/dpdk-lab/VNF-VM/home/user/.bash_profile: This is the .bash_profile from the VNF VM /home/user directory. It exports the following variables and then calls /root/setup_env.sh:
- RTE_SDK: This is the location of DPDK. RTE stands for real time environment
- RTE_TARGET: This is the type of DPDK build (64-bit native Linux app using gcc)
- host-vm/training/dpdk-lab/VNF-VM/root/setup_env.sh: This script mounts the 1 GB huge pages that were allocated at system boot. Then it loads the igb_uio driver into the kernel and then binds PCI devices 00:04.0 and 00:05.0 (the DPDK-enabled vhostuser ports attached to Open vSwitch in the Host VM) to the igb_uio DPDK driver.
- host-vm/training/dpdk-lab/VNF-VM/root/run_testpmd.sh: This script launches the working version of testpmd in case the learner wants to see how the lab is supposed to work. It locks DPDK to cores 2 and 3, and gives DPDK 512 MB of memory per socket. Then it starts testpmd with 64-byte packet bursts, and 2048 tx and rx descriptors.
- host-vm/training/dpdk-lab/VNF-VM/root/dpdk-16.07/app/testpmd/iofwd.c: This is the source code file that contains the DPDK hands-on lab exercises. They are clearly marked with the phrase DPDK_HANDS_ON_LAB. Each step in the lab has hints, and the final source code solution is contained in the comments, thus allowing each learner to choose how much research to do in order to succeed.
- host-vm/training/dpdk-lab/TenantVM/home/user/.bash_profile: This is the .bash_profile from the Tenant VM /home/user directory. It exports the following variables, calls /root/setup_env.sh, and then launches pktgen using /root/start_pktgen.sh:
- RTE_SDK: This is the location of DPDK. RTE stands for real time environment
- RTE_TARGET: This is the type of DPDK build (64-bit native Linux app using gcc)
- host-vm/training/dpdk-lab/TenantVM/root/setup_env.sh: This script mounts the 1 GB huge pages that were allocated at system boot. Then it loads the igb_uio driver into the kernel and then binds PCI devices 00:04.0 and 00:05.0 (the DPDK-enabled vhostuser ports attached to Open vSwitch in the Host VM) to the igb_uio DPDK driver.
- host-vm/training/dpdk-lab/TenantVM/root/start_pktgen.sh: This script launches pktgen. The parameters allow DPDK to run on CPUs 2–6, allocate 512 MB of memory per socket, and specify that the huge page memory for this process should have a prefix of 'pg' to distinguish it from other applications that might be using the huge pages. The pktgen parameters specify that it should run in promiscuous mode and that:
- Core 2 should handle port 0 rx
- Core 4 should handle port 0 tx
- Core 3 should handle port 1 rx
- Core 5 should handle port 1 tx
host-vm/training/sr-iov-lab
The sr-iov-lab folder contains all of the scripts that were used during the SR-IOV hands-on lab.
- host-vm/training/sr-iov-lab/00_show_net_info.sh: Lists pci info filtering for the phrase 'net'.
- host-vm/training/sr-iov-lab/01_stop_VMs.sh: This script starts an SSH session into the nested VNF and Tenant VMs and runs the 'shutdown -h now' command to shut them down gracefully. Note: This script may not be run as root.
- host-vm/training/sr-iov-lab/02_stop_ovs.sh: This script kills all Open vSwitch processes and cleans up all databases and shared memory. It then removes all dpdk drivers from the kernel and inserts i40e and ixgbe drivers into the kernel. Finally, it unmounts the 1 GB huge pages at /mnt/huge.
- host-vm/training/sr-iov-lab/03_unload_dpdk.sh: This script explicitly binds the NICs at PCI addresses 00:09.0 and 00:0a.0 to the Intel® kernel drivers. This is necessary so that we can find out what MAC address has been allocated to the NIC ports.
- host-vm/training/sr-iov-lab/04_build_load_dpdk_on_vf.sh: This script builds and configures DPDK on the target PCI/SR-IOV NIC ports. It:
- Determines the MAC address for the testpmd and pktgen interfaces
- Builds DPDK
- Loads the DPDK igb_uio driver into the kernel
- Mounts the huge page memory
- Binds the SR-IOV NICS at PCI address 00:09.0 and 00:0a.0 to the DPDK igb_uio driver
- Displays the MAC addresses for the SR-IOV NICS that were just bound to DPDK so that information can be used in the following steps of the lab.
- host-vm/training/sr-iov-lab/05_build_start_testpmd_on_vf.sh: This script re-builds DPDK and then launches testpmd. It expects to have the MAC address of the pktgen Ethernet port passed as a command-line parameter. The pktgen MAC address should have been displayed at the end of the previous step. See comments in the script for more information about the testpmd and DPDK parameters.
- host-vm/training/sr-iov-lab/06_build_start_pktgen_on_vf.sh: This script re-builds DPDK and then launches pktgen. See comments below for more details about parameters.
- host-vm/training/sr-iov-lab/07_unload_all_x710_drivers.sh: This script verifies that the caller is root, and then unloads from the kernel all drivers for the Intel Ethernet Controller XL710 virtual function (both kernel and DPDK) in the Host VM. It also unmounts the huge pages that DPDK was using. This script can be called during the lab by each learner, or the instructor can call it on each Host VM by using the provisioning-master/utility/hvm_07_unload_all_x710_drivers.sh script.
Files
The files directory contains several files that were used during the SDN NFV hands-on lab.
- files/Macvtap.xml: Contains the XML definition of the libvirt macvtap network. You will not use this file if you are working with the downloadable VM.
- files/sr-iov-networks: This folder contains the XML files that defined the SR-IOV libvirt networks. (See the libvirt documentation on defining SR-IOV virtual functions.)
- files/sr-iov-networks/sr-iov-port0.xml: This file defines a pool of SR-IOV virtual function network interfaces that are attached to the enp6s0f0 physical function interface on the Intel Ethernet Controller XL710. The Intel Ethernet Controller XL710 supports up to 64 virtual function network interfaces in this pool. Libvirt exposes this pool as a virtual network from which virtual machines can allocate an SR-IOV virtual network interface by adding an interface whose source network is ‘sr-iov-port0’.
- files/sr-iov-networks/sr-iov-port1.xml: This file defines a pool of SR-IOV virtual function network interfaces that are attached to the enp6s0f1 physical function interface on the Intel Ethernet Controller XL710. The Intel Ethernet Controller XL710 supports up to 64 virtual function network interfaces in this pool. Libvirt exposes this pool as a virtual network from which virtual machines can allocate an SR-IOV virtual network interface by adding an interface whose source network is ‘sr-iov-port1’.
- files/sr-iov-networks/sr-iov-port2.xml: This file defines a pool of SR-IOV virtual function network interfaces that are attached to the enp6s0f2 physical function interface on the Intel Ethernet Controller XL710. The Intel Ethernet Controller XL710 supports up to 64 virtual function network interfaces in this pool. Libvirt exposes this pool as a virtual network from which virtual machines can allocate an SR-IOV virtual network interface by adding an interface whose source network is ‘sr-iov-port2’.
- files/sr-iov-networks/sr-iov-port3.xml: This file defines a pool of SR-IOV virtual function network interfaces that are attached to the enp6s0f3 physical function interface on the Intel Ethernet Controller XL710. The Intel Ethernet Controller XL710 supports up to 64 virtual function network interfaces in this pool. Libvirt exposes this pool as a virtual network from which virtual machines can allocate an SR-IOV virtual network interface by adding an interface whose source network is ‘sr-iov-port3’.
Utility
The utility directory contains utility scripts that simplify key tasks of the SDN NFV hands-on lab. In general, they tie together YAML files from the roles directory with scripts from the scripts directory, making it unnecessary to have to enter full Ansible command lines for repeated tasks.
- utility/aptInstall.sh: This helper script used the Ansible apt module to install packages on compute nodes and on the Host VMs, both of which ran Ubuntu 16.04. It used the aptInstall.yaml role found in ../roles. See the comments in aptInstall.yaml for more information.
- utility/cn_00_cleanup_sr-iov.sh: This script uses Ansible to copy the 00_cleanup_sr-iov.sh script from the ../compute_node directory to the compute nodes and then executes it. See the documentation in 00_cleanup_sr-iov.sh and runScript.yaml for more information.
- utility/cn_01_create_vf.sh: This script uses Ansible to copy the 01_create_vfs.sh script from the ../compute_node directory to the compute nodes and then executes it. See the documentation in 01_create_vfs.sh and runScript.yaml for more information.
- utility/cn_02_load_vfs_into_libvirt.sh: This script runs the Ansible load_vfs_into_libvirt.yaml role from ../roles on the compute_nodes. See the load_vfs_into_libvirt.yaml documentation for more information.
- utility/cn_03_insert_vfs_into_vm.sh: This script uses Ansible to list the libvirt networks on each of the compute nodes, and then executes the insert_sr-iov_nics.yaml Ansible role found in ../roles. See the documentation in insert_sr-iov_nics.yaml for more information.
- utility/cn_04_remove_vf_from_vm.sh: This script launches the remove_sr-iov_nics.yaml found in the ../roles directory, and then sleeps for 20 seconds to give each of the newly redefined domains adequate time to reboot before printing out the network bus information of each of the domains that previously had SR-IOV interfaces. See remove_sr-iov_nics.yaml documentation for more information about what that role does.
- utility/cn_change_hostvm_cpu_topology.sh: This script runs the change-hostvm-cpu-topology.yaml Ansible role found in ../roles, and then uses Ansible to run lscpu on each Host VM to verify that the CPU topology changed. See change-hostvm-cpu-topology.yaml for more information about what the role does.
- utility/hvm_07_unload_all_x710_drivers.sh: This script used the generic runScript.yaml Ansible role found in ../roles to run the 07_unload_all_x710_drivers.sh script from ../host-vm on each one of the Host VM systems. See the documentation for 07_unload_all_x710_drivers.sh for more information about what that script does. This script passes three parameters into the runScript.yaml role:
- dest_path: This variable is defined in runScript.yaml, but the command-line extra-vars definition overrides that definition. It is the directory on the Host VM into which the script should be copied before it is run.
- script_name: This is the name of the script, in this case 07_unload_all_x710_drivers.sh.
- relative_source_path: This is the location of the script relative to provisioning_master_dir, which is defined in /etc/ansible/hosts. Thus, the location of the 07_unload_all_x710_drivers.sh script is {{ provisioning_master_dir }}/host-vm.
- utility/listHostVMs.sh: A simple script that uses Ansible to call $sudo virsh list all on all of the compute_nodes to show the status of each of the Host VM systems.
- utility/pingComputeNodes.sh: A simple script that uses Ansible to ping all of the compute_nodes.
- utility/pingHostVMs.sh: A simple script that uses Ansible to ping all of the Host VM systems.
- utility/pingSR-IOVHostVMs.sh: A simple script that uses Ansible to ping all of the SR-IOV VMs. See /etc/ansible/hosts.
- utility/startHostVMs.sh: This script uses the startGuestVMs.yaml Ansible role found in ../roles to start all of the Host VMs. Then it sleeps for 20 seconds to give the VMs time to start, and then uses Ansible to list all of the Host VM systems to ascertain their status. See the ../roles/startGuestVMs.yaml for more information.
- utility/stopHostVMs.sh: This script uses the shutdownGuestVMs.yaml Ansible role found in ../roles to shut down all of the Host VMs. The role will not return from each compute node until all VMs on that system are shut down. See ../roles/shutdownGuestVMs.yaml for more information.
Roles
The roles directory contains all of the files that Ansible scripts used to provision the SR-IOV lab.
- roles/runScript.yaml: This script is a generic script that copies a specified script to a remote inventory and then executes it as root. It has several input parameters:
- provisioning_slave_dir: This is the directory on the remote node into which the script file is copied. This variable is defined in /etc/ansible/hosts.
- provisioning_master_dir: This is the Ansible root directory on the Ansible controller. This variable is defined in /etc/ansible/hosts.
- relative_source_path: This is a path relative to provisioning_master_dir in which the script file is located. This variable MUST be defined on the command line when instantiating this Ansible role.
- script_name: This is the name of the script that is found at provisioning_master_dir/relative_source_path and which will be copied to provisioning_slave_dir on the remote node and then executed. This variable MUST be defined on the command line when instantiating this Ansible role.
- roles/load_vfs_into_libvirt.yaml: This role loads the SR-IOV virtual functions into libvirt networks. It has four tasks:
- Copy the 02_load_vfs_into_libvirt.sh script to the compute node.
- Change the owner of the script to root and make it executable.
- Copy the SR-IOV libvirt network definition XML files to the compute node.
- Execute the 02_load_vfs_into_libvirt.sh script on the compute node.
This play has two input parameters:- provisioning_slave_dir: This is the directory on the remote node into which the script file is copied. This variable is defined in /etc/ansible/hosts.
- provisioning_master_dir: This is the Ansible root directory on the Ansible controller. This variable is defined in /etc/ansible/hosts.
- roles/insert_sr-iov_nics.yaml: This Ansible role prepares the compute nodes to run the insert_sr-iov_nics.py script found in ../scripts and then runs that script on the compute nodes. It copies the VMManager.py module to the remote node as well. It also prepares the compute nodes to run the startGuestVMs.py script found in ../scripts and then executes that script. See the documentation in insert_sr-iov_nics.py and startGuestVMs.py for more information. This role has two input parameters:
- provisioning_slave_dir: This is the directory on the remote node into which the script file is copied. This variable is defined in /etc/ansible/hosts.
- provisioning_master_dir: This is the Ansible root directory on the Ansible controller. This variable is defined in /etc/ansible/hosts.
- roles/remove_sr-iov_nics.yaml: This Ansible role prepares the compute nodes to run the remove_sr-iov_nics.py script found in ../scripts and then runs that script on the compute nodes. It copies the VMManager.py module to the remote node as well. It also prepares the compute nodes to run the startGuestVMs.py script found in ../scripts and then executes that script. See the documentation in remove_sr-iov_nics.py and startGuestVMs.py for more information.This role has two input parameters:
- provisioning_slave_dir: This is the directory on the remote node into which the script file is copied. This variable is defined in /etc/ansible/hosts.
- provisioning_master_dir: This is the Ansible root directory on the Ansible controller. This variable is defined in /etc/ansible/hosts.
- roles/aptInstall.yaml: This role simply uses apt to install a package on the target inventory, assuming the target inventory is running Ubuntu or Debian*. Its only input parameter is package_name, which must be defined as an --extra-vars on the command line.
- roles/change-hostvm-cpu-topology.yaml: This Ansible role runs the change-hostvm-cpu-topology.py script found in ../scripts and then runs that script on the compute nodes. It also prepares the compute nodes to run the startGuestVMs.py script found in ../scripts and then executes that script. It copies the VMManager.py module to the remote node as well. See the documentation in change-hostvm-cpu-topology.py and startGuestVMs.py for more information.This role has two input parameters:
- provisioning_slave_dir: This is the directory on the remote node into which the script file is copied. This variable is defined in /etc/ansible/hosts.
- provisioning_master_dir: This is the Ansible root directory on the Ansible controller. This variable is defined in /etc/ansible/hosts.
- roles/edit_host_vm_kernel_params.yaml: This Ansible role modified the Host VM guest machine grub command line to add support for nine huge pages of 1 GB, remove CPUs 1–4 from the SMP scheduler algorithms, and set the other parameters for tickless kernel on CPUs 1–4.
- roles/startGuestVMs.yaml: This Ansible role prepares the compute nodes to run the startGuestVMs.py script found in ../scripts and then executes that script. See the documentation in startGuestVMs.py for more information. This role has two input parameters:
- provisioning_slave_dir: This is the directory on the remote node into which the script file is copied. This variable is defined in /etc/ansible/hosts.
- provisioning_master_dir: This is the Ansible root directory on the Ansible controller. This variable is defined in /etc/ansible/hosts.
- roles/shutdownGuestVMs.yaml: This Ansible role prepares the compute nodes to run the shutdownGuestVMs.py script found in ../scripts and then executes that script. See the documentation in shutdownGuestVMs.py for more information. This role has two input parameters:
- provisioning_slave_dir: This is the directory on the remote node into which the script file is copied. This variable is defined in /etc/ansible/hosts.
- provisioning_master_dir: This is the Ansible root directory on the Ansible controller. This variable is defined in /etc/ansible/hosts.
- roles/cleanImages.yaml: This Ansible play cleans out the default libvirt image store location (/var/lib/libvirt/images) by deleting the directory and re-creating it. The play spares only the master VM image by first moving it to a temporary directory and then putting it back. Pre-conditions: This play assumes that all VMs are shut down and have been undefined.
- roles/cloneImages.yaml: This Ansible play prepared the compute nodes to run the cloneImages.sh script found in ../scripts. It has the following tasks:
- Copy the cloning script to the compute node.
- Verify that the HostVM-Master.xml domain definition file was present on the compute node in the correct location.
- Verify that the HostVM-master.qcow2 image was present on the compute node and in the correct location.
- Run the cloneImages.sh script.
- provisioning_slave_dir: This is the directory on the remote node into which the script file is copied. This variable is defined in /etc/ansible/hosts.
- provisioning_master_dir: This is the Ansible root directory on the Ansible controller. This variable is defined in /etc/ansible/hosts.
- roles/copyFile.yaml: This Ansible play copies a file to the inventory by 1) removing the existing file from the remote system, 2) copying the file to a temp location on the remote system, 3) moving the file to the right location on the remote system, and 4) changing file ownership. The play has one input parameter:
- provisioning_master_dir: This is the Ansible root directory on the Ansible controller. This variable is defined in /etc/ansible/hosts.
- roles/copyImages.yaml: This Ansible play was used to prepare for the cloneImages.yaml play. It copies the HostVM-Master domain definition XML file and image files to the target inventory. This play has two preconditions:
- The HostVM-Master.qcow2 image must be located at /var/lib/libvirt/images on the Ansible controller node.
- The HostVM-Master.xml domain definition file must be located at {{ provisioning_master_dir }}.
- provisioning_slave_dir: This is the directory on the remote node into which the script file is copied. This variable is defined in /etc/ansible/hosts.
- provisioning_master_dir: This is the Ansible root directory on the Ansible controller. This variable is defined in /etc/ansible/hosts.
- roles/createmacvtap.yaml: You will not use this file if you are working with the downloadable VM. The createmacvtap.yaml Ansible play creates macvtap NICs on the compute nodes that the Host VMs use to communicate directly with the cluster 'public' network, or the network that the learners use. Theses macvtap logical NICs are simpler than a Linux bridge, and allow the learners to SSH to their assigned Host VM directly from the cluster jump server. The libvirt macvtap network is defined in ../files/macvtap.xml; the script to create the interfaces is in ../scripts/create_macvtapif.sh. See the create_macvtapif.sh script for more information. This role has two input parameters:
- provisioning_slave_dir: This is the directory on the remote node into which the script file is copied. This variable is defined in /etc/ansible/hosts.
- provisioning_master_dir: This is the Ansible root directory on the Ansible controller. This variable is defined in /etc/ansible/hosts.
- roles/edit_host_vm_kernel_params.yaml: This Ansible play modified the deployed Host VM guest machines’ grub command lines to add support for nine huge pages of 1 GB, remove CPUs 1–4 from the SMP scheduler algorithms, and set the other parameters for tickless kernel on CPUs 1–4. It then rebooted the Host VM system and waited for their return. Obviously, if the base image already has this in in the boot/grub command line, this play is not necessary.
- roles/generateSSHInfo.yaml: The generateSSHInfo.yaml Ansible play collected SSH information about the Host VMs and the nested Tenant and VNF VMs—information that was generated during the clone process. Ideally, this would have been run as a playbook together with the cloneImages.yaml play. The play:
- Removed any existing ssh_config file on the compute node.
- Copied the generateSSHInfo.sh script to the compute node and made it executable.
- Ran the generateSSHInfo.sh script on the compute node.
- Gathered the ssh_config file from each compute node back to the Ansible controller.
- provisioning_slave_dir: This is the directory on the remote node into which the script file is copied. This variable is defined in /etc/ansible/hosts.
- provisioning_master_dir: This is the Ansible root directory on the Ansible controller. This variable is defined in /etc/ansible/hosts.
- roles/snapshotGuestVMS.yaml: The snapshotGuestVMs.yaml Ansible play copied the snapshotGuest.sh script from the ../scripts directory to the remote compute nodes, and then ran that script. See the snapshotGuestVMs.sh script for more information. This play has two input parameters:
- provisioning_slave_dir: This is the directory on the remote node into which the script file is copied. This variable is defined in /etc/ansible/hosts.
- provisioning_master_dir: This is the Ansible root directory on the Ansible controller. This variable is defined in /etc/ansible/hosts.
Scripts
The scripts directory contains many of the scripts that were run on both the compute nodes, the guest VMs, and the nested VMs.
- scripts/insert_sr-iov_nics.py: This script is intended to be run on the compute nodes that are exposing the SR-IOV virtual functions. The module edits the libvirt XML definition file and inserts sr-iov nics on the compute node into the specified VMs. It expects there to be four SR-IOV NIC ports per compute node (for example, one XL710 ) with two guest VMs each getting two SR-IOV NIC ports. It also expects those SR-IOV NICS to already be defined as separate libvirt networks. (In reality, a single libvirt network can expose a pool of SR-IOV virtual functions, that number limited by the NIC hardware/driver. However, in this lab, each libvirt network exposed only a single virtual function. (See the libvirt documentation on defining SR-IOV virtual functions for more information on how to define a libvirt network that exposes a pool of SR-IOV virtual functions.) If the SR-IOV NICs have not been defined as libvirt networks, and if those libvirt networks are not active, the edited VMs will fail to start. This module also expects there to already be two existing network interfaces in the VM XML domain definition file. See inline comments for more information.
- scripts/VMManager.py: This Python module/library class contains all of the functions that we use to programmatically manage the VMs on each compute node. Because there is no state saved, all of the methods and attributes on this class are class scope and there is no __init()__ method. See the inline documentation for more information about what functions are available and what they do. This module is used by the following Python scripts and must be copied to the remote node along with those scripts:
- insert_sr-iov_nics.py
- startGuestVMs.py
- shutdownGuestVMs.py
- remove_sr-iov_nics.py
- scripts/remove_sr-iov_nics.py: This module removes the sr-iov nics from specified VMs on the compute node. It expects there to be two guests per compute node that use the SR-IOV NICS, that those guests end with even numbers, and that each guest has been using two SR-IOV NICS. Note that when the XML snippets to define the SR-IOV NICS are first inserted into the domain XML definition, the XML tag looks like this, where 'sr-iov-port0' refers to an active libvirt network that has previously been defined to point at the NIC physical function that is hosting the virtual function:
<interface type='network'>
<source network='sr-iov-port0'/>
</interface>
However, once the domain XML has been validated by libvirt during the create or define processes, libvirt allocates an SR-IOV NIC from the libivrt SR-IOV network and modifies the SR-IOV NIC XML snippet to point to the host machine's PCI address of the virtual function. The new XML snippet begins like this, and thereafter refers to the source network PCI address rather than the name of the libvirt network:
<interface type='hostdev'>
This module does not restart the domains after editing them. - scripts/change-hostvm-cpu-topology.py: This module changes the CPU topology of the Host VM guests to one socket with eight cores and no hyper-threading. On each compute node, it shuts down the Host VM guests, saves the XML definition of each guest, undefines it, modifies the CPU XML tag, and then redefines the domain using the modified XML. The modified CPU tag looks like this:
- <cpu mode='host-passthrough'>
- <topology sockets='1' cores='8' threads='1'/>
- </cpu>
- scripts/create_macvtapif.sh: This script creates a simple macvtap libvirt network on the compute node, activates, the network and sets it to auto start. The libvirt network is defined in macvtap.xml, and the name of the network is macvtap-net. You will not use this file if you are working with the downloadable VM.
- scripts/generateSSHInfo.sh: This script generates the SSH information that gets rolled into the ssh_config file on the jump server. This script was derived from the cloneImages.sh script, and technically is not necessary; however, I’ve included it because it is used by generateSSHInfo.yaml, which demonstrates how to use the Ansible fetch module.
- scripts/snapshotGuestVMs.sh: The snapshotGuestVMs.sh script starts all of the domains on the system, and then creates a snapshot labelling it with the current date.
- scripts/startGuestVMs.py: The startGuestVMs.py script simply calls the VMManager.start_domains function with a mask of VMManager.VM_MASK_ALL. Its only precondition is that the VMManager module is present in the current working directory.
- scripts/shutdownGuestVMs.py: The shutdownGuestVMs.py script simply calls the VMManager.shutdown_domains function with a mask of VMManager.VM_MASK_ALL. See the VMManager.shutdown_domains documentation for more information. Its only precondition is that the VMManager module is present in the current working directory.
- scripts/undefineGuestVMs.sh: The undefineGuestVMs.sh script undefines all libvirt guests that are currently in a shutoff state.
- scripts/cloneImages.sh: The cloneImages.sh script does the heavy lifting of creating the Host VM clones from HostVM-Master. It is intended to be run on the compute nodes and does the following:
- Calculates the last quad of the static IP Address of the new Host VM from the last two digits of the compute node hostname.
- Calculates the last two digits of the Host VM and nested Tenant and VNF VMs from the last two digits of the compute node's hostname.
- Uses virt-clone to create a complete clone of HostVM-Master.
- Uses virt-sysprep to:
- Delete all user accounts except user and root.
- Reset dhcp-client-state
- Create a new machine-id
- Reset ssh-hostkeys
- Delete the ~/.ssh directory
- Set the new hostname
- dpkg-reconfigure openssh-server to get the SSH server keys set up correctly.
- Uses guestfish to edit the newly created image file and:
- Add static IP address info into /etc/network/interfaces.d/ens3
- Add the new hostname info to /etc/hosts
- Create an entry in the ssh_config file for the new Host, VNF, and Tenant VMs.
- The HostVM-Master.xml domain definition file is in $PROVISIONING_DIR.
- The HostVM-Master.qcow2 image file is in $VM_IMAGE_PATH.
- The last two digits of the compute node's hostname are numeric.
- virt-clone, virt-sysprep, and guestfish are installed on the compute node.
- scripts/copy-id.sh: This helper script copied my SSH public key to all of the systems in the entire cluster, both compute node, and Host, Tenant, and VNF VMs. Ideally, those SSH keys would be copied during the cloning and creation process; I just didn't figure that out until it was too late. I copied the user SSH keys rather than the root SSH keys so that Ansible could be run as non-root user.
- scripts/deleteGuestVMSnapshot.sh: The deleteGuestVMSnapshot.sh script deleted the snapshots attached to all guest VMs on a compute node that were currently in a shutoff state. If the VMs are not shut off, it does nothing to them.
Files Not Included in the Repository
HostVM-Master.qcow2
The Host VM qcow2 image is not included in the repository. However, it can be downloaded here. (Note, the file is very large: 14GB. If there is sufficient interest, I’ll create a recipe to re-create the VM from scratch.) You are welcome to use that image, but be aware of the hardware requirements to support it, most particularly the nine 1 GB huge pages that are allocated when the virtual machine boots. If the system you are booting the VM on doesn’t have that much RAM, try editing the kernel parameters at boot time or results may be unexpected.
The images for the nested Tenant and VNF virtual machines used in the DPDK hands-on lab (Fed23_TenantVM.img and Fed23_VNF-VM.img ) are also in this image at /home/user/vm-images.
At a high level, here is the information to recreate it.
- OS: Ubuntu 16.04.
- Kernel Parameters: Nine 1 GB huge pages are allocated at boot. This is because the DPDK hands-on lab expects four of the 1 GB pages for DPDK running in each of the nested VMs, and the remaining 1 GB huge page is consumed when Open vSwitch + DPDK is launched.
- Username: user; Password: password. The user account has sudo without password privileges in the /etc/sudoers.d/user file.
- Installed software sources:
- DPDK version 16.07 is found at /usr/src/dpdk-16.07.
- Pktgen version 3.0.14 is at /usr/src/pktgen-3.0.14. It also uses the RTE_SDK and RTE_TARGET environment variables.
- Sources for qemu-2.6.0 are also installed at /home/user/qemu-2.6.0 and are used to launch the internal Tenant and VNF virtual machines.
- libpcap-dev is installed because pktgen requires it.
- Open vSwitch branch 2.6 sources are installed at /usr/src/ovs-branch-2.6.
- The RTE_SDK environment variable is set in both the user and root accounts in .bashrc and points to this location. The RTE_TARGET environment variable is also defined so that DPDK will create x86_64-native-linuxapp-gcc builds.
NIC Physical Function PCI Pass-Through files
The original hands-on lab had scripts that would in-parallel insert physical functions from the Intel Ethernet Controller XL710 NICs into the same guest machines that hosted SR-IOV virtual functions so that the attendees could compare the performance of virtual and physical functions. These functions are not included in this package.
Acknowledgments and References
These provisioning scripts were created using things I learned from many places. The libvirt.org Networking wiki entry was indispensable. In particular, I need to acknowledge Tim Stoop at kumina.nl for the bash scripts that used virsh to manipulate domain lifecycle. (See https://github.com/kumina/shutdown-kvm-guests/blob/master/shutdown-kvm-guests.sh.) I also learned how to use macvtap interfaces with libvirt from Scott Lowe’s blog on that topic. Mohammad Mohtashim’s Python class objects tutorial at https://www.tutorialspoint.com/python/python_classes_objects.htm helped me get back into Python after a few years’ absence. And, of course, the Ansible, Python 2.7, Libvirt Python and Libvirt networking documentation sites were indispensable. I also found a few helpful (albeit random) libvirt nuggets in the Rust libvirt-sys documentation, and worked through some roadblocks with the crowd-sourced wisdom of stackoverflow.com.
"