1. Introduction
OpenCL™ JumpStart Kit is a plug-in for Microsoft Visual Studio* that enables developers to quickly create OpenCL projects in the Visual Studio IDE. JumpStart is a new feature in the Intel® SDK for OpenCL™ Applications.
Creating an OpenCL application involves a lot of boiler-plate code: create/query the platform, create/query devices, create context, command queues, etc. At every step proper error checking on the return codes of every API call needs to be done too. JumpStart allows you to create OpenCL projects from existing templates or based on existing samples with all the object creation and OpenCL setup done automatically, so that you can start working on the algorithm or application design. It also allows you to create empty projects. You can read more about JumpStart and its features in the Developer Guide for Intel® SDK for OpenCL™ Applications.
In this tutorial we will show you how to use JumpStart to create an image processing application for Sobel edge detection of a given image, by creating an OpenCL project based on a project template.
This tutorial is intended for beginners with no prior OpenCL experience to help them get started with OpenCL development.
2. Creating a project from a template
Download and install the Intel SDK for OpenCL Applications.
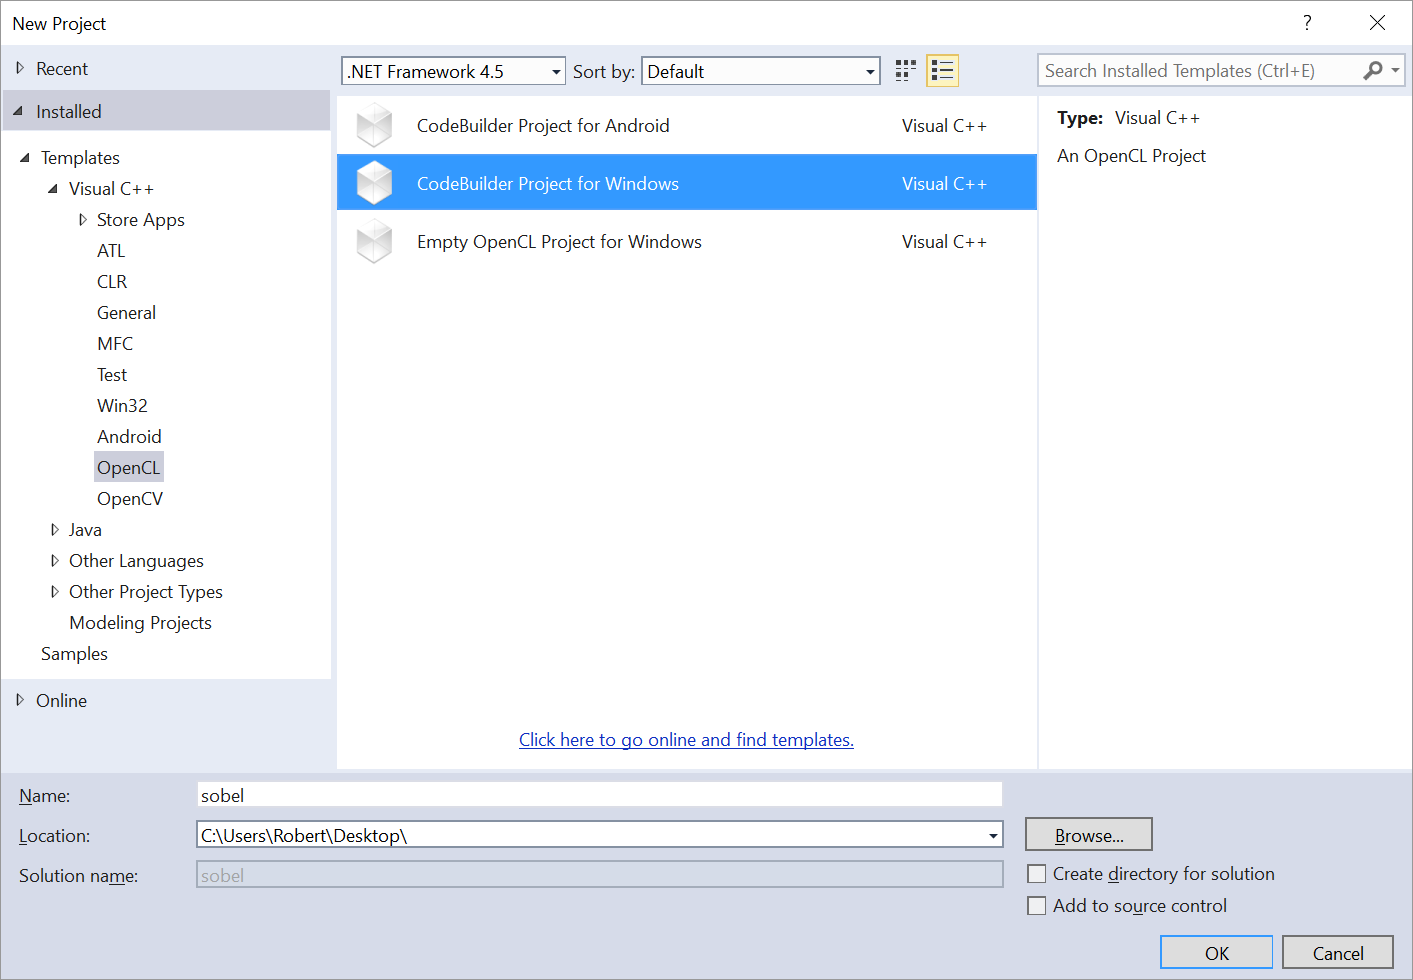
To create a project from a template, create a new OpenCL project by selecting File: New: Project or by typing Ctrl+Shift+N. Select OpenCL under Visual C++ templates. Select CodeBuilder Project for Windows. Select the location of the project and enter a name for the project, say sobel. Click Ok, and the Code Builder wizard will be displayed.

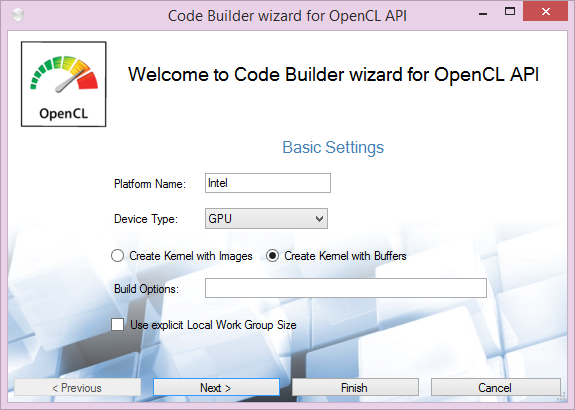
You will then be presented with the Code Builder wizard for OpenCL API dialog:

In the settings dialog you can set the target device (CPU or GPU) and change other settings as appropriate. For this exercise keep all the default settings and click Finish to complete the project creation. The following are the auto-generated files and a brief explanation.
- utils.[h|cpp] – define functions for reading OpenCL kernel file and for logging debug and error messages
- <sample_name>.cpp – is the main file where all the OpenCL host-side processing happens including building the kernel, setting kernel arguments, enqueuing the kernel, etc.
- <sample_name>.cl – is the main OpenCL kernel file
The project can be built and run successfully, but this doesn’t do much. In the next section we will show how to make simple changes to the project to create our application.
3. Creating Sobel filter application
First we need to add code to open and read the input image file to which we will apply the edge detection. We will use OpenCV for doing so, but it can be done in a number of other ways.
// Read and normalize the input image
Mat ReadInputImage(const std::string &fileName, int flag, int alignCols, int alignRows)
{
	Size dsize;
	Mat img = imread(fileName, flag);

	if (! img.empty())
	{
		// Make sure that the input image size is fit:
		// number of rows is multiple of 8
		// number of columns is multiple of 64
		dsize.height = ((img.rows % alignRows) == 0) ? img.rows : (((img.rows +
			alignRows - 1) / alignRows) * alignRows);
		dsize.width = ((img.cols % alignCols) == 0) ? img.cols : (((img.cols +
			alignCols - 1) / alignCols) * alignCols);
		resize(img, img, dsize);
	}

	return img;
}
Since our Sobel kernel accepts an input buffer and an output buffer as arguments, we will modify CreateBufferArguments() function to delete the creation of the second input buffer (delete the below lines):
    // Create second memory object based on host memory inputB
    ocl->srcB = clCreateBuffer(ocl->context, CL_MEM_READ_ONLY | CL_MEM_USE_HOST_PTR,
sizeof(cl_uint) * arrayWidth * arrayHeight, inputB, &err);
    if ((ocl->srcB == (cl_mem)0) || (CL_SUCCESS != err))
    {
        LogError("ERROR: Failed to create srcB buffer (%s)n",
TranslateOpenCLError(err));
        return -1;
    }
Accordingly, we will change the function signature from
    int CreateBufferArguments(ocl_args_d_t *ocl, cl_uint* inputA, cl_uint* inputB,
	cl_uint* outputC, cl_uint arrayWidth, cl_uint arrayHeight)
to
    int CreateBufferArguments(ocl_args_d_t *ocl, cl_uchar* inputA, cl_uchar* outputC,
	cl_uint arrayWidth, cl_uint arrayHeight)
Next we will modify the SetKernelArguments() function as shown below:
// Set the arguments for the kernel
cl_uint SetKernelArguments(ocl_args_d_t *ocl, cl_uint width, cl_uint height)
{
    cl_int err = CL_SUCCESS;

    err  =  clSetKernelArg(ocl->kernel, 0, sizeof(cl_mem), (void *) &ocl->srcA);
    //err  |= clSetKernelArg(ocl->kernel, 1, sizeof(cl_mem), (void *) &ocl->srcB);
    err  |= clSetKernelArg(ocl->kernel, 1, sizeof(cl_mem), (void *) &ocl->dstMem);
    err  |= clSetKernelArg(ocl->kernel, 2, sizeof(cl_mem), (void *) &width);
    err  |= clSetKernelArg(ocl->kernel, 3, sizeof(cl_mem), (void *) &height);
    if (err != CL_SUCCESS)
    {
        LogError("ERROR: Failed to set input g_kernel arguments, returned %sn",
		TranslateOpenCLError(err));
    }

    return err;
}
Modify ReadOutputBuffer to return unsigned char data instead of unsigned int.
// Execute the kernel
cl_uchar *ReadOutputBuffer(ocl_args_d_t *ocl, cl_uint arrayWidth, cl_uint arrayHeight)
{
    …
    …
    tmpPtr = clEnqueueMapBuffer(ocl->commandQueue, ocl->dstMem, true, CL_MAP_READ, 0,
		sizeof(cl_uchar) * arrayWidth * arrayHeight, 0, NULL, NULL, &err);
    …
    …

    return (cl_uchar *)tmpPtr;
}
Finally in the main() routine, change the code to use the image data for OpenCL processing instead of the random input. Delete the input generation and buffer allocation of inputA, inputB, and output. Make the following changes:
// Read the input image
	Mat img_src = ReadInputImage(OCL_SAMPLE_IMAGE_NAME, CV_8UC1, 8, 64);
	if (img_src.empty())
	{
		LogError("Cannot read image file: %sn", OCL_SAMPLE_IMAGE_NAME);
		return -1;
	}

	Mat img_dst = Mat::zeros(img_src.size(), CV_8UC1);

	imshow("Before:", img_src);
	waitKey();


	cl_uint arrayWidth  = img_src.cols;
	cl_uint arrayHeight = img_src.rows;


    // Create OpenCL buffers from host memory
    // These buffers will be used later by the OpenCL kernel
    if (CL_SUCCESS != CreateBufferArguments(&ocl, img_src.ptr(), img_dst.ptr(),
                                            arrayWidth, arrayHeight))
    {
        return -1;
    }
Pass the required kernel arguments:
// Set kernel arguments
if (CL_SUCCESS != SetKernelArguments(&ocl, arrayWidth, arrayHeight))
Read the output buffer and display the result of applying the kernel to the input image:
// Read the output buffer (map/unmap it to the host memory)
    if (NULL == ReadOutputBuffer(&ocl, arrayWidth, arrayHeight))
    {
        return -1;
    }


    imshow("After:", img_dst);
    waitKey();
4. Summary
In this basic tutorial we showed how to quickly create an OpenCL application using the new JumpStart kit which is part of the Intel SDK for OpenCL Applications. We showed two ways to create a project and showed how to make minimal changes to implement an OpenCL sobel edge detection application.
Intel and the Intel logo are trademarks of Intel Corporation in the U.S. and/or other countries.
Copyright © 2014-2016 Intel Corporation. All rights reserved.
*Other names and brands may be claimed as the property of others.
OpenCL and the OpenCL logo are trademarks of Apple Inc and are used by permission by Khronos.
"