Overview
It is a good idea to profile your Data Plane Development Kit (DPDK) application at different stages in development. In this tutorial we show how to use VTune™ Amplifier 2019 to run two Data Plane Development Kit Test Suite (DPDK Test Suite) microbenchmarks, distributor_perf_autotest and ring_perf_autotest, using DPDK v16.11.8 LTS. We then analyze data collected during each of the profiling runs.
The system used in this tutorial is running Ubuntu* 16.04.5 LTS on an Intel® Xeon® processor E5-2699 v4 with two 10-Gigabit network interface cards (NICs). Each NIC has two 10 Gigabit ports; the NICs used in this tutorial are the Intel® 82599 Gigabit Ethernet Controller and Intel® Ethernet Controller X540-AT2.
Note: You must have root access on your test system to follow the steps in this tutorial.
Install Kernel Debug Symbols
To get started, install the Linux* debug symbols and download the correct Linux source files. This step is required to enable the profiling report to display function names and corresponding source code.
The size of the Linux debug symbols package is roughly 600 MB.
echo "deb http://ddebs.ubuntu.com $(lsb_release -cs) main restricted universe multiverse" | tee -a /etc/apt/sources.list.d/ddebs.list
echo "deb http://ddebs.ubuntu.com $(lsb_release -cs)-updates main restricted universe multiverse" | tee -a /etc/apt/sources.list.d/ddebs.list
apt-get update
apt-get install linux-image-$(uname -r)-dbgsym
uname -r
apt install linux-source-4.15.0
cd /usr/src/linux-source-4.15.0
tar xf linux-source-4.15.0.tar.bz2
Install DPDK
Next, download and build the DPDK using the following commands.
Download
wget http://fast.dpdk.org/rel/dpdk-16.11.8.tar.xz tar xf dpdk-16.11.8.tar.xz
Build
Install build tools, an ancillary library header, set the correct environment variables, and then build the DPDK.
cd
apt install build-essential
apt install libnuma-dev
export RTE_SDK=/home/dpdk/dpdk-stable-16.11.8
export RTE_TARGET=x86_64-native-linuxapp-gcc
export EXTRA_CFLAGS='-g'
make install T=x86_64-native-linuxapp-gcc DESTDIR=install
Configure DPDK
After the DPDK is built, you’ll configure your system to use hugepages, then bind it to a specified NIC.
Configure Hugepages
The Getting Started Guide for Linux at DPDK.org describes why hugepage support is needed: “Hugepage support is required for the large memory pool allocation used for packet buffers …By using hugepage allocations, performance is increased since fewer pages are needed, and therefore fewer Translation Lookaside Buffers (TLBs, high-speed translation caches), which reduce the time it takes to translate a virtual page address to a physical page address. Without hugepages, high TLB miss rates would occur with the standard 4k page size, slowing performance."
The Use of Hugepages in the Linux Environment section of the Getting Started guide mentioned above will guide you through configuring hugepages for your system.
Bind DPDK to a NIC
To bind the DPDK to a NIC on this system, first load the correct drivers into the environment, then use the dpdk-devbind tool to bind the NIC to the DPDK driver. To achieve this, run the following commands:
cd
cd dpdk-stable-16.11.8
modprobe uio
insmod ./x86_64-native-linuxapp-gcc/kmod/igb_uio.ko
./tools/dpdk-devbind.py --status
This outputs the status of network and crypto devices on the system and the current driver it is using.
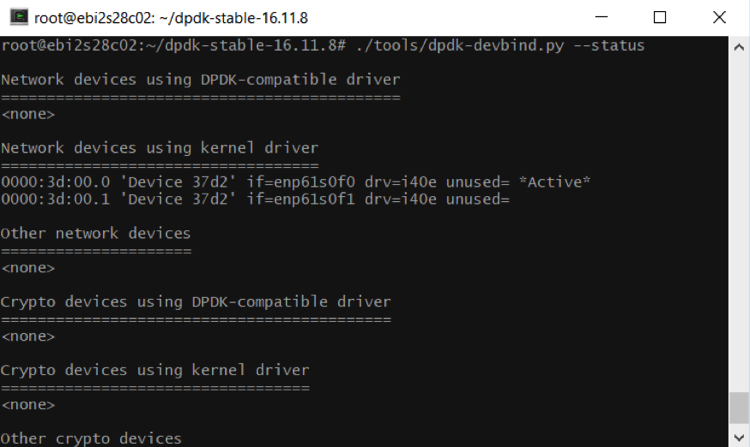
Figure 1. dpdk-devbind status
Bind the Network Device enp61s0f1 to the DPDK using the following command:
./tools/dpdk-devbind.py --bind=igb_uio enp61s0f1
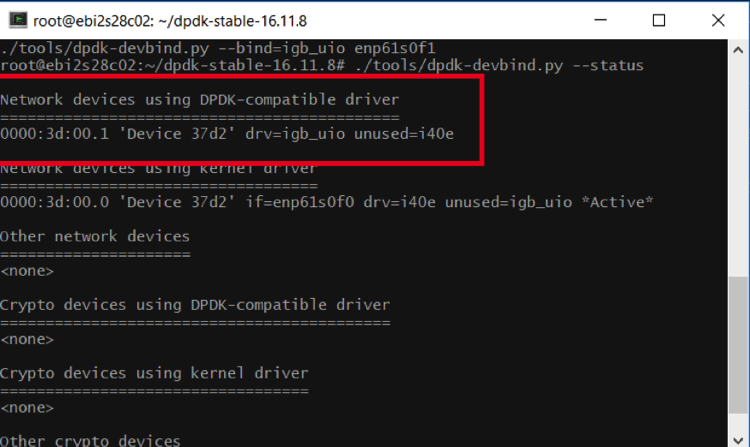
Figure 2. dpdk-devbind bind
Now that the network device is bound to a DPDK compatible driver, configure the DPDK to use hugepages. Do this by running the dpdk-setup.sh tool.
./tools/dpdk-setup.sh
Since this example uses a two-socket NUMA system, we will select option 20 and allocate 10,000 hugepages, which are 2 MB in size.
Note: Use a lower number of hugepages for memory-constrained systems.
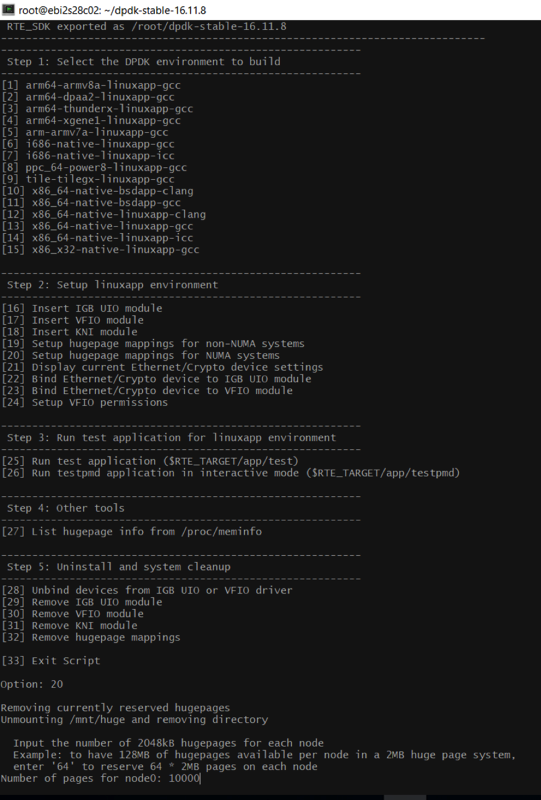
Figure 3. dpdk-setup
Profiling DPDK Test Suite Microbenchmarks
Now that the DPDK is configured, we will use VTune Amplifier Hotspots Analysis Hardware Event-Based Sampling to profile two DPDK microbenchmark tests, distributor_perf_autotest and ring_perf_autotest, using VTune Amplifier.
Configure and start VTune™ Amplifier
If you haven’t installed VTune Amplifier, do it now. For more information and installation instructions, read Get Started with VTune™ Amplifier 2019.
Type the two commands below to load environment variables and start the VTune Amplifier graphical user interface (GUI).
/opt/intel/vtune_amplifier/amplxe-vars.sh
/opt/intel/vtune_amplifier/bin64/amplxe-gui
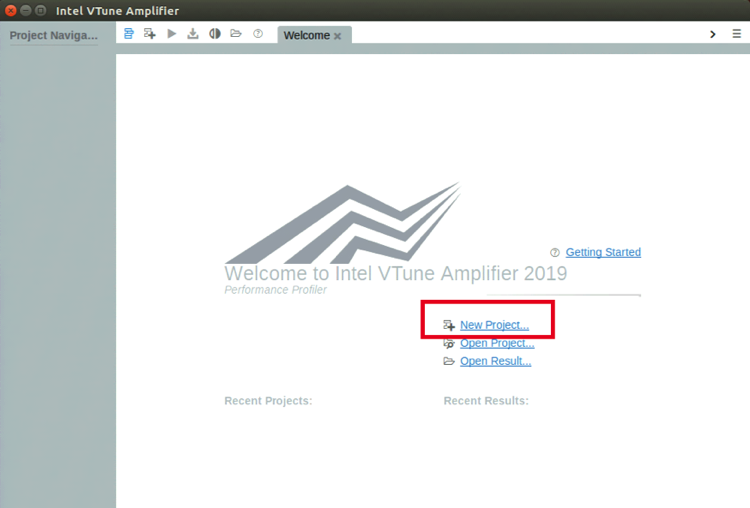 Figure 4. The VTune Amplifier GUI
Select New Project and give it an appropriate name.
Start the DPDK test suite
Open a new terminal window and use the commands below to start the DPDK Test Suite test application:
cd
cd dpdk-stable-16.11.8
./x86_64-native-linuxapp-gcc/app/test
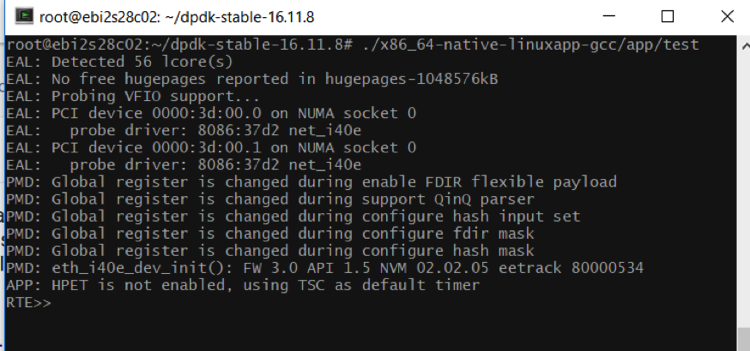 Figure 5. Start the DPDK Test Suite application test
RTE>>? lists all the available benchmarks.
After you have created your project, do the following steps:
- Select Configure Analysis
- Run a default Hotspots analysis with Hardware Event-Based Sampling selected.
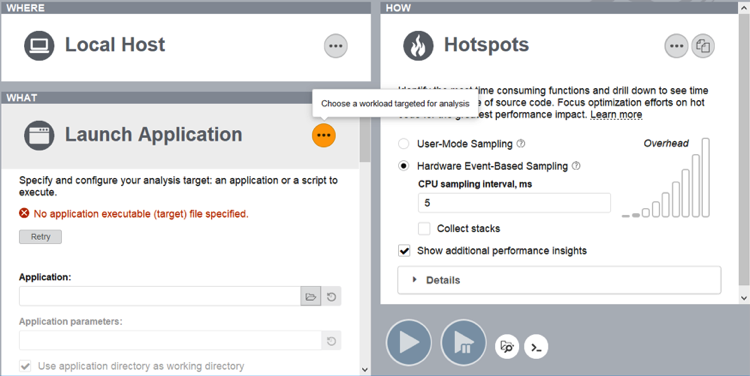 Figure 6
- Next, Attach VTune Amplifier to the running test process by specifying its Process ID (PID).
To determine the correct PID for the test process run the following:
ps ax | grep test
 Figure 7

Figure 8
- Finally, set the path for the source files and binaries for the project. Under Configure Analysis click Search Sources/Binaries.
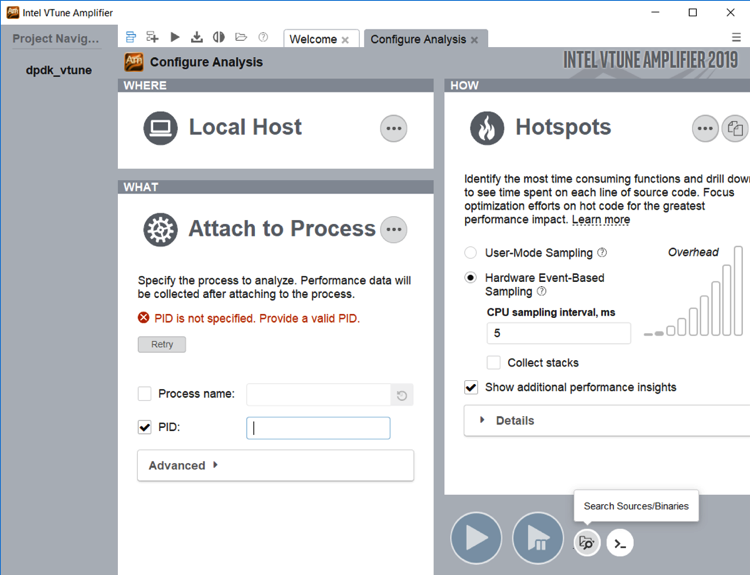 Figure 9
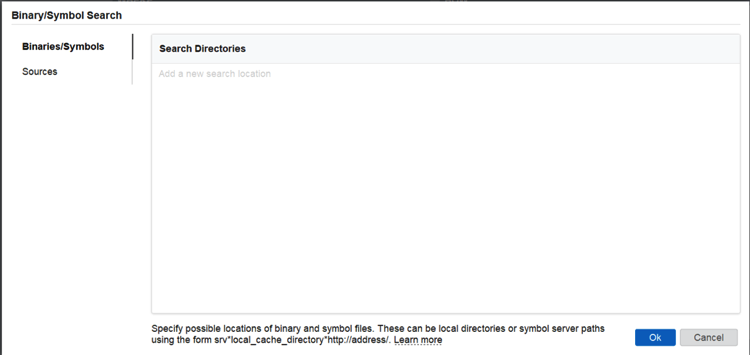 Figure 10
Place the following paths in the appropriate text box:
Binaries/Symbols: /root/dpdk-stable-16.11.8/x86_64-native-linuxapp-gcc/app
Sources: /usr/src/linux-source-4.15.0/linux-source-4.15.0
Profiling distributor_perf_autotest
First, we’ll profile the distributor_perf_autotest microbenchmark, which measures the interprocessor communication of moving a cache line from one processor to another.
Test and analyze
Start the Hotspots analysis.
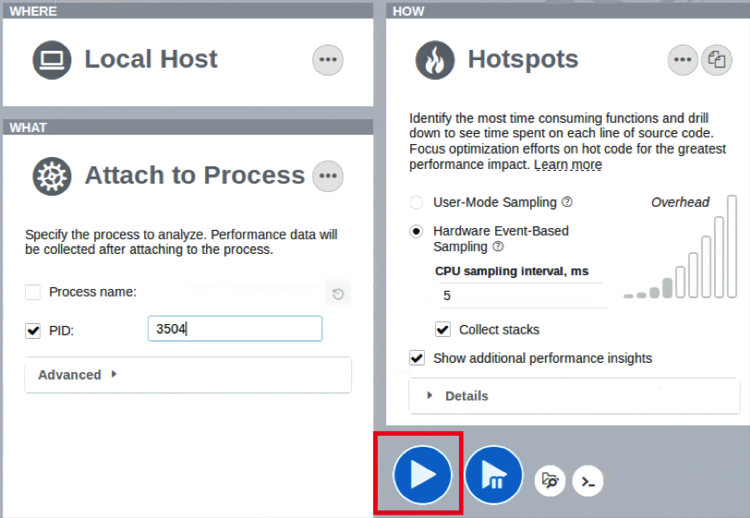 Figure 11
Once the Hotspots analysis has started, return to the terminal running the ./x86_64-native-linuxapp-gcc/app/test process, and run the distributor_perf_autotest microbenchmark.
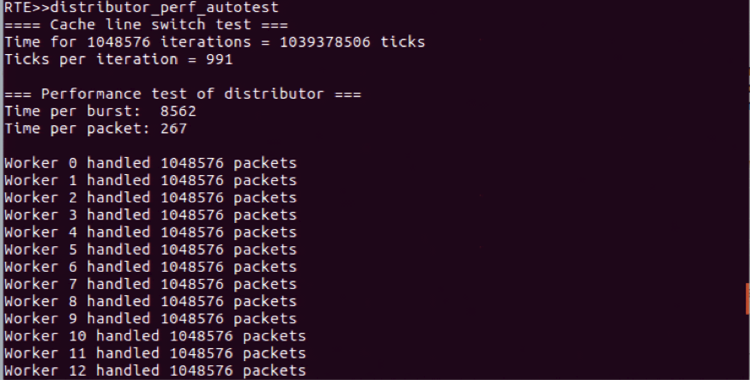 Figure 12. distributor_perf_autotest benchmark
After the distributor_perf_autotest microbenchmark has completed, click the stop button for VTune Amplifier to end profiling. From there, VTune Amplifier will analyze the collection and output a report, as shown below.
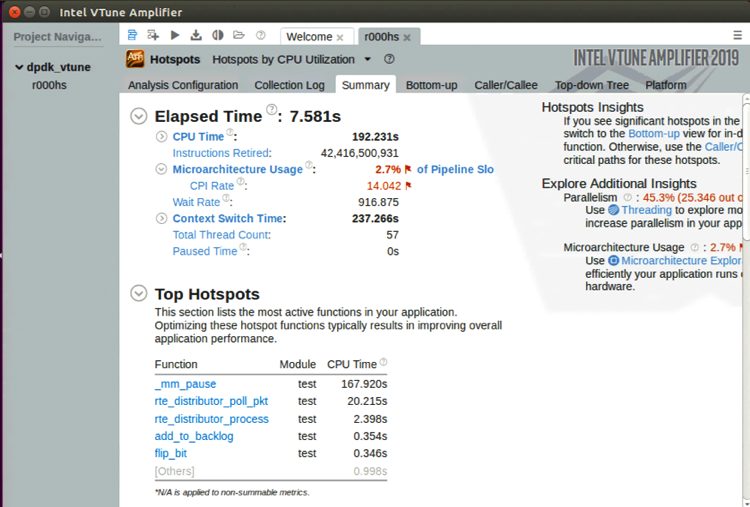 Figure 13. distributor_perf_autotest profile
Observe on the Summary page in Figure 14 that the function that runs the longest in the distributor_perf_autotest microbenchmark is _mm_pause. Also, notice that CPU 0 is essentially the only CPU being utilized when running the benchmark. This graph shows if the workload is Parallelized.
Note Not all workloads can be parallelized.
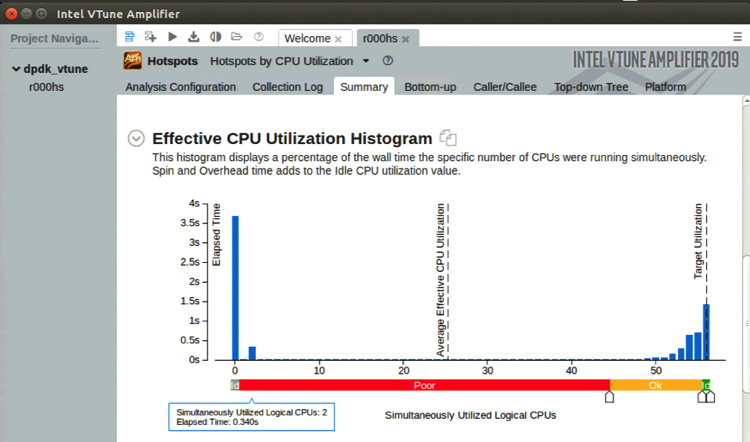 Figure 14
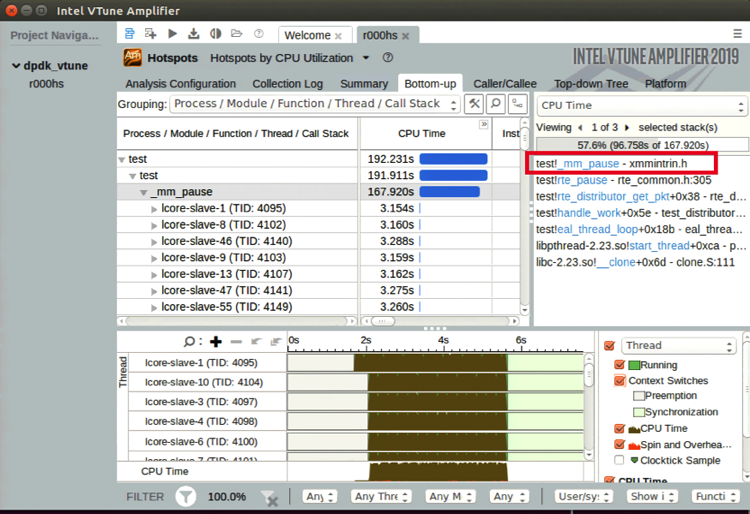
Figure 15
When navigating to the Bottom-up tab it is easy to see that _mm_pause takes up the majority of the CPU time. Also, view how the _mm_pause function is being called in the bottom-up stack.
start_thread -> eal_thread_loop -> handle_work -> rte_distributor_get_pkt -> rte_pause -> _mm_pause
VTune Amplifier also shows the source file of the function. Double-click the function to view the location of your source files and binaries, as shown below.
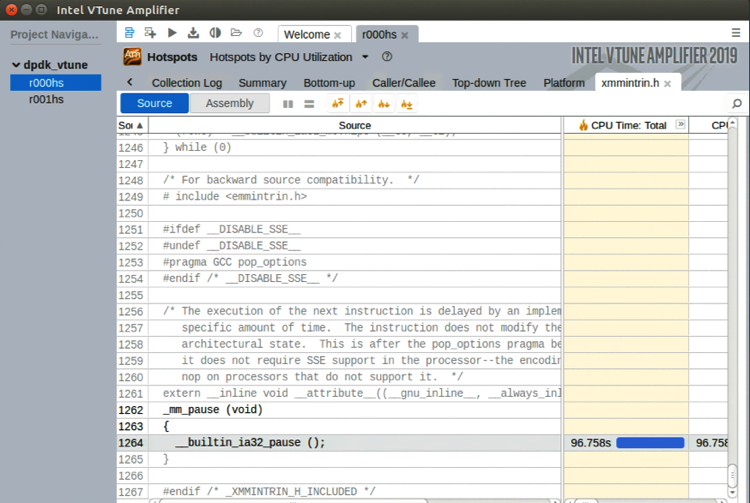 Figure 16
After running the microbenchmark, the results show that the majority of the time is spent in spin-wait loops.
Profiling ring_perf_autotest
The communication between cores for interprocessor communication, as well as communication between cores and the NIC, happens through rings and descriptors.
While NIC hardware does optimizations in terms of report status (RS) bit and descriptor done (DD) bit in bunching the data size, DPDK also enhances bunching with amortization by offering an API for bulk communication through rings.
The ring tests show that single producer, single consumer (SP/SC) with bulk sizes both in enqueue and dequeue give the best performance, compared to multiple producers, multiple consumers (MP/MC).
Test and analyze
Run another Hotspots analysis. Return to the terminal running the test process and run the ring_perf_autotest micro benchmark; stop collection when the benchmark has finished.
 Figure 17
Observe from the Summary page that the function that runs the longest in the ring_perf_autotest microbenchmark is __rte_ring_mc_do_dequeue. However, the function that runs the longest may not necessarily mean it is inefficient, as shown later on. Also, notice on the Summary page that the ring_perf_autotest micro benchmark utilizes only three CPUs.
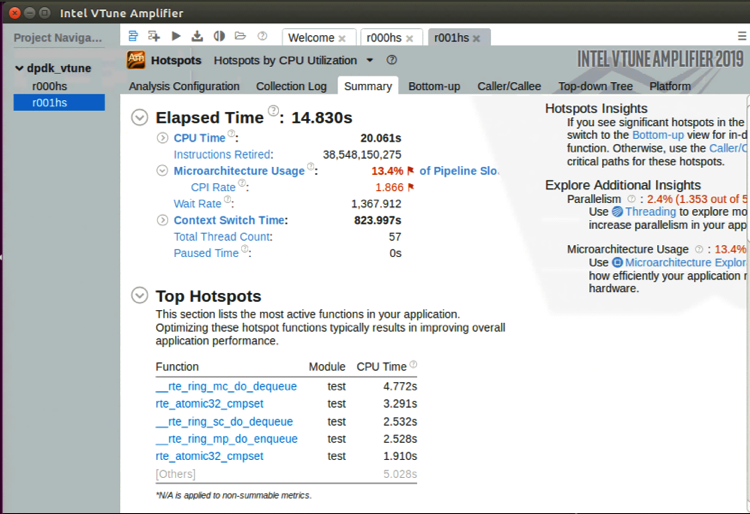 Figure 18
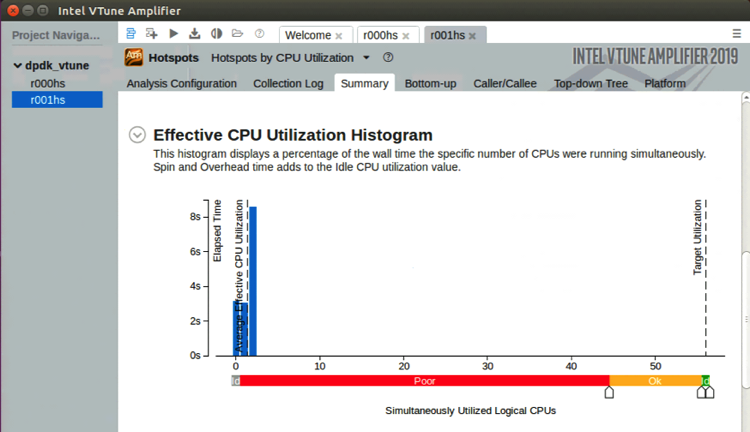 Figure 19
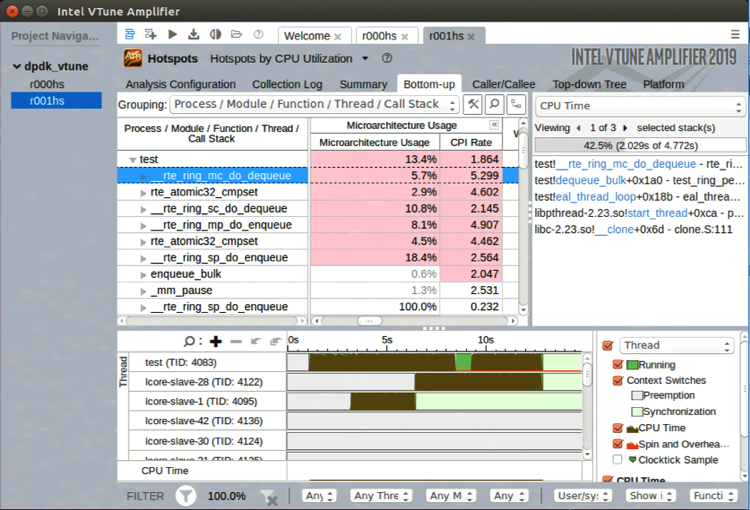 Figure 20
On the Bottom-up tab notice the light red-shaded cells under the Microarchitecture Usage column. This metric estimates how effectively the code runs on the current microarchitecture. Within the Microarchitecture Usage column, there is the CPI Rate column. Cycles per Instructions Retired (CPI) rate is a fundamental performance metric as it measures how much time each instruction takes. In this analysis the rte_ring_mc_do_dequeue is the biggest offender, taking five cycles per instruction, making this a good place to optimize for performance.
Summary
This tutorial showed how to configure your system to analyze DPDK using VTune Amplifier, then how to use VTune Amplifier Hotspots Analysis to profile two DPDK .Test Suite microbenchmarks. Use this article and the resources listed below to get started profiling your DPDK application with VTune Amplifier.
Resources
Get Started with VTune™ Amplifier 2019