Persistent memory technologies, such as Intel® Optane™ DC persistent memory, come with several challenges. Remote access seems to be one of the most difficult aspects of persistent memory applications because there is no ready-to-use technology that supports remote persistent memory (RPMEM). Most commonly used remote direct memory access (RDMA) for remote memory access does not consider data durability aspects.
This paper proposes solutions for accessing RPMEM based on traditional RDMA. These solutions have been implemented in the Persistent Memory Development Kit (PMDK) librpmem library. Before you read this final part, which describes how to use PMDK-based libraries to replicate persistent memory, we suggest first reading Part 3: RDMA Enabling for Data Replication. The other parts in this series include:
- Part 1, “Understanding Remote Persistent Memory," describes the theoretical realm of remote persistent memory.
- Part 2, "Remote Persistent Memory 101," depicts examples of setups and practical uses of RPMEM.
Prepare to Shine – Persistent Memory
The librpmem library is designed to replicate to persistent memory, so the replica on the target is expected to be located on the persistent memory. In Figure 1, the box in the lower-right corner shows where the persistent memory is desired in the rpmem software stack.
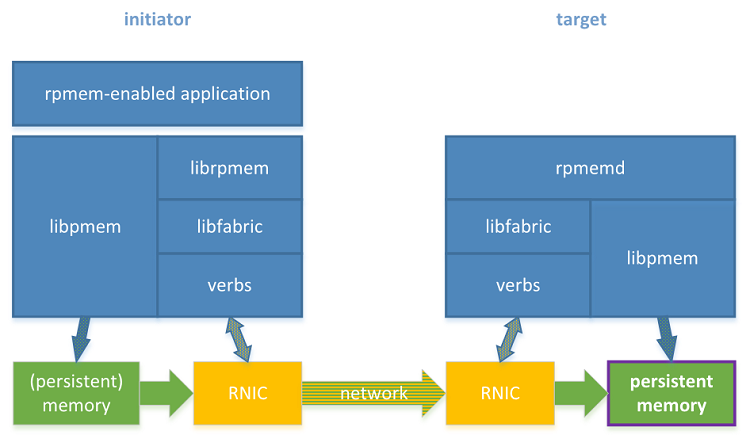
Figure 1. Rpmem software stack with two machines equipped with RDMA and persistent memory
This section describes how to emulate the persistent memory in software and how to configure it for rpmem replication.
Note Details regarding persistent memory configuration are outside the scope of this paper. For details see the Persistent Memory Programming site, Persistent Memory Wiki from kernel.org, and materials provided by the persistent memory manufacturers1.
Requirements on the Linux* Kernel
Persistent memory support has been present in the Linux* kernel since version 4.0, but as of this writing it is still being improved, so the newest possible kernel is recommended. The Linux kernel must be configured to enable Direct Access (DAX), which is the mechanism to allow access to persistent memory without the need to copy data through the page cache. Before proceeding, check if DAX and PMEM are supported:
$ egrep '(DAX|PMEM)' /boot/config-`uname -r`
CONFIG_X86_PMEM_LEGACY_DEVICE=y
CONFIG_X86_PMEM_LEGACY=y
CONFIG_BLK_DEV_PMEM=m
CONFIG_NVDIMM_DAX=y
CONFIG_DAX=y
CONFIG_DEV_DAX=m
CONFIG_DEV_DAX_PMEM=m
CONFIG_FS_DAX=y
CONFIG_FS_DAX_PMD=y
CONFIG_ARCH_HAS_PMEM_API=y
The output from this command may differ according to the kernel version. The point of the above command is to make sure the lines with DAX and PMEM exist and are set to either "y" or "m."
Emulating Persistent Memory Using DRAM
If the machine is equipped with some kind of hardware-based persistent memory there is no need to emulate it using DRAM.
The memmap kernel parameter defines which memory region the kernel has to reserve for use as persistent memory. Add, for example, memmap=4G!12G to the GRUB_CMDLINE_LINUX to reserve 4 gigabytes (GB) of memory starting at offset 12 GB. The resulting GRUB_CMDLINE_LINUX would look like this:
$ cat /etc/default/grub | grep GRUB_CMDLINE_LINUX
GRUB_CMDLINE_LINUX="intel_pstate=disable rd.lvm.lv=fedora/root rd.lvm.lv=fedora/swap memmap=4G!12G"
For details regarding the memmap kernel parameter see How to choose the correct memmap kernel parameter.
After making the above change, build the GRUB configuration.
# on a BIOS machine
$ sudo grub2-mkconfig -o /boot/grub2/grub.cfg

# OR

# on an EFI machine
$ sudo grub2-mkconfig -o /boot/efi/EFI/fedora/grub.cfg
Changes will take effect after reboot.
Supported Persistent Memory Namespace Modes
Persistent memory behavior differs depending on how the namespace is configured. There are two persistent memory namespace modes with DAX support:
- Filesystem-DAX: This creates a block device (example: /dev/pmem0), which allows some Linux filesystems (only xfs and ext4 at the moment) to support the DAX capability. It disables the page cache and allows establishing direct mappings to persistent memory media.
- Device-DAX: This creates a character device (example: /dev/dax0.0), which allows memory ranges to be mapped without a filesystem.
Linux kernel currently does not yet support long-lived memory registrations required by RDMA for files on Filesystem-DAX. The effort to add this support is currently underway. Until that support is added, the only way to use RDMA with Filesystem-DAX is to use RNICs with support for on-demand paging (ODP). For example, the Mellanox* MLX5 supports ODP.
Libfabric v1.5 and newer allows using this feature, but it is disabled by default. Enabling it is required to set an environment variable, as follows:
$ export FI VERBS USE ODP=1
The variable has to be set before running the application that wants to use it. It's also important to set this variable on each node that is expected to use Filesystem-DAX for RDMA; for example, on the initiator system using the librpmem library and on the target system running the rpmemd utility.
The Mellanox implementation of the ODP feature is marked as an experimental feature by the libfabric library. Additionally, the ODP feature imposes the limitation on the maximum size of the memory registration, which should not exceed 128 MB. The entire memory pool replicated by rpmem is a single memory registration; therefore, it is also the upper limit of the rpmem memory pool size established on Filesystem-DAX using this ODP implementation. For details, see the ibv_exp_reg_mr(3) manual page.
Using librpmem with Device-DAX avoids the need for using an RNIC with ODP support so it's more broadly available; this is the setup described in this section. Note that librpmem setup is common for both Filesystem-DAX and Device-DAX.
Configuring Persistent Memory
The ndctl utility is used to manage persistent memory devices on Linux. To install it, use this command:
$ sudo dnf install ndctl
Persistent memory devices are configured by the BIOS as interleave sets, which are called regions by Linux. The capacity of the persistent memory regions are exposed as namespaces. To list all available persistent memory regions and namespaces use ndctl-list(1).
$ ndctl list --regions --namespaces --human
[
    {
      "dev":"region0",
      "size":"4.00 GiB (4.29 GB)",
      "available_size":0,
      "max_available_extent":0,
      "type":"pmem",
      "persistence_domain":"unknown",
      "namespaces":[
        {
          "dev":"namespace0.0",
          "mode":"fsdax",
          "map":"mem",
          "size":"4.00 GiB (4.29 GB)",
          "blockdev":"pmem0"
        }
      ]
    }
]
The persistent memory namespace behavior differs depending on the configured mode. Currently, the only mode supported by the rpmem is devdax. To reconfigure existing namespace to use devdax, use ndctl-create-namespace(1).
$ sudo ndctl create-namespace --reconfig namespace0.0 --mode devdax --force
{
  "dev":"namespace0.0",
  "mode":"devdax",
  "map":"dev",
  "size":"3.94 GiB (4.23 GB)",
  "uuid":"8ce343a3-848c-431b-85c0-83cfe83d604f",
  "daxregion":{
    "id":0,
    "size":"3.94 GiB (4.23 GB)",
    "align":2097152,
    "devices":[
      {
        "chardev":"dax0.0",
        "size":"3.94 GiB (4.23 GB)"
      }
    ]
  },
  "numa_node":0
}
If ndctl-create-namespace(1) succeeds, a new DAX device is available in the /dev directory. By default, it is owned by the root user. Chown allows making it available for the regular user (for example, user in the commands below).
# list available DAX devices
$ ls -a /dev | grep dax
dax0.0

# change DAX device owner
$ sudo chmod user:user /dev/dax0.0
Start to Shine – Replication to Remote Persistent Memory
Having configured the persistent memory, the setup is ready to perform true replication to persistent memory—for which rpmem replication has been created (see Figure 2). Replication to persistent memory makes sense when it is performed using RDMA-capable NICs (RNICs) as already described in Shift to RDMA-Capable Network. This section highlights the differences between using regular files and persistent memory.
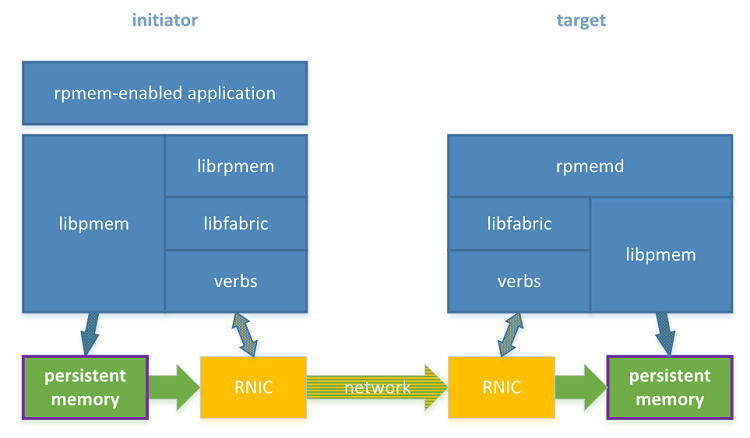
Figure 2. Two machines with RDMA software stack
Configuring Platforms
The rpmem replication between two machines may be subject to limits established via limits.conf(5). Limits are modified on the initiator and on the target separately. For details, see Single Machine Setup.
Configuring the Target
Rpmem can operate in one of two possible modes (described in Two Remote Replication Methods), depending on the target platform configuration:
- Appliance remote replication method (ARRM)
- General-Purpose Remote Replication Method (GPRRM)
Appliance Remote Replication Method Configuration
Disabling Intel® Data Direct I/O Technology (Intel® DDIO) in the ARRM allows the data to reach persistent memory without first going into the CPU cache. But disabling Intel DDIO alone does not provide the full solution to the problem of how to make stores persistent. Simply writing to the target’s memory using RDMA Write doesn’t guarantee that it reached the persistence because it may be stuck in NIC, PCIe*, or memory controller buffers. This is why rpmem in ARRM mode follows RDMA Writes with an RDMA Read to flush those buffers.
ARRM is the most performant rpmem replication mode and it is the recommended way to use rpmem, but it can be used only when Intel DDIO can be switched off. The GPRRM shall be used as alternative approach if Intel DDIO cannot be disabled.
Note Intel DDIO is enabled by default on all Intel® Xeon® E5 processors and version 2 of the Intel® Xeon® E7 processor product family. Some manufacturers allow it to be disabled in the BIOS2. For details on how to disable Intel DDIO see your motherboard manual.
General-Purpose Remote Replication Method Configuration
In GPRRM mode, rpmem has to notify rpmemd on the target machine each time it wants to make the memory range persistent. This additional communication makes the GPRRM configuration not reach the full RDMA potential. In the ARRM mode, rpmem can guarantee data persistence using only RDMA without involving additional software components.
When writing data to persistent memory, Intel DDIO prevents the data from reaching persistence directly by storing it in the processor cache. Afterwards, the data must be flushed from the processor cache to reach persistence. This caching behavior makes it impossible for rpmem to make stores persistent using only the RDMA commands. In this case, rpmem has to operate in the GPRRM mode.
Network Interfaces Configuration
Network interface configuration (Figure 3) is exactly as described in Shift to RDMA-Capable Network.
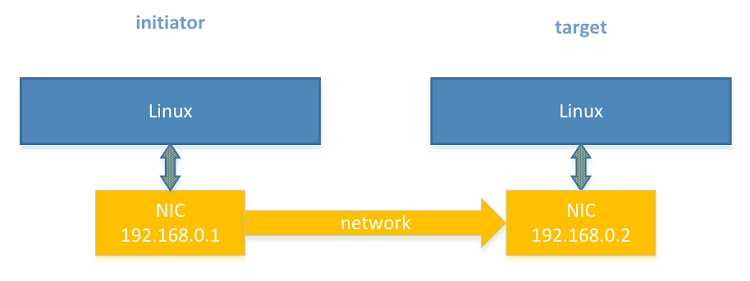
Figure 3. Two RDMA machines network
Rpmem Installation
The required software components are the same as in previous examples. Additionally, the initiator requires libpmem and libpmem-devel. The libpmem library is required because now, on the initiator’s side, persistent memory will be used instead of volatile memory. This time, an additional application—called daxio—will be needed to read device DAX contents from the command line.
# initiator
$ sudo dnf install librpmem librpmem-devel
$ sudo dnf install libpmem libpmem-devel # required by a fibonacci application
$ sudo dnf install daxio # for results inspection

# target
$ sudo dnf install rpmemd
$ sudo dnf install daxio # for results inspection
The librpmem-devel and libpmem-devel packages are required only for compiling the application. They are not needed at run time.
SSH Configuration
SSH configuration is exactly the same as in previous examples. Those steps do not have to be repeated.
# initiator

#  1. Generating an SSH authentication key pair
$ ssh-keygen
# (...)
Enter passphrase (empty for no passphrase): # leave empty
Enter same passphrase again: # leave empty
# (...)

# 2. Allowing to connect to the target via SSH
$ ssh-copy-id user@target
# (...)

# 3. Checking SSH connection
$ ssh user@target
# (...)
[user@target ~] $ # the sample shell prompt on the target

# target
# do nothing
Rpmemd Configuration
In the rpmemd poolset configuration, point to the DAX device. This will enable replication to the persistent memory.
# initiator
# do nothing

# target
$ cat > /home/user/target.poolset <<EOF
PMEMPOOLSET
AUTO /dev/dax0.0
EOF
The device DAX line in the poolset file should use the AUTO keyword instead of specifying a file size. This keyword tells rpmemd to use the entire capacity of the DAX device.
By default, rpmemd is using the GPRRM method for assuring data persistence. Assuming that Intel DDIO is disabled, to let rpmemd take advantage of ARRM instead of GPRRM, we need to enable ARRM. To do it, add a new line to the rpmemd configuration file:
# initiator
# do nothing

# target
$ echo "persist-apm = yes" >> ~/.rpmemd.conf
For details about possible rpmemd configuration file locations and syntax, see the rpmemd(1) manual page.
Librpmem Configuration
The librpmem configuration is exactly the same as described in Librpmem Configuration.
# initiator
# do nothing

# target
# do nothing
What is Next?
The application that takes advantage of the presence of persistent memory on the initiator and on the target is described in Recover From the Replica. In this example, instead of allocating volatile memory on the initiator, memory mapped from device DAX will be used.
static struct pool_t *
map_pmem(const char *path, size_t *mapped_len)
{
    int is_pmem;
    struct pool_t *pool = pmem_map_file(path, 0, 0, 0, mapped_len,
            &is_pmem);
    if (!pool)
        return NULL;

    if (!is_pmem) {
        fprintf(stderr, "is not persistent memory: %s\n", path);
        goto err;
    }

    if (*mapped_len < POOL_SIZE) {
        fprintf(stderr, "too small: %ld < %ld\n", *mapped_len,
                POOL_SIZE);
        goto err;
    }

    return pool;
err:
    pmem_unmap(pool, *mapped_len);
    exit(1);
}
This code sample comes from Fibonacci application (fibonacci.c)
Replicating Data
To demonstrate how to replicate data using rpmem, the Hello World application (hello.c) will be used. It is a simple Hello World application but in rpmem style.
int
main(int argc, char *argv[])
{
    const char *target, *poolset;
    parse_args(argc, argv, &target, &poolset);

    void *pool = alloc_memory();
    if (!pool)
        exit(1);

    struct hello_t *hello = (struct hello_t *)(pool + DATA_OFF);
    int created;
    int ret;

    RPMEMpool *rpp = remote_open(target, poolset, pool, &created);
    if (!rpp) {
        ret = 1;
        goto exit_free;
    }

    if (created) {
        write_hello_str(hello, en);
    } else {
        ret = remote_read(rpp, hello);
        if (ret)
            goto exit_close;
        printf("\n%s\n\n", hello->str);
        translate(hello);
    }

    ret = remote_write(rpp);
    if (ret)
        goto exit_close;
    printf("rerun application to read the translation.\n");

exit_close:
    /* close the remote pool */
    if (rpmem_close(rpp)) {
        fprintf(stderr, "rpmem_close: %s\n", rpmem_errormsg());
        exit(1);
    }

exit_free:
    free(pool);
    return ret;
}
This application creates a replica on the target, stores the Hello world! message in it, and closes the replica. The local replica on the initiator is volatile, so it is freed after storing the message remotely. When the application is run the second time it reads the message from the remote replica and displays it. After that it translates the original English message into Spanish and stores it in the replica so that the next time it runs it will display the message in Spanish.
This application can be executed on any of the previously described setups. For brevity it is assumed it is executed on the setup described in Start to Shine – Replication to Remote Persistent Memory.
In this part, the initiator and the target are two separate machines connected using an RDMA-capable connection, and both of them are equipped with persistent memory. The persistent memory namespaces on both are configured as device DAX, so /dev/dax0.0 is available on both systems.
Creating a Memory Pool with a Replica
The hello.c file should be compiled and linked. When the hello application is run for the first time it stores the message string on the target and prints a request to run the application again. From now on each time the application is run it reads a message from the target and prints it on the screen. After that it translates it to another language and writes it back to the target, so the next time it will read it in a different language.
# initiator
$ cc hello.c -o hello -lrpmem -lpmem

$ ./hello target target.poolset
translating...
uploading translation to the target...
rerun application to read the translation.

$ ./hello target target.poolset
download translation from the target...

Hello world!
translating...
uploading translation to the target...
rerun application to read the translation.

$ ./hello target target.poolset
download translation from the target...

¡Hola Mundo!

translating...
uploading translation to the target...
rerun application to read the translation.

# target
# do nothing
Replicating data to the target and reading it back are performed by two simple functions:
#define DATA_OFF    4096 /* rpmem header size */
#define DATA_SIZE   (sizeof(struct hello_t))

static int
remote_write(RPMEMpool *rpp)
{
    printf("write message to the target...\n");
    if (rpmem_persist(rpp, DATA_OFF, DATA_SIZE, 0, 0)) {
        printf("upload failed: %s\n", rpmem_errormsg());
        return 1;
    }
    return 0;
}

static int
remote_read(RPMEMpool *rpp, void *buff)
{
    printf("read message from the target...\n");
    if (rpmem_read(rpp, buff, DATA_OFF, DATA_SIZE, 0)) {
        printf("download failed: %s\n", rpmem_errormsg());
        return 1;
    }
    return 0;
}
This code sample for reading and writing to the persistent memory on the target is from the Hello World application (hello.c).
The rpmem_persist(3) function always replicates data from the memory provided during rpmem_create(3) / rpmem_open(3) calls. Offset and length determines the specific range of this memory to replicate.
Both functions skip DATA_OFF, which is reserved for the rpmem pool header.
Recover From the Replica
Rpmem also allows continued operation using the replica when the initiator is corrupted. To demonstrate how this works, Fibonacci application (fibonacci.c) is used. This application opens the memory pool on the initiator and the replica on the target. It first writes the first two numbers from the Fibonacci sequence, and then it closes the memory pool and exits. When it’s executed again, it opens both pools, reads the two stored numbers, and generates the next one. It generates one number from the Fibonacci sequence each time it is executed.
The interesting part of this example starts when the primary pool is somehow corrupted. In the scenario presented below it will be overwritten with random data. When the application executes again it will have to decide which copy, initiator’s or target’s, is valid, generate the next number, and store the valid state in both memory pools.
Creating a Memory Pool with a Replica
The fibonacci.c file should be compiled, linked, and run as follows:
# initiator
$ cc fibonacci.c -o fibonacci -lrpmem -lpmem

$ ./fibonacci target target.poolset /dev/dax0.0
no valid Fibonacci numbers found.
initializing...
F[0] = 0
F[1] = 1
storing Fibonacci numbers on the target...
rerun application to generate next Fibonacci number.

# target
# do nothing
Inspecting the Results
In this part, the Fibonacci application stores its data at offset 4096 in the pool. On the initiator, the application does not store any pool header, so the first 4096 bytes are zeroed. But on the target side, the first 4096 bytes are reserved for the rpmem pool header. Apart from that, data in the primary pool and its replica are the same.
Note For brevity, the first 4096 bytes are skipped using the --skip argument to daxio. For details regarding the daxio(1) command, refer to its manual page.
# initiator
$ daxio -i /dev/dax0.0 --skip 4096 --len 4096 | hexdump -C
daxio: copied 4096 bytes to device "STDOUT"
00000000  46 49 42 4f 00 00 00 00  09 00 00 00 00 00 00 00  |FIBO............|
00000010  22 00 00 00 00 00 00 00  37 00 00 00 00 00 00 00  |".......7.......|
00000020  9f 00 00 00 00 00 00 00  00 00 00 00 00 00 00 00  |................|
00000030  00 00 00 00 00 00 00 00  00 00 00 00 00 00 00 00  |................|
*
00001000

# target
$ daxio -i /dev/dax0.0 --skip 4096 --len 4096 | hexdump -C
daxio: copied 4096 bytes to device "STDOUT"
00000000  46 49 42 4f 00 00 00 00  09 00 00 00 00 00 00 00  |FIBO............|
00000010  22 00 00 00 00 00 00 00  37 00 00 00 00 00 00 00  |".......7.......|
00000020  9f 00 00 00 00 00 00 00  00 00 00 00 00 00 00 00  |................|
00000030  00 00 00 00 00 00 00 00  00 00 00 00 00 00 00 00  |................|
*
00001000
The Fibonacci application stores the state required to generate the next number from the Fibonacci sequence. This structure looks as follows:
#define POOL_SIGNATURE  "FIBO"
#define FIBO_SIG_LEN RPMEM_POOL_HDR_SIG_LEN

struct fibo_t {
    char signature[FIBO_SIG_LEN];
    unsigned n;     /* index */
    uint64_t fn;    /* F_{n} */
    uint64_t fn1;   /* F_{n + 1} */
    int checksum;
};
This code sample comes from the Fibonacci application (fibonacci.c).
Each state structure starts with the FIBO signature, so it is easy to find them in the memory views obtained using hexdump. The view shown below represents the state after running the Fibonacci application 10 times.
Assuming the primary pool on the initiator is broken, Fibonacci would have to detect that it is corrupted, restore the state from the replica, and continue with generation of the next number from the Fibonacci sequence. To corrupt the memory, the daxio command is used.
# initiator
# overwrite the memory pool
$ cat /dev/urandom | daxio -o /dev/dax0.0 -seek 4096
daxio: copied 4096 bytes to device "/dev/dax0.0"

# examine its contents
$ daxio -i /dev/dax0.0 --skip 4096 --len 4096 | hexdump -C
daxio: copied 4096 bytes to device "STDOUT"
00000000  9e dd a3 83 26 93 de 4e  f7 3f ce 6e dd 9e 32 e1  |....&..N.?.n..2.|
00000010  d4 18 d6 47 77 4a 97 a9  9e 91 3b 6b 6e 8e eb cf  |...GwJ....;kn...|
00000020  57 76 c7 92 ad 88 ef 3e  d4 f0 0e 0c 43 50 e9 40  |Wv.....>....CP.@|
00000030  1f fd 0f 64 7a f1 bc 57  ba a9 d1 62 83 ac b5 db  |...dz..W...b....|
00000040  b8 b0 e5 c7 1e d7 fe 52  d4 d7 ba 07 54 21 5f 5f  |.......R....T!__|
# (...)

# target
# do nothing
Now it’s time to check how resilient our Fibonacci sequence generator is.
# initiator
$ ./fibonacci target target.poolset /dev/dax0.0
broken local memory pool!
restore Fibonacci numbers from the target...
F[11] = 89
storing Fibonacci numbers on the target...
rerun application to generate next Fibonacci number.

# target
# do nothing
Even though the initiator’s pool was corrupted, the state was recovered from the replica and the application continued. As the last step let’s check both the initiator’s memory pool and the target’s memory pool.
# initiator
$ daxio -i /dev/dax0.0 --skip 4096 --len 4096 | hexdump -C
daxio: copied 4096 bytes to device "STDOUT"
00000000  46 49 42 4f 00 00 00 00  0a 00 00 00 00 00 00 00  |FIBO............|
00000010  37 00 00 00 00 00 00 00  59 00 00 00 00 00 00 00  |7.......Y.......|
00000020  d6 00 00 00 00 00 00 00  00 00 00 00 00 00 00 00  |................|
00000030  00 00 00 00 00 00 00 00  00 00 00 00 00 00 00 00  |................|
*
00001000

# target
$ daxio -i /dev/dax0.0 --skip 4096--len X | hexdump -C
00000000  46 49 42 4f 00 00 00 00  0a 00 00 00 00 00 00 00  |FIBO............|
00000010  37 00 00 00 00 00 00 00  59 00 00 00 00 00 00 00  |7.......Y.......|
00000020  d6 00 00 00 00 00 00 00  00 00 00 00 00 00 00 00  |................|
00000030  00 00 00 00 00 00 00 00  00 00 00 00 00 00 00 00  |................|
*
00001000
Similarly, this application can recover from the target’s replica failure. The relevant part of the Fibonacci application (fibonacci.c) follows:
#define POOL_SIZE       (size_t)(32 * 1024 * 1024)
#define RPMEM_HDR_SIZE  4096
#define FIBO_OFF        RPMEM_HDR_SIZE
#define FIBO_SIZE       (sizeof(struct fibo_t))
#define RESERVED_SIZE   (POOL_SIZE - RPMEM_HDR_SIZE - FIBO_SIZE)

struct pool_t {
    unsigned char pool_hdr[RPMEM_HDR_SIZE];
    struct fibo_t fibo;
    unsigned char reserved[RESERVED_SIZE];
};


/*
 * fibo_validate -- validate local and remote copies of the F
 * sequence
 */
static struct fibo_t *
fibo_validate(struct fibo_t *fibo, struct fibo_t *fibo_r,
        unsigned *state)
{
    struct fibo_t *valid = NULL;

    if (fibo_is_valid(fibo))
        valid = fibo;
    else if (!fibo_is_zeroed(fibo)) {
        fprintf(stderr, "broken local memory pool!\n");
        *state |= BROKEN_LOCAL;
    }

    if (fibo_is_valid(fibo_r)) {
        if (!valid)
            valid = fibo_r;
        else if (fibo_r->n > valid->n)
            valid = fibo_r;
    } else if (!fibo_is_zeroed(fibo_r)) {
        fprintf(stderr, "broken remote memory pool!\n");
        *state |= BROKEN_REMOTE;
    }

    if (!valid)
        fprintf(stderr, "no valid Fibonacci numbers found.\n");

    return valid;
}

/*
 * fibo_recovery -- based on validation outcome cleanup copies and
 * initialize if required
 */
static int
fibo_recovery(RPMEMpool *rpp, struct pool_t *pool,
        struct fibo_t *fibo_r, int *initialized)
{
    struct fibo_t *fibo = &pool->fibo;
    unsigned state = 0;
    int ret;

    struct fibo_t *valid = fibo_validate(fibo, fibo_r, &state);

    /* store valid fibonacci data in local */
    if (valid) {
        if (valid != fibo)
            pmem_memcpy_persist(fibo, valid, FIBO_SIZE);
        *initialized = 0;
    } else {
        /* init local */
        fibo_init(fibo);
        *initialized = 1;
    }

    /* local cleanup */
    if (state & BROKEN_LOCAL) {
        /* zero reserved parts */
        memset(pool->pool_hdr, 0, RPMEM_HDR_SIZE);
        memset(pool->reserved, 0, RESERVED_SIZE);
        pmem_persist(pool, POOL_SIZE);
    }

    /* remote cleanup */
    if (state & BROKEN_REMOTE) {
        /* replicate data + reserved */
        ret = rpmem_persist(rpp, FIBO_OFF, POOL_SIZE - FIBO_OFF,
                0, 0);
        if (ret) {
            fprintf(stderr, "remote recovery failed: %s\n",
                    rpmem_errormsg());
            return ret;
        }
    }

    return 0;
}
In this case it is a simple process engaging naive checksum and signature to verify validity of the structures being read from persistent memory. Having that, detecting memory pool corruption is straightforward.
To keep the Fibonacci example simple and focused on rpmem, a simplistic checksum is used to detect and recover from corruption. For more complex persistent memory data structures, libpmemobj (also part of PMDK) is recommended. That library supports flexible allocation, transactions, and atomic in persistent memory, and will use rpmem when the poolset files are configured for remote replication.
Other Articles in This Series
Part 1, "Understanding Remote Persistent Memory," describes the theoretical realm of remote persistent memory.
Part 2, "Remote Persistent Memory 101," depicts examples of setups and practical uses of RPMEM.
Part 3, "RDMA Enabling for Data Replication," describes how to build an RDMA-capable network.
Footnotes
1. Intel, Persistent Memory
2. Intel, Intel® Xeon® Processor E5 v2 and E7 v2 Product Family Uncore Performance Monitoring Reference Manual
"