Persistent memory technologies, such as Intel® Optane™ DC persistent memory, come with several challenges. Remote access seems to be one of the most difficult aspects of persistent memory applications because there is no ready-to-use technology that supports remote persistent memory (RPMEM). Most commonly used remote direct memory access (RDMA) for remote memory access does not consider data durability aspects.
This paper proposes solutions for accessing RPMEM based on traditional RDMA. These solutions have been implemented in the Persistent Memory Development Kit (PMDK) librpmem library. Before you read this part, which describes how to set up a machine to work with rpmem and set up another machine as the replication target, we suggest reading Part 1, “Understanding Remote Persistent Memory." The other parts in this series include:
- Part 3, "RDMA Enabling for Data Replication," describes how to enable RDMA for data replication.
- Part 4, "Persistent Memory Development-Kit Based PMEM Replication," discusses PMDK-based persistent memory replication.
Single Machine Setup
To start working with rpmem, the only thing required is a machine with a configured single virtual loopback network interface. Persistent memory is not required at this stage. This machine acts as an initiator and a target at the same time. In this case, rpmem replicates via the virtual loopback network interface (127.0.0.1). This is a good starting point to get to know the rpmem setup process. It is also a good enough configuration to develop software using rpmem without access to an RDMA-capable NIC.
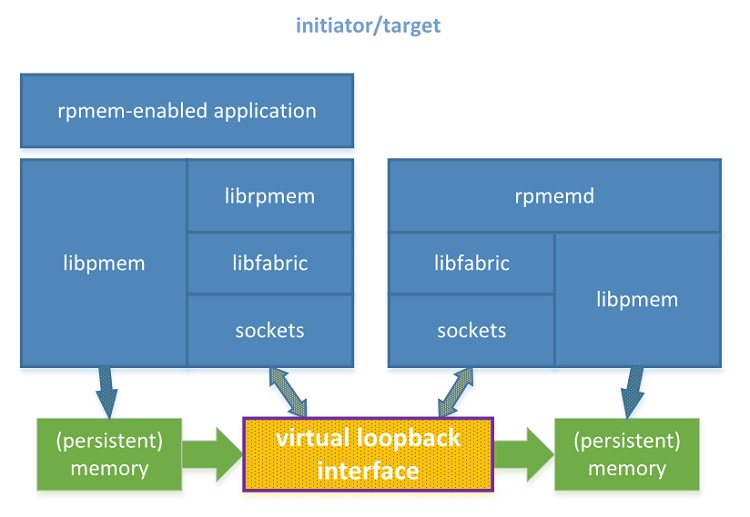
Figure 1. Rpmem software stack on a single machine
This section describes how to configure rpmem components to define the replication of a pmem pool. The simple open-persist-close application will be used as an example of an rpmem-enabled application.
In the described setup, the librpmem library sends commands via a virtual loopback interface to start rpmemd and replicate data to a specific pmem pool. Note that rpmemd runs on the same machine as the application, but it is started via the SSH connection. All replication commands are executed on the same machine, but they are all transmitted over a virtual loopback interface.
Configuring the Platform
The operating systems establish the limits to what users can do, how many processes they can run, and how much memory they can use. The default values differ according to the distribution and version, for example:
$ ulimit -a
core file size (blocks, -c) unlimited
data seg size (kbytes, -d) unlimited
scheduling priority (-e) 0
file size (blocks, -f) unlimited
pending signals (-i) 19719
max locked memory (kbytes, -l) 64
max memory size (kbytes, -m) unlimited
open files (-n) 1024
pipe size (512 bytes, -p) 8
POSIX message queues (bytes, -q) 819200
real-time priority (-r) 0
stack size (kbytes, -s) 8192
cpu time (seconds, -t) unlimited
max user processes (-u) 19719
virtual memory (kbytes, -v) unlimited
file locks (-x) unlimited
Rpmem replication sometimes imposes requirements greater than the default values for these limits. Rpmem users have to be aware that:
- A single replication process may use many logical connections between the initiator and the target. Each one of them is represented by an open file descriptor.
- Memory registered for replication (on the initiator side as well as on the target side) counts against the limit of overall memory locked by the user.
File descriptors and locked memory are two limits that have to be taken into consideration. Both of them are configured by limits.confg(5). These limits can be increased by adding new lines to /etc/security/limits.conf, for example:
$ cat /etc/security/limits.conf
# (...)
* soft memlock unlimited
* hard memlock unlimited
* soft nofile 1048000
* hard nofile 1048000
Changes take effect in a new login session. For details on how to increase these limits, see the manual page limits.confg(5).
Rpmem Installation
The setup described in this section requires the following software components:
- librpmem, librpmem-devel (initiator)
- rpmemd (target)
In this example our initiator and target are the same machine, so the installation of all required software components is done with a single command:
$ sudo dnf install librpmem librpmem-devel rpmemdThe librpmem-devel package is required to compile rpmem-enabled applications. It is not required at run time.
SSH Configuration
Librpmem and rpmemd pass control messages over SSH. SSH, in order to connect without assistance, requires public key authentication without a passphrase.
- Generating an SSH authentication key pair:
$ ssh-keygen
# (...)
Enter passphrase (empty for no passphrase): # leave empty
Enter same passphrase again: # leave empty
# (...)
In this part, rpmem is set up on the single machine but, in the general case, an SSH key pair has to be generated on the Initiator node and a public key has to be copied to the Target node.
- Allowing to connect to localhost via SSH:
$ ssh-copy-id user@localhost
# (...)
In this part, the user account is used on both the initiator and the target. In the general case, accounts on the Initiator node and on the Target node may differ.
- Checking SSH connection:
$ ssh user@localhost
# (...)
[user@localhost ~] $ # the sample shell prompt on the localhost
Poolset
Poolset(5) is a persistent memory pool configuration file format defined by PMDK. The poolset file describes which memory devices and files are merged together into a single memory pool.
The rpmemd application uses poolset files to describe memory pools used as replicas on the target. The rpmemd poolset files cannot define local or remote replicas, so it looks as follows:
$ cat target.poolset
PMEMPOOLSET

# memory pool consists of three files
100G /path0/to/myfile.part0
200G /path1/to/myfile.part1
400G /path2/to/myfile.part2
In the example above, the poolset file consists of the following sections:
- Poolset header required for validation purpose
PMEMPOOLSET- A memory pool description where each line points to exactly one file or device, which will be used as memory pool parts. The order of lines matters because it is also the order in which pool parts will be mapped to create a single memory pool. A memory pool must consist of one or more pool parts. A line describing the pool part starts with a file size followed by an absolute path to the part file.
100G /path0/to/myfile.part0
200G /path1/to/myfile.part1
400G /path2/to/myfile.part2
Detailed syntax of poolset files is outside the scope of this paper. For details, see the poolset(5) manual page.
Rpmemd Configuration
Rpmemd requires a poolset file describing a replica memory pool.
By default, rpmemd looks for poolset files in the user’s home directory. It is possible to change the default search directory by setting poolset-dir in an rpmemd configuration file. For details, see the rpmemd(1) manual page.
In this part, rpmemd will use a single file on tmpfs (/dev/shm).
$ mkdir /dev/shm/target # the directory has to exist

$ cat > /home/user/target.poolset <<EOF
PMEMPOOLSET
10M /dev/shm/target/replica
EOF
Librpmem Configuration
In the configuration described above, the replication goes via the virtual loopback interface, which does not support the verbs fabric provider. By default, the librpmem library refuses to use an interface if it does not support the verbs provider. To use the sockets provider, it is required to explicitly enable it using an environment variable.
$ export RPMEM_ENABLE_SOCKETS=1Note The RPMEM_ENABLE_SOCKETS variable has to be set in an application’s environment each time it starts.
Creating a Memory Pool with a Replica
The code sample below shows the minimal viable example of using librpmem API from the simple open-persist-close application (manpage.c).
#define POOL_SIGNATURE          "MANPAGE"
#define POOL_SIZE         (32 * 1024 * 1024)
#define NLANES                               4

#define DATA_OFF          4096
#define DATA_SIZE         (POOL_SIZE - DATA_OFF)
int
main(int argc, char *argv[])
{
        const char *target, *poolset;
        parse_args(argc, argv, &target, &poolset);

        unsigned nlanes = NLANES;
        void *pool = alloc_memory();
        int ret;

        /* fill pool_attributes */
        struct rpmem_pool_attr pool_attr;
        memset(&pool_attr, 0, sizeof(pool_attr));
        strncpy(pool_attr.signature, POOL_SIGNATURE, RPMEM_POOL_HDR_SIG_LEN);

        /* create a remote pool */
        RPMEMpool *rpp = rpmem_create(target, poolset, pool, POOL_SIZE,
                                        &nlanes, &pool_attr);
        if (!rpp) {
                        fprintf(stderr, "rpmem_create: %s\n", rpmem_errormsg());
                        return 1;
        }

        /* store data on local pool */
        memset(pool, 0, POOL_SIZE);

        /* make local data persistent on remote node */
        ret = rpmem_persist(rpp, DATA_OFF, DATA_SIZE, 0, 0);
        if (ret) {
                        fprintf(stderr, "rpmem_persist: %s\n", rpmem_errormsg());
                        return 1;
        }

        /* close the remote pool */
        ret = rpmem_close(rpp);
        if (ret) {
                        fprintf(stderr, "rpmem_close: %s\n", rpmem_errormsg());
                        return 1;
        }

        free(pool);

        return 0;
}
Assuming the source code is stored in the file called rpmem101.c, compile and link it using the following command:
$ cc rpmem101.c -o rpmem101 -lrpmemAfter that, the resulting rpmem101 executable can be run to open the remote replica target.poolset on the target and perform a single rpmem_persist operation:
$ ./rpmem101 localhost target.poolsetThis application will perform a few simple steps:
- Create a replica using target.poolset on localhost
- Fill the local memory pool with zeros
- Replicate the data to the replica on localhost
- Close the replica
Inspecting the Results
If the command succeeds, the pool replica in tmpfs is created:
$ tree /dev/shm/
/dev/shm/
└── target
└── replica
This can also be verified using hexdump to verify that the replica has the expected contents:
$ hexdump -C /dev/shm/replica
00000000 4d 41 4e 50 41 47 45 00 00 00 00 00 00 00 00 00 |MANPAGE.........|
00000010 00 00 00 00 00 00 00 00 5c 06 8e c4 13 0b c9 4b |........\......K|
00000020 ae cf 8b 02 56 8d 47 e1 48 76 64 ed 97 31 6a 4a |....V.G.Hvd..1jJ|
00000030 bc 32 4f eb 15 9a a9 a4 48 76 64 ed 97 31 6a 4a |.2O.....Hvd..1jJ|
*
00000070 bc 32 4f eb 15 9a a9 a4 f7 16 a2 5c 00 00 00 00 |.2O........\....|
00000080 10 73 77 37 f7 07 00 00 02 01 00 00 00 00 3e 00 |.sw7..........>.|
00000090 00 00 00 00 00 00 00 00 00 00 00 00 00 00 00 00 |................|
*
00000ff0 00 00 00 00 00 00 00 00 71 d1 fa bf 29 57 a8 e3 |........q...)W..|
00001000 00 00 00 00 00 00 00 00 00 00 00 00 00 00 00 00 |................|
*
06400000
Replicating to Another Machine
The next step in replicating data to persistent memory setup (persistent memory is not yet installed) is to use another machine as the replication target. It starts with a similar setup as the one described in the previous part, but this time the single virtual loopback interface is replaced with two regular network interfaces (NICs). This setup won’t give the best possible performance. It is a more advanced configuration that provides a good example of how the rpmem replication of memory pools between machines works.
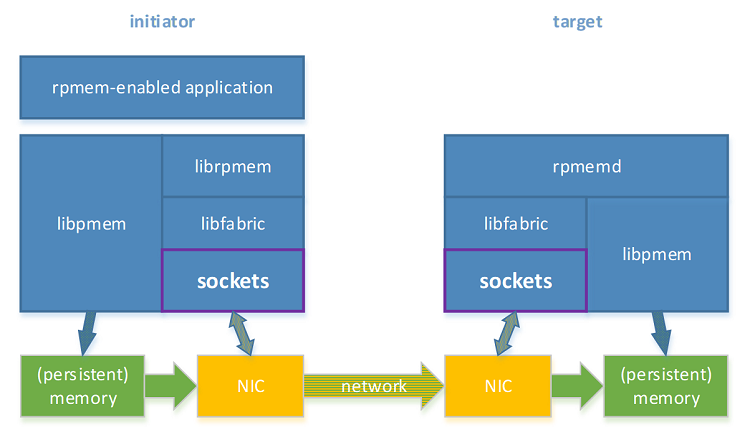
Figure 2. Rpmem software stack with two machines
In the described setup, the librpmem library sends commands to start rpmemd and replicate data to a specified memory pool. Commands are sent from the initiator to a network interface on the target machine via the network. The librpmem library runs on the initiator. The rpmemd daemon runs on the target. The source memory pool is located on the initiator and it is replicated to the replica on the target.
In this configuration, it is assumed that the initiator and the target are two separate machines that will require different configuration steps. To emphasize which command is performed on which machine, the steps are split into two groups as follows:
# initiator
# steps to perform on the initiator

# target
# steps to perform on the target
This section describes how to configure rpmem components to define the replication of a memory pool from the initiator to the replica on the target. Again, using the simple open-persist-close application (manpage.c).
Network Interfaces Configuration
The first step for the scenario described by this section is to configure NICs on both machines to allow routing TCP packets between them. An example network configuration might look like this:
# initiator
$ sudo ifconfig eth0 192.168.0.1 up

# Allow translating human-friendly name “target” to the target IP address
$ echo “192.168.0.2 target” | sudo tee –append “/etc/hosts”

# target
$ sudo ifconfig eth0 192.168.0.2 up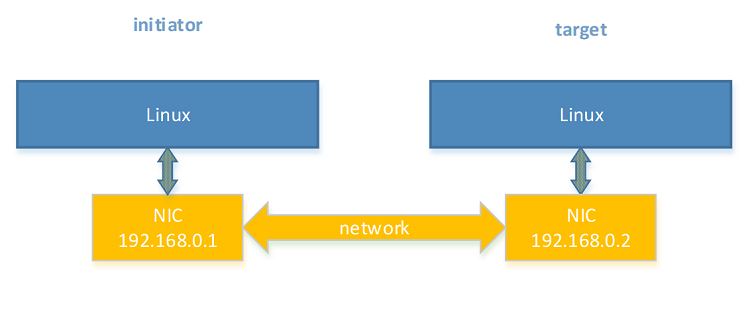
Figure 3. Network configuration of two machines
The ping command can be used to make sure the initiator and the target are connected:
# initiator
$ ping target # or ping 192.168.0.2
PING target (192.168.0.2) 56(84) bytes of data.
64 bytes from target (192.168.0.2): icmp_seq=1 ttl=64 time=1.000 ms
64 bytes from target (192.168.0.2): icmp_seq=2 ttl=64 time=1.000 ms
64 bytes from target (192.168.0.2): icmp_seq=3 ttl=64 time=1.000 ms
# (…)

# target
# do nothing
Note A firewall configuration on the target node may prevent pinging from the initiator. Firewall configuration is outside the scope of this paper.
Configuring Platforms
The platform configuration steps are the same as the case of a single machine replicating data via a virtual loopback device. The rpmem replication between two machines may be subject to limits established via limits.conf(5). Limits are modified on the initiator and on the target separately. For details, see “Single Machine Setup."
Rpmem Installation
Rpmem requires the following software components:
initiator:
- librpmem
- librpmem-devel (for linking an application)
target:
- rpmemd
# initiator
$ sudo dnf install librpmem librpmem-devel

# target
$ sudo dnf install rpmemd
SSH Configuration
Librpmem and rpmemd pass control messages over SSH. In order to connect without the assistance, SSH requires public key authentication without a passphrase. Librpmem initializes the SSH connection from the initiator to the target so all SSH configuration is done on the initiator.
# initiator

# 1. Generating an SSH authentication key pair
$ ssh-keygen
# (...)
Enter passphrase (empty for no passphrase): # leave empty
Enter same passphrase again: # leave empty
# (...)

# 2. Allowing to connect to the target via SSH
$ ssh-copy-id user@target
# (...)

# 3. Checking SSH connection
$ ssh user@target
# (...)
[user@target ~] $ # the sample shell prompt on the target

# target
# do nothing
In this part, the user account is used on both the initiator and the target. In the general case, accounts on the Initiator node and on the Target node don’t have to be the same.
Rpmemd Configuration
The rpmemd application manages replicas on the target, so it is required to describe the replica on the Target node as an rpmemd poolset file:
# initiator
# do nothing

# target
$ mkdir /dev/shm/target

$ cat > /home/user/target.poolset <<EOF
PMEMPOOLSET
10M /dev/shm/target/replica
EOF
Librpmem Configuration
In the described configuration, the replication goes via the network interface, which requires the sockets fabric provider. By default, the librpmem library refuses to use an interface if it does not support the verbs provider. To use the sockets provider, it is required to explicitly enable it using an environment variable.
# initiator
$ export RPMEM_ENABLE_SOCKETS=1

# target
# do nothing
Creating a Memory Pool with a Replica
The rpmem101 application, open-persist-close (manpage.c), from the previous section is also used here. Its compilation and linking should be performed on the initiator. To allocate memory on the initiator and replicate its content to the replica on the target via rpmem, execute the following commands:
# initiator
$ cc rpmem101.c -o rpmem101 -lrpmem
$ ./rpmem101 target target.poolset

# target
# do nothing
Inspecting the Results
If the command succeeds, it creates a replica pool in tmpfs on the target. Since rpmem101 allocates a memory pool from DRAM, there are no visible results on the initiator.
# initiator
# do nothing

# target
$ tree /dev/shm/
/dev/shm/
└── target
└── replica
This can also be verified using hexdump to verify that the replica has the expected contents:
# initiator
# do nothing

# target
$ hexdump -C /dev/shm/replica
00000000 4d 41 4e 50 41 47 45 00 00 00 00 00 00 00 00 00 |MANPAGE.........|
00000010 00 00 00 00 00 00 00 00 5c 06 8e c4 13 0b c9 4b |........\......K|
00000020 ae cf 8b 02 56 8d 47 e1 48 76 64 ed 97 31 6a 4a |....V.G.Hvd..1jJ|
00000030 bc 32 4f eb 15 9a a9 a4 48 76 64 ed 97 31 6a 4a |.2O.....Hvd..1jJ|
*
00000070 bc 32 4f eb 15 9a a9 a4 f7 16 a2 5c 00 00 00 00 |.2O........\....|
00000080 10 73 77 37 f7 07 00 00 02 01 00 00 00 00 3e 00 |.sw7..........>.|
00000090 00 00 00 00 00 00 00 00 00 00 00 00 00 00 00 00 |................|
*
00000ff0 00 00 00 00 00 00 00 00 71 d1 fa bf 29 57 a8 e3 |........q...)W..|
00001000 00 00 00 00 00 00 00 00 00 00 00 00 00 00 00 00 |................|
*
06400000
Proceed to Part 3, "RDMA Enabling for Data Replication," which describes how to build an RDMA-capable network.
Other Articles in This Series
Part 1, “Understanding Remote Persistent Memory," describes the theoretical realm of remote persistent memory.
Part 4, "Persistent Memory Development Kit-Based PMEM Replication," describes how to create and configure an application that can replicate persistent memory over an RDMA-capable network.
"