Deep Learning Inference Engine Workflow
The Deep Learning Inference Engine is a part of Intel® Deep Learning Deployment Toolkit (Intel® DL Deployment Toolkit) and OpenVINO™ toolkit. It facilitates deployment of deep learning solutions by delivering a unified, device-agnostic inference API.
For more information, refer to the Inference Engine Developer Guide.
The Deep Learning Inference Engine workflow involves the creation of custom kernels and either custom or existing layers.
A layer is defined as a convolutional neural network (CNN) building block implemented in the training framework (for example, Convolution in Caffe*). A kernel is defined as the corresponding implementation in the Inference Engine. This tutorial is aimed at advanced users of the Inference Engine. It allows users to provide their own kernels for existing or completely new layers.
Networks training is typically done on high-end data centers, using popular training frameworks like Caffe or TensorFlow*. Scoring (or inference), on the other hand, can take place on the embedded, low-power platforms. The limitations of these target platforms make the deployment of the final solution very challenging, both with respect to the data types and API support. Model Optimizer tool enables automatic and seamless transition from the training environment to the deployment environment.
Below is an example Caffe workflow (TensorFlow steps are the same). The Model Optimizer converts the original Caffe proprietary formats to the Intermediate Representation (IR) file that describes the topology accompanied by a binary file with weights. These files are consumed by the Inference Engine and used for scoring.
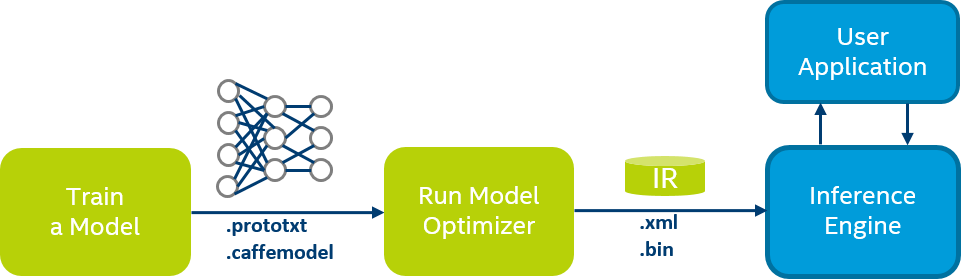
Note: To work with Caffe, the Model Optimizer requires Caffe recompilation with the special interface wrappers (see the Model Optimizer Developer Guide for details).
The process of conversion from the supported frameworks to the Inference Engine formats is automatic for topologies with the standard layers that are known to the Model Optimizer tool (see Using the Model Optimizer to Convert TensorFlow* Models or Using the Model Optimizer to Convert Caffe* Models).
This tutorial explains the flow and provides examples for the non-standard (or custom) layers.
Inference Engine and the Model Optimizer are provided as parts of the Intel DL Deployment Toolkit and OpenVINO toolkit. The components are the same in both toolkits, but the paths are slightly different:
- In the Intel DL Deployment Toolkit:
<DL_TOOLKIT_ROOT_DIR>/deployment_tools/model_optimizer<DL_TOOLKIT_ROOT_DIR>/deployment_tools/inference_engine
- In the OpenVINO toolkit:
<OPENVINO_ROOT_DIR>/model_optimizer<OPENVINO_ROOT_DIR>/inference_engine
Custom Layers Workflow
The Inference Engine has a notion of plugins (device-specific libraries to perform hardware-assisted inference acceleration). Before creating any custom layer with the Inference Engine, you need to consider the target device. The Inference Engine supports only CPU and GPU custom kernels. It is usually easier to begin with the CPU extension, and debugging with the CPU path, and then switch to the GPU.
For performance implications and estimations, see Performance Implications and Estimating Performance Without Implementing or Debugging a Kernel.
When creating new kernels in the Inference Engine, you must connect custom layers to these kernels as follows:
- Register the custom layer for the Model Optimizer tool. This step, which is device agnostic, is required to generate correct Intermediate Representation (IR) file with the custom layers.
- Implement the kernel in OpenCL™ (if you target GPU acceleration) or C++ (for general CPU codepath) that can be plugged into the Inference Engine.
- Register the kernel in the Inference Engine, so that each time it meets the layer of the specific type in the IR, it inserts a call to the custom kernel into the internal graph of computations. The registration process also defines the connection between the Caffe parameters of the layer and the kernel inputs.
The rest of document explains the steps in details.
Note: The Inference Engine moved to the concept of core primitives implemented by the plugins and extensions that come in the source code. For the CPU device, it allows re-compilation for the target platform with SSE, AVX2, and similar codepaths. The CPU extensions, which you can modify or use as a starting point, are located in the <INSTALL_DIR>/deployment_tools/samples/extension directory.
Registering Custom Layers for the Model Optimizer
The main purpose of registering a custom layer within the Model Optimizer is to define the shape inference (how the output shape size is calculated from the input size). Once the shape inference is defined, the Model Optimizer does not need to call the specific training framework again.
For information on registering custom layers, see Custom Layers in the Model Optimizer.
Note: For Caffe, there is legacy option to use the training framework fallback for shape inference. Custom layers can be registered in the <MODEL_OPTIMIZER_DIR>/bin/CustomLayersMapping.xml, and the tool will call the Caffe directly to get information on the output shapes.
Although the legacy option is much simpler than the primary registration process, it has a limitation related to shapes that dynamically depend on the input data. So we strongly encourage you to use general custom layers registration mechanism via Python* classes for the Model Optimizer.
Performance Considerations for Custom Kernels and Custom Layers
Creating custom kernels and custom layers can create performance issues in certain conditions, so it is important to keep in mind the implications of specific development decisions and to estimate how these development decisions might affect performance.
Performance Implications
- Overriding Existing Layers.
Custom kernels are used to quickly implement missing layers for cutting-edge topologies. For that reason, it is not advised to override layers on the critical path (for example, Convolutions). Also, overriding existing layers can disable some existing performance optimizations such as fusing.
- Post-processing Custom Layers.
When the custom layers are at the very end of your pipeline, it is easier to implement them as regular post-processing in your application without wrapping as kernels. This is particularly true for kernels that do not fit the GPU well, for example, (output) bounding boxes sorting. In many cases, you can do such post-processing on the CPU.
- Blocked Layout.
If the performance of the CPU extension is of concern, consider an implementation that supports the blocking layout (that the Intel® Math Kernel Library for Deep Neural Networks (Intel® MKL-DNN) is using internally), which would eliminate (automatic) Reorders before and after your kernel. For example of the blocked layout support, please refer to the PReLu extension example in the
<INSTALL_DIR>/deployment_tools/samples/extension/ext_prelu.cpp.
Estimating Performance without Implementing or Debugging a Kernel
In most cases, before actually implementing a full-blown code for the kernel, you can estimate the performance by creating a stub kernel that does nothing and is “infinitely” fast to let the topology execute end-to-end. The estimation is valid only if the kernel output does not affect the performance (for example, if its output is not driving any branches or loops).
CPU Kernels
Interface
Since the primary vehicle for the performance of the CPU codepath in the Inference Engine is Intel MKL-DNN, new CPU kernels are extending the Inference Engine plugin for the Intel MKL-DNN. Implementing the InferenceEngine::ILayerImplFactory defines a general “CPU-side” extension. So, there are no Intel MKL-DNN specifics in the way you need to implement a kernel.
Let’s consider simple MyCustomLayerFactory class that registers example kernels which make multiplication by two of its input data, but and does not change the dimensions:
- Create a constructor, a virtual destructor, and a data member to keep the layer info:
// my_custom_layer.h class MyCustomLayerFactory: public InferenceEngine::ILayerImplFactory { public: explicit MyCustomLayerFactory(const CNNLayer *layer): cnnLayer(*layer) {} private: CNNLayer cnnLayer; }; - Overload and implement the abstract methods (
getShapes,getImplementations) of theInferenceEngine::ILayerImplFactoryclass:StatusCode MyCustomLayerFactory::getShapes(const std::vector<TensorDesc>& inShapes, std::vector<TensorDesc>& outShapes, ResponseDesc *resp) noexcept override { if (cnnLayer == nullptr) return GENERAL_ERROR; outShapes.clear(); // the kernel accepts single tensor only if (inShapes.size() != 1) return GENERAL_ERROR; else// the output tensor’s shape is the same (kernel doesn’t change that) outShapes.emplace_back(inShapes[0]); return OK; } StatusCode MyCustomLayerFactory::getImplementations(std::vector<ILayerImpl::Ptr>& impls, ResponseDesc *resp) noexcept override { // below the method reports single (CPU) impl of the kernel // in theory, here you can report multiple implementations // (e.g. depending on the layer parameters, available via the cnnLayer instance impls.push_back(ILayerImpl::Ptr(new MyCustomLayerImpl(cnnLayer))); return OK; } - Introduce an actual kernel as
MyCustomLayerImplclass, inherited from the abstractInferenceEngine::ILayerExecImplclass:// my_custom_layer.h class MyCustomLayerImpl: public ILayerExecImpl { public: explicit MyCustomLayerImpl(const CNNLayer *layer): cnnLayer(*layer) {} StatusCode getSupportedConfigurations(std::vector<LayerConfig>& conf, ResponseDesc *resp) noexcept override; StatusCode init(LayerConfig& config, ResponseDesc *resp) noexcept override; StatusCode execute(std::vector<Blob::Ptr>& inputs, std::vector<Blob::Ptr>& outputs, ResponseDesc *resp) noexcept override; private: CNNLayer cnnLayer; }; - Implement the virtual methods for your kernel class. First of all, implement the
getSupportedConfigurations, which returns all supported format (input/output tensor layouts) for your implementation:// my_custom_layer.cpp virtual StatusCode MyCustomLayerImpl::getSupportedConfigurations(std::vector< LayerConfig>& conf, ResponseDesc *resp) noexcept { try { if (cnnLayer == nullptr) THROW_IE_EXCEPTION << "Cannot get cnn layer"; if (cnnLayer->insData.size() != 1 || cnnLayer->outData.empty()) THROW_IE_EXCEPTION << "Incorrecr number of input/outpput edges!"; DataPtr dataPtr = cnnLayer->insData[0].lock(); if (!dataPtr) THROW_IE_EXCEPTION << "Cannot get input data!"; DataConfig dataConfig; // this layer can procees data in-place but it is not constant dataConfig.inPlace = -1; dataConfig.constant = false; SizeVector order; //order of dimensions is default (unlike some Permute, etc kernels) for (size_t i = 0; i < dataPtr->getTensorDesc().getDims().size(); i++) { order.push_back(i); } // combine info into the TensorDesc dataConfig.desc = TensorDesc( dataPtr->getTensorDesc().getPrecision(), dataPtr->getTensorDesc().getDims(), {dataPtr->getTensorDesc().getDims(), order} /*BlockingDesc*/ ); //NCHW is default, so this call can be omitted, but see comment in the end dataConfig.desc.SetLayout(MemoryFormat::NCHW); LayerConfig config; // finally, add the expected input config to the kernel config config.inConfs.push_back(dataConfig); //pretty much the same for the (single) output that the kernel will produce DataConfig outConfig; outConfig.constant = false; outConfig.inPlace = 0; order.clear(); for (size_t i = 0; i < cnnLayer->outData[0]->getTensorDesc().getDims().size(); i++) { order.push_back(i); } // NCHW is default, so we use the TensorDesc constructor that omits the layout outConfig.desc = TensorDesc( cnnLayer->outData[0]->getTensorDesc().getPrecision(), cnnLayer->outData[0]->getDims(), {cnnLayer->outData[0]->getDims(), order} ); // add the output config to the layer/kernel config config.outConfs.push_back(outConfig); // no dynamic batch support config.dynBatchSupport = 0; // finally, “publish” the single configuration that we are going to support conf.push_back(config); return OK; } catch (InferenceEngine::details::InferenceEngineException& ex) { std::string errorMsg = ex.what(); errorMsg.copy(resp->msg, sizeof(resp->msg) - 1); return GENERAL_ERROR; }Note: Carefully select the formats to support, as the framework might insert potentially costly reorders - special calls to reshape the data to meet the kernels requirements. Many streaming kernels (for example, that apply some arithmetic to every element of the input, like ReLU) are actually agnostic to the layout, so you should specify
InferenceEngine::MKLDNNPlugin::MemoryFormat::anyfor them. Similarly, kernels that do not follow the traditional tensor semantics (of batches or features), but store the values in tensors can also useMemoryFormat::any.Finally, if the performance is of concern, consider an implementation that supports the blocking layout (that the Intel MKL-DNN is using internally), which would eliminate reorders before and after your kernel. For an example of the blocked layout support, please see the PReLu extension example in the following directory:
<INSTALL_DIR>/deployment_tools/samples/extension/ext_prelu.cpp. - Implement
initmethod to get a runtime-selected configuration from a vector that populated in the previous step and check the parameters:// my_custom_layer.cpp virtual StatusCode MyCustomLayerImpl::init(LayerConfig& config, ResponseDesc *resp) noexcept { StatusCode rc = OK; if (config.dynBatchSupport) { config.dynBatchSupport = 0; rc = NOT_IMPLEMENTED; } for (auto& input : config.inConfs) { if (input.inPlace >= 0) { input.inPlace = -1; rc = NOT_IMPLEMENTED; } for (auto& offset : input.desc.getBlockingDesc().getOffsetPaddingToData()){ if (offset) // our simplified impl doesn’t support data offsets return GENERAL_ERROR; } if (input.desc.getBlockingDesc().getOffsetPadding()) return GENERAL_ERROR; // our simplified impl doesn’t support padding for (size_t i = 0; i < input.desc.getBlockingDesc().getOrder().size(); i++){ if (input.desc.getBlockingDesc().getOrder()[i] != i) { // our simplified tensors other than 4D, and just regular dims order if (i != 4 || input.desc.getBlockingDesc().getOrder()[i] != 1) return GENERAL_ERROR; } } } // pretty much the same checks for output for (auto& output : config.outConfs) { if (output.inPlace < 0) // no in-place support for the output return GENERAL_ERROR; for (auto& offset : output.desc.getBlockingDesc().getOffsetPaddingToData()) { if (offset) return GENERAL_ERROR; } if (output.desc.getBlockingDesc().getOffsetPadding()) return GENERAL_ERROR; for (size_t i = 0; i < output.desc.getBlockingDesc().getOrder().size(); i++) { if (output.desc.getBlockingDesc().getOrder()[i] != i) { if (i != 4 || output.desc.getBlockingDesc().getOrder()[i] != 1) return GENERAL_ERROR; } } } return rc; } - Implement the execute method, which accepts and processes the actual tenors as input/output blobs:
// my_custom_layer.cpp
virtual StatusCode MyCustomLayerImpl::execute(std::vector<Blob::Ptr>& inputs, std::vector<Blob::Ptr>& outputs, ResponseDesc *resp) noexcept {
    if (inputs.size() != 1 || outputs.empty()) {
        std::string errorMsg = "Incorrect number of input or output edges!";
        errorMsg.copy(resp->msg, sizeof(resp->msg) - 1);
        return GENERAL_ERROR;
    }
    const float* src_data = inputs[0]->buffer();
    float* dst_data = outputs[0]->buffer();
    for (size_t o = 0; o < outputs->size(); o++) {
            dst_data[o] = src_data[o]*2; // the kernel just multiplies the input
    }
}
Packing the Kernels into a Shared Library
Packing the kernels into a shared library groups kernels into a shared library. The library should internally implement the InferenceEngine::IExtension, which defines the functions that you need to implement:
// my_custom_extension.h
class MyCustomExtentionLib: public InferenceEngine::IExtension {
private:
    static InferenceEngine::Version ExtensionDescription = {
        {1, 0},             // extension API version
        "1.0",
        "MyCustomExtentionLib"   // extension description message
    };
public:
    // cleanup resources, in our case does nothing
    void Unload() noexcept override {
    }
    //  method called upon destruction, in our case does nothing
    void Release() noexcept override {
        delete this;
    }
    // logging, in our case does nothing
    void SetLogCallback(InferenceEngine::IErrorListener &listener) noexcept override {}
// returns version info
void GetVersion(const InferenceEngine::Version *& versionInfo) const noexcept override {
        versionInfo = &ExtensionDescription;
    }
// retrunes the list of supported kernels/layers
 StatusCode getPrimitiveTypes(char**& types, unsigned int& size, ResponseDesc* resp) noexcept override {
        std::string type_name = "MyCustomLayer";
        types = new char *[1];
        size = 1;
        types[0] = new char[type_name.size() + 1];
        std::copy(type_name.begin(), type_name.end(), types[0]);
        types[0][type_name.size()] = '\0';
        return OK;
    }
// main function!
    StatusCode MyCustomExtentionLib::getFactoryFor(ILayerImplFactory *&factory, const CNNLayer *cnnLayer, ResponseDesc *resp) {
        if (cnnLayer->type != "MyCustomLayer") {
            std::string errorMsg = std::string("Factory for ") + cnnLayer->type + " wasn't found!";
            errorMsg.copy(resp->msg, sizeof(resp->msg) - 1);
            return NOT_FOUND;
        }
        factory = new MyCustomLayerFactory(cnnLayer);
        return OK;
    }
};
Loading the Shared Library
Before loading a network with the plugin, you must load the library with kernels to avoid errors on the unknown layer types:
// Load Intel MKL-DNN plugin, refer to the samples for more examples
InferenceEngine::InferenceEnginePluginPtr plugin_ptr(selectPlugin(…, “CPU”));
InferencePlugin plugin(plugin_ptr);
 // Load CPU (MKL-DNN) extension as a shared library
auto extension_ptr =
make_so_pointer<InferenceEngine:: IExtension>(“<shared lib path>”);
// Add extension to the plugin list
plugin.AddExtension(extension_ptr);
For code examples, see Inference Engine Samples. for code samples. All Inference Engine samples (except trivial hello_classification) feature a dedicated command-line option to load custom kernels. Use the following command-line code to execute the sample with custom CPU kernels:
$ ./classification_sample -i <path_to_image>/inputImage.bmp -m <path_to_model>/CustomAlexNet.xml -d CPU
-l <absolute_path_to_library>/libmy_sample_extension.so
GPU Kernels
General Workflow
Unlike CPU custom kernels, the GPU codepath abstracts many details about OpenCL. You do not need to use host -side OpenCL APIs. You only need to provide a configuration file and one or more kernel source files. See Example Configuration for examples of configuration and kernel files.
There are two options for using custom layer configuration file within the Inference Engine:
- To include a section with your kernels into global automatically-loaded
cldnn_global_custom_kernels/cldnn_global_custom_kernels.xmlfile (hosted in the<INSTALL_DIR> /deployment_tools/inference_engine/bin/intel64/{Debug/Release}folder) - To call the
IInferencePlugin::SetConfig()method from the user application with thePluginConfigParams::KEY_CONFIG_FILEkey and the configuration file name as the value before loading the network that uses custom layers to the plugin:// Load GPU plugin, refer to the samples for more examples InferenceEngine::InferenceEnginePluginPtr plugin_ptr(selectPlugin({…, “GPU”)); InferencePlugin plugin(plugin_ptr); // Load GPU Extensions plugin.SetConfig({{PluginConfigParams::KEY_CONFIG_FILE, ”<path to the xml file>”}}); …
All Inference Engine samples (except trivial hello_classification) feature a dedicated command-line option to load custom kernels with -c option, as follows:
$ ./classification_sample -m ./models/alexnet/bvlc_alexnet_fp16.xml -i ./validation_set/daily/227x227/apron.bmp -d GPU
 -c absolute_path_to_config /custom_layer_example.xml
Configuration File Format
The configuration file is expected to follow the .xml file structure with a node of type CustomLayer for every custom layer provided by the user.
The following definitions will use the notations:
- (0/1) Can have 0 or 1 instances of this node/attribute
- (1) Must have 1 instance of this node/attribute
- (0+) Can have any number of instances of this node/attribute
- (1+) Can have 1 or more instances of this node/attribute
CustomLayer Node and Sub-node Structure
CustomLayer node contains the entire configuration for a single custom layer.
| Attribute Name | # | Description |
|---|---|---|
name |
(1) | The name of the layer type to be used. This name should be identical to the type used in the IR. |
type |
(1) | Must be SimpleGPU |
version |
(1) | Must be 1 |
Sub-nodes: Kernel (1), Buffers (1), CompilerOptions (0+), WorkSizes (0/1)
Kernel Node and Sub-node Structure
Kernel node contains all kernel source code configuration. No kernel node structure exists.
Sub-nodes: Source (1+), Define (0+)
Source Node and Sub-node Structure
Source node points to a single OpenCL source file.
| Attribute Name | # | Description |
|---|---|---|
filename |
(1) | Name of the file containing OpenCL source code. Notice that path is relative to your executable. Multiple source nodes will have their sources concatenated in order. |
Sub-nodes: None
Define Node and Sub-node Structure
Define node configures a single #define instruction to be added to the sources during compilation (JIT).
| Attribute Name | # | Description |
|---|---|---|
name |
(1) | The name of the defined JIT. For static constants, this can include the value as well (taken as a string). |
param |
(0/1) | Name of one of the layer parameters in the IR. This parameter value will be used as the value of this JIT definition. |
type |
(0/1) | The parameter type. Accepted values: |
default |
(0/1) | The default value to be used if the specified parameters is missing from the layer in the IR |
Sub-nodes: None
The resulting JIT will be of the form: #define [name] [type] [value/default].
Buffers Node and Sub-node Structure
Buffers node configures all input/output buffers for the OpenCL entry function. No buffers node structure exists.
Sub-nodes: Data (0+), Tensor (1+)
Data Node and Sub-node Structure
Data node configures a single input with static data (for example, weight or biases).
| Attribute Name | # | Description |
|---|---|---|
name |
(1) | Name of a blob attached to this layer in the IR |
arg-index |
(1) | 0-based index in the entry function arguments to be bound to |
Sub-nodes: None
Tensor Node and Sub-node Structure
Tensor node configures a single input or output tensor.
| Attribute Name | # | Description |
|---|---|---|
arg-index |
(1) | 0-based index in the entry function arguments to be bound to |
type |
(1) | input or output |
port-index |
(1) | 0-based index in the layer’s input/output ports in the IR |
format |
(0/1) | Data layout declaration for the tensor Accepted values: BFYX, BYXF, YXFB, FYXB (also in all lowercase) Default value: BFYX |
CompilerOptions Node and Sub-node Structure
CompilerOptions node configures the compilation flags for the OpenCL sources.
| Attribute Name | # | Description |
|---|---|---|
options |
(1) | Options string to be passed to the OpenCL compiler |
Sub-nodes: None
WorkSizes Node and Sub-node Structure
WorkSizes node configures the global/local work sizes to be used when queuing the OpenCL program for execution.
| Attribute Name | # | Description |
|---|---|---|
global |
(0/1) | An array of up to 3 integers (or formulas) for defining the OpenCL work-sizes to be used during execution. The formulas can use the values of the B,F,Y,X dimensions and contain the operators: +,-,/,*,% (all evaluated in integer arithmetic) Default value:global=”B*F*Y*X” local=”” |
local |
(0/1) |
Sub-nodes: None
Example Configuration file
The following code sample provides an example configuration file (in .xml format). For information on configuration file structure, see Configuration File Format.
<!-- the config file introduces a custom "ReLU" layer-->
<CustomLayer name="ReLU" type="SimpleGPU" version="1">
  <!-- the corresponding custom kernel is "example_relu_kernel" from the specified .cl file-->
  <Kernel entry="example_relu_kernel">
    <Source filename="custom_layer_kernel.cl"/>
    <!-- the only ReLU specific parameter (for "leaky" one)-->
    <Define name="neg_slope" type="float" param="negative_slope" default="0.0"/>
  </Kernel>
  <!-- inputs and outputs of the kernel-->
  <Buffers>
    <Tensor arg-index="0" type="input" port-index="0" format="BFYX"/>
    <Tensor arg-index="1" type="output" port-index="0" format="BFYX"/>
  </Buffers>
  <!-- OpenCL compiler options-->
  <CompilerOptions options="-cl-mad-enable"/>
  <!-- define the global worksize. The formulas can use the values of the B,F,Y,X dimensions and contain the operators: +,-,/,*,% (all evaluated in integer arithmetic)
Default value: global="B*F*Y*X,1,1"-->
  <WorkSizes global="X,Y,B*F"/>
</CustomLayer>
Built-In Defines for Custom Layers
The following table includes definitions that will be attached before the user sources, where <TENSOR> is the actual input and output, (for example, INPUT0 or OUTPUT0).
For an example, see Example Kernel.
| Name | Value |
|---|---|
NUM_INPUTS |
Number of the input tensors bound to this kernel |
GLOBAL_WORKSIZE |
An array of global work sizes used to execute this kernel |
GLOBAL_WORKSIZE_SIZE |
The size of the GLOBAL_WORKSIZE array |
LOCAL_WORKSIZE |
An array of local work sizes used to execute this kernel |
LOCAL_WORKSIZE_SIZE |
The size of the LOCAL_WORKSIZE array |
<TENSOR>_DIMS |
An array of the tensor dimension sizes. Always ordered as BFYX |
<TENSOR>_DIMS_SIZE |
The size of the <TENSOR>_DIMS array |
<TENSOR>_TYPE |
The data-type of the tensor: float, half or char |
<TENSOR>_FORMAT_ |
The format of the tensor, BFYX, BYXF, YXFB , FYXB or ANY
|
<TENSOR>_LOWER_PADDING |
An array of padding elements used for the tensor dimensions before they start. Always ordered as BFYX. |
<TENSOR>_ LOWER_PADDING_SIZE |
The size of the <TENSOR>_LOWER_PADDING array |
<TENSOR>_UPPER_PADDING |
An array of padding elements used for the tensor dimensions after they end. Always ordered as BFYX. |
<TENSOR>_UPPER_PADDING_SIZE |
The size of the <TENSOR>_UPPER_PADDING array |
<TENSOR>_PITCHES |
The number of elements between adjacent elements in each dimension. Always ordered as BFYX. |
<TENSOR>_PITCHES_SIZE |
The size of the <TENSOR>_PITCHES array |
<TENSOR>_OFFSET |
The number of elements from the start of the tensor to the first valid element (bypassing the lower padding) |
All <TENSOR> values will be automatically defined for every tensor bound to this layer (INPUT0, INPUT1, OUTPUT0, and so on), as shown in the following for example:
#define INPUT0_DIMS_SIZE 4
#define INPUT0_DIMS (int []){ 1,96,55,55, }
Refer to the Appendix A: Resulting OpenCL™ Kernel for more examples.
Example Kernel
#pragma OPENCL EXTENSION cl_khr_fp16 : enable
__kernel void example_relu_kernel(
    const __global INPUT0_TYPE*  input0,
          __global OUTPUT0_TYPE* output)
{
    const uint idx  = get_global_id(0);
    const uint idy  = get_global_id(1);
    const uint idbf = get_global_id(2);//batches*features, as OpenCL supports 3D nd-ranges only
    const uint feature = idbf%OUTPUT0_DIMS[1];
    const uint batch   = idbf/OUTPUT0_DIMS[1];
    //notice that pitches are in elements, not in bytes!
    const uint in_id  = batch*INPUT0_PITCHES[0] + feature*INPUT0_PITCHES[1]   + idy*INPUT0_PITCHES[2]  + idx*INPUT0_PITCHES[3]  + INPUT0_OFFSET;
    const uint out_id = batch*OUTPUT0_PITCHES[0] + feature*OUTPUT0_PITCHES[1]  + idy*OUTPUT0_PITCHES[2]  + idx*OUTPUT0_PITCHES[3]  + OUTPUT0_OFFSET;

    INPUT0_TYPE value = input0[in_id];
    //neg_slope (which is non-zero for leaky ReLU) is put automatically as #define, refer to the config xml
    output[out_id] = value < 0 ? value * neg_slope : value;
}
Note: As described in the previous section, all the things like INPUT0_TYPE are actually defined as OpenCL (pre-) compiler inputs by the Inference Engine for efficiency reasons. See Debugging Tips for information on debugging the results.
Debugging Tips
Dumping the Resulting Kernels
Compared to the CPU-targeted code, debugging the GPU kernels is less trivial.
First of all, it is recommended to get a dump of the kernel with all of the values set by the Inference Engine (all of the tensors sizes, floating-point, and integer kernel parameters). To get the dump, add a following line to your code that configures the GPU plugin to output the custom kernels:
plugin.SetConfig({{ PluginConfigParams::KEY_DUMP_KERNELS, PluginConfigParams::YES }});
When the Inference Engine compiles the kernels for the specific network, it will also output the resulting code for the custom kernels. In the directory of your executable, you will locate files like clDNN_program0.cl, clDNN_program1.cl. There are as many files as distinct sets of parameters for your custom kernel (different input tensor sizes, and kernel parameters). See Appendix A: Resulting OpenCL™ Kernel for an example of a dumped kernel.
Using printf in the OpenCL™ Kernels
To debug the specific values, you can use printf in your kernels. However, you should be careful: for instance, do not output excessively as it would generate too much data. Since the printf output is typical, your output can be truncated to fit the buffer. Also, because of buffering, you actually get an entire buffer of output when the execution ends.
For more information, refer to printf Function.
Appendix A: Resulting OpenCL™ Kernel
This is an example of the code produced by the Inference Engine that Compute Library for Deep Neural Networks (clDNN) generates internally for the specific layer, when all the params (like neg_slope value for the ReLU) and tensor dimensions are known.
Essentially, this is original user code (see Example Kernel) plus a bunch of define values from the clDNN. Notice that the layer name is also reported (relu1):
// Custom Layer Built-ins
#define NUM_INPUTS 1
#define GLOBAL_WORKSIZE_SIZE 3
#define GLOBAL_WORKSIZE (size_t []){ 55,55,96, }
#define LOCAL_WORKSIZE_SIZE 0
#define LOCAL_WORKSIZE (size_t []){  }
#define INPUT0_DIMS_SIZE 4
#define INPUT0_DIMS (int []){ 1,96,55,55, }
#define INPUT0_TYPE float
#define INPUT0_FORMAT_BFYX
#define INPUT0_LOWER_PADDING_SIZE 4
#define INPUT0_LOWER_PADDING (int []){ 0,0,0,0, }
#define INPUT0_UPPER_PADDING_SIZE 4
#define INPUT0_UPPER_PADDING (int []){ 0,0,0,0, }
#define INPUT0_PITCHES_SIZE 4
#define INPUT0_PITCHES (int []){ 290400,3025,55,1, }
#define INPUT0_OFFSET 0
#define OUTPUT0_DIMS_SIZE 4
#define OUTPUT0_DIMS (int []){ 1,96,55,55, }
#define OUTPUT0_TYPE float
#define OUTPUT0_FORMAT_BFYX
#define OUTPUT0_LOWER_PADDING_SIZE 4
#define OUTPUT0_LOWER_PADDING (int []){ 0,0,0,0, }
#define OUTPUT0_UPPER_PADDING_SIZE 4
#define OUTPUT0_UPPER_PADDING (int []){ 0,0,0,0, }
#define OUTPUT0_PITCHES_SIZE 4
#define OUTPUT0_PITCHES (int []){ 290400,3025,55,1, }
#define OUTPUT0_OFFSET 0

// Layer relu1 using Custom Layer ReLU
// Custom Layer User Defines
#define neg_slope 0.0
// Custom Layer Kernel custom_layer_kernel.cl
#pragma OPENCL EXTENSION cl_khr_fp16 : enable
__kernel void example_relu_kernel(
    const __global INPUT0_TYPE*  input0,
          __global OUTPUT0_TYPE* output)
{
    const uint idx  = get_global_id(0);
    const uint idy  = get_global_id(1);
    const uint idbf = get_global_id(2);//batches*features, as OpenCL supports 3D nd-ranges only
    const uint feature = idbf%OUTPUT0_DIMS[1];
    const uint batch   = idbf/OUTPUT0_DIMS[1];

    //notice that pitches are in elements, not in bytes!
    const uint in_id  = batch*INPUT0_PITCHES[0]   + feature*INPUT0_PITCHES[1]   + idy*INPUT0_PITCHES[2]  + idx*INPUT0_PITCHES[3]  + INPUT0_OFFSET;
    const uint out_id = batch*OUTPUT0_PITCHES[0]  + feature*OUTPUT0_PITCHES[1]  + idy*OUTPUT0_PITCHES[2]  + idx*OUTPUT0_PITCHES[3]  + OUTPUT0_OFFSET;

    INPUT0_TYPE value = input0[in_id];
    //neg_slope (which is non-zero for leaky ReLU) is put automatically as #define by the clDNN, refer to the xml
    output[out_id] = value < 0 ? value * neg_slope : value;
}