Overview
This guide is for users who are already familiar with deep learning using Intel® AVX512 and Intel® Deep Learning Boost. It provides recommendations for configuring hardware and software that will provide the best performance in most situations. However, please note that we rely on the users to carefully consider these settings for their specific scenarios, since these tools can be deployed in multiple ways.
The 3rd Generation Intel® Xeon® Scalable Processor platform has the following advantages:
- Speedy processing of memory-intensive workloads such as 3D-CNN topologies used in medical imaging, GAN, seismic analysis, genome sequencing, etc.
- Leveraging the simple
numactlcommand for flexible core control and real-time inference even when the number of batches is small - Cost-effective distributed training on large-scale clusters used to perform computations directly at the data source in order to avoid the additional costs of redundant data storage and expensive cache mechanisms
- Multiple types of workloads (HPC/BigData/AI) are supported on the same cluster to achieve better TCO
- SIMD acceleration
- The same infrastructure can be used for training and inference
- An active ecosystem full of developers, experts, and learners
Deep Learning Stages
A typical deep learning application has these stages:
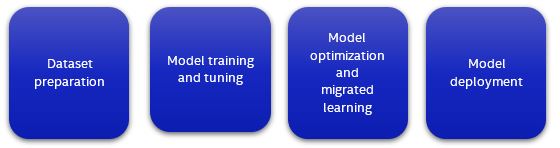
Each stage requires the allocation of these resources:
- Computational power
- Memory
- Storage for datasets
- Communication link between compute nodes
- Optimized software
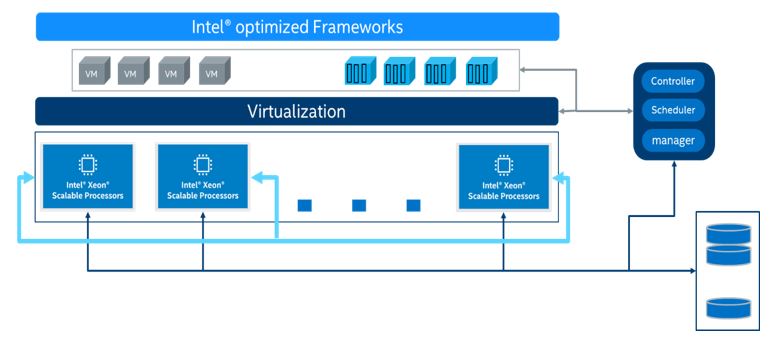
Choosing the right combination of resources greatly accelerates the efficiency of your AI services. All of the processes including dataset preparation, model training, model optimization, and model deployment, can be done on a 3rd Generation Intel® Xeon® Scalable Processor platform-based infrastructure that supports machine learning/deep learning platforms for training and inference. A proposed infrastructure is shown in the figure below:
Introducing Intel® AVX-512 and Intel® Deep Learning Boost
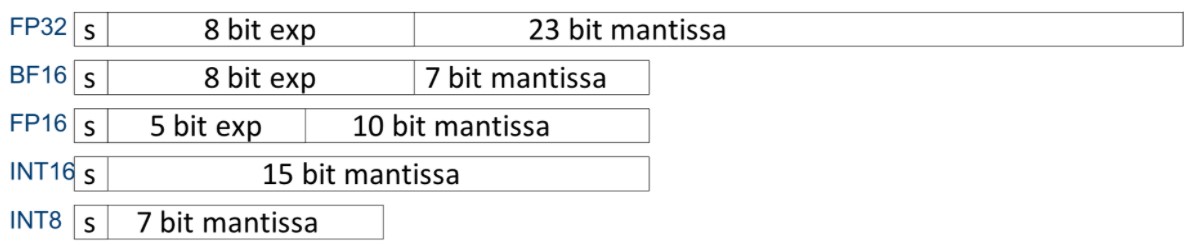
Intel® Advanced Vector Extensions 512 (Intel® AVX-512) is a “single instruction, multiple data” (SIMD) instruction set based on x86 processors. Compared to traditional “single instruction, single data” instructions, a SIMD instruction allows for executing multiple data operations with a single instruction. As the name implies, Intel® AVX-512 has a register width of 512 bits, and it supports 16 32-bit single-precision floating-point numbers or 64 8-bit integers.
Intel® Xeon® Scalable Processors support multiple types of workloads, including complex AI workloads, and improve AI computation performance with the use of Intel® Deep Learning Boost (Intel® DL Boost). Intel Deep Learning Boost includes Intel® AVX-512 VNNI (Vector Neural Network Instructions) which is an extension to the Intel® AVX-512 instruction set. It can combine three instructions into one for execution, which further unleashes the computing potential of next-generation Intel® Xeon® Scalable Processors and increases the inference performance of the INT8 model. Both 2nd-Generation and 3rd-Generation Intel® Xeon® Scalable Processors support VNNI.
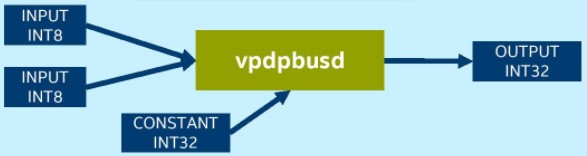
Platforms not using VNNI require the vpmaddubsw, vpmaddwd and vpaddd instructions to complete the multiply-accumulate operations in INT8 convolution operation:

Platforms using VNNI require only one instruction, “vpdpbusd”, to complete the INT8 convolution operation:
Environment
Tested hardware and software for this tuning guide include:
Hardware
The configuration described in this article is based on 3rd Generation Intel® Xeon® processor hardware. The server platform, memory, hard drives, and network interface cards can be determined according to your usage requirements.
| Hardware | Model |
|---|---|
| Server Platform Name/Brand/Model | Intel® Coyote Pass Server Platform |
| CPU | Intel® Xeon® PLATINUM 8380 CPU @ 2.30GHz |
| Memory | 8*64 GB DDR4, 3200 MT/s |
Software
| Software | Version |
|---|---|
| Operating System | Ubuntu 20.04.4 LTS |
| Kernel | 5.4.0 |
Note: The configuration described in this article is based on 3rd Generation Intel Xeon processor hardware. Server platform, memory, hard drives, network interface cards can be determined according to customer usage requirements.
BIOS Settings
| Configuration item | Recommended value |
|---|---|
| Processor configuration: Hyper-Threading | Enable |
| SNC (Sub NUMA) | Disable |
| Boot performance mode | Max Performance |
| Turbo Mode | Enable |
| Power and Performanace: Hardware P-States | Native Mode |
Memory
Use all available memory channels
CPU
FMA, the Intel AVX-512 acceleration module, is an important component for unleashing computational performance. In order to achieve better computing performance, use the Intel Xeon® Scalable Processors Gold 6 series (or above) which have two Intel AVX512 computational modules per core.
Note: To confirm that AVX-512 is supported by the CPU, enter the following command and look for avx512 in the "flags" section.
$ cat /proc/cpuinfo
Network
If cross-node training clusters are required, choose high-speed networks, such as 25G/100G, for better scalability.
Hard drive
For high I/O efficiency, use SSDs and drives with higher read and write speeds.
Linux Operating System Optimization
To speed up processing tune the Linux operating system for parallel programming.
OpenMP Parameter Settings
The OpenMP is a specification for parallel programming. Set these environment variables as follows:
- OMPNUMTHREADS = “number of cpu cores in container”
- KMP_BLOCKTIME = 1 or 0 (set according to actual type of model)
- KMP_AFFINITY=granularity=fine, verbose, compact,1,0
Number of CPU cores
Consider the impact on inference performance based on the number of CPU cores being used, as follows:
• When batchsize is small (in online services for instance) the increase in inference throughput gradually weakens as the number of CPU cores increases. In practice, 8-16 CPU cores is recommended for service deployment depending on the model used.
• When batchsize is large (in offline services for instance) the inference throughput can increase linearly as the number of CPU cores increases. In practice, more than 20 CPU cores is recommended for service deployment.
# taskset -C xxx-xxx –p pid (limits the number of CPU cores used in service)
NUMA Configuration
For NUMA-based servers, there is usually a 5-10% increase in performance when configuring NUMA on the same node compared to using it on different nodes.
#numactl -N NUMA_NODE -l command args ... (controls NUMA nodes running in service)
Configuration of Linux Performance Governor
Efficiency is the key consideration. Set the CPU frequency to its peak for the best performance.
# cpupower frequency-set -g performance
CPU C-States Settings
There are several power modes available for each CPU which are collectively referred to as C-states or C-modes. To reduce power consumption when the CPU is idle, the CPU can be placed in the low-power mode. Disabling C-States can increase performance.
#cpupower idle-set -d 2,3
Intel® Optimization for TensorFlow* Deep Learning Framework
TensorFlow* is one of the most popular deep learning frameworks used in large-scale machine learning (ML) and deep learning (DL) applications. Since 2016, Intel and Google* engineers have been working together to use Intel® oneAPI Deep Neural Network Library (Intel® oneDNN) to optimize TensorFlow* performance and accelerate its training and inference performance on the Intel® Xeon® Scalable Processor platform.
Deploying Intel® Optimization for TensorFlow* Deep Learning Framework
Step 1: Install a Python3.x environment. Here is an example to illustrate how to build Python* 3.6 with Anaconda*
Reference: https://www.anaconda.com/products/individual
Download and install the latest version of Anaconda
# wget https://repo.anaconda.com/archive/Anaconda3-2020.02-Linux-x86_64.sh

# sh Anaconda3-2020.02-Linux-x86_64.sh

# source /root/.bashrc

# conda install python=3.6 (create a Python3.6 environment)

#(base) [root@xx]# python -V

Python 3.6.10
Step 2: Install the Intel optimation for TensorFlow*: intel-tensorflow.
Install the latest version (2.x)
# pip install intel-tensorflow
If you need to install tensorflow1.x, we recommend installing the following version to take advantage of the performance acceleration on the 3rd Gen Intel® Xeon® Scalable Processor platform:
# pip install https://storage.googleapis.com/intel-optimized-tensorflow/intel_tensorflow-1.15.0up2-cp36-cp36m-manylinux2010_x86_64.whl
Step 3: Set run-time optimization parameters.
Reference:
https://github.com/IntelAI/models/blob/master/docs/general/tensorflow/GeneralBestPractices.md
Usually, the following two methods are used for inference, which use different optimization settings
Batch inference: Batch Size >1, measures the number of input tensors that can be processed per second. Usually, all the physical cores in the same CPU socket can be used for batch inference to achieve the best performance.
On-line inference (also known as real-time inference): Batch Size=1, a measure of time needed to process one input tensor (when the batch size is 1). In real-time inference, multiple instances are run concurrently to achieve the optimal throughput.
1: Obtaining the number of physical cores in the system:
To confirm the current number of physical cores, we recommend using the following command:
# lscpu | grep "Core(s) per socket" | cut -d':' -f2 | xargs
You may also use this command to list all physical cores for all sockets:
$ lscpu -b -p=Core,Socket | grep -v '^#' | sort -u | wc -l
In this example, we assume 8 physical cores.
2: Setting optimization parameters:
Optimization parameters are configured using the two following methods. Please choose the configuration method according to your needs.
Method 1: Configure environment parameters directly:
export OMP_NUM_THREADS=physical cores

export KMP_AFFINITY="granularity=fine,verbose,compact,1,0"

export KMP_BLOCKTIME=1

export KMP_SETTINGS=1
Method 2: Add environment variables in the Python code that is running:
import os

os.environ["KMP_BLOCKTIME"] = "1"

os.environ["KMP_SETTINGS"] = "1"

os.environ["KMP_AFFINITY"]= "granularity=fine,verbose,compact,1,0"

if FLAGS.num_intra_threads > 0:

os.environ["OMP_NUM_THREADS"]= # <physical cores>

config = tf.ConfigProto()

config.intra_op_parallelism_threads = # <physical cores>

config.inter_op_parallelism_threads = 1

tf.Session(config=config)
Inferencing using Intel® Optimization for TensorFlow* DL Model with FP32/INT8 support
This section mainly explains how to run the inference benchmark on ResNet50. You can refer to the following reference to inference using your machine learning/deep learning model.
Reference: https://github.com/IntelAI/models/blob/master/docs/image_recognition/tensorflow/Tutorial.md
Taking inference benchmarking for ResNet50* as an example, FP32, BFloat16, and Int8 are supported for model inference.
FP32-based model inference:
INT8-based model inference:
Training using Intel® Optimization for TensorFlow* DL Model with FP32/ INT8 Support
This section mainly explains how to run a training benchmark on ResNet50. You can refer to the following reference to run your machine learning/deep learning model training.
FP32-based training:
Applications – Inferencing and Training Using Intel Optimized TensorFlow Wide & Deep Model
Among the many operations in the data center, it is a typical application to use recommendation systems to match users with content they are interested in. Recommendation system is a type of information filtering system that learns about users' interests according to their profiles and past behavior records and predict their ratings or preferences for a given item. It changes the way a business communicates with users and enhances the interaction between the business and its users.
When using deep learning, we find, from a large amount of complex raw data, the deep interactions between features that are difficult to be expressed with traditional machines using artificial feature engineering. Related study outcomes include Wide & Deep, DeepFM, FNN, DCN, and other models.
Using the Wide & Deep model as an example, the core idea is to take advantage of both the memorization capability of a linear model and the generalization capability of the DNN model and optimize the parameters in these models at the same time during training. This will result in better overall model prediction capabilities. Its structure is shown in the figure below:
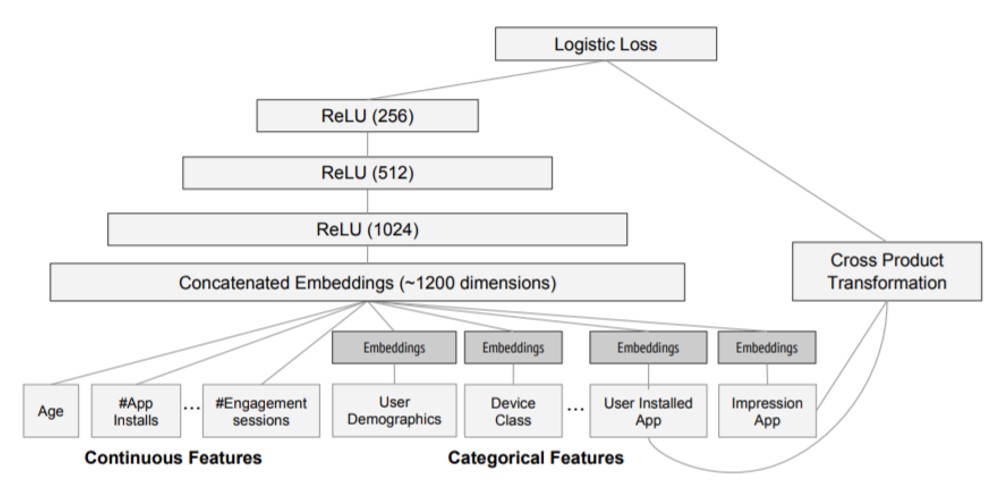
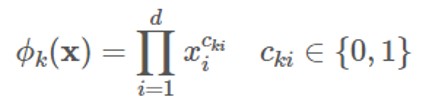
Wide
"Wide" is a generalized linear model, and its inputs mainly include original and interactive features. We can use cross-product transformation to build the interactive features of K-group:
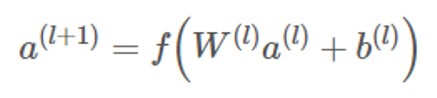
Deep
“Deep” is a DNN model, and the calculation for each layer is as follows:
Co-training
The Wide & Deep model uses co-training instead of integration. The difference is that co-training shares a loss function, then updates the parameters in either part of the model at the same time, while integration trains N models independently and fuses them together afterwards. Therefore, the output of the model is:

The above is the background information on the Wide & Deep model. Next, we will describe how to run inference benchmarking for the Wide & Deep model.
Reference:
https://github.com/IntelAI/models/blob/master/docs/recommendation/tensorflow/Tutorial.md
Dataset preparation:
FP32-based model inference:
INT8-based model inference:
FP32-based training:
Intel® Math Kernel Library (MKL) Threadpool-Based TensorFlow (Optional)
Starting with TensorFlow 2.3.0, a new feature has been added. You can choose Eigen Threadpool for TensorFlow multi-threading support instead of OpenMP, by using the compiling option --config=mkl_threadpool instead of --config=mkl, when compiling the Tensorflow source code.
If the user wants to try this feature with TensorFlow 1.15, they need to download the source code that has been ported and optimized by Intel and compile it (it should be particularly pointed out that Bazel* 0.24.1 needs to be installed for the purpose):
# git clone https://github.com/Intel-tensorflow/tensorflow.git

# git checkout -b tf-1.15-maint remotes/origin/tf-1.15-maint

# bazel --output_user_root=$BUILD_DIR build --config=mkl_threadpool -c opt --copt=-O3 //tensorflow/tools/pip_package:build_pip_package

bazel-bin/tensorflow/tools/pip_package/build_pip_package $BUILD_DIR
After successfully completing the steps above, the TensorFlow wheel file can be found under the $BUILDDIR path. For example: tensorflow-1.15.0up2-cp36-cp36m-linuxx86_64.whl. The installation steps are as follows:
# pip uninstall tensorflow

# pip install $BUILD_DIR/<filename>.whl --user
Using PyTorch*, a Deep Learning Framework
Deploying PyTorch
Environment: Python3.6 or above
Step 1: Visit the official PyTorch website: https://pytorch.org/
Step 2: Select CPU
Currently, Intel oneDNN is integrated into the official version of PyTorch, so there is no need for additional installation to have accelerated performance on the Intel® Xeon® Scalable Processor platform. Select “None” for CUDA. See the figure below for details.
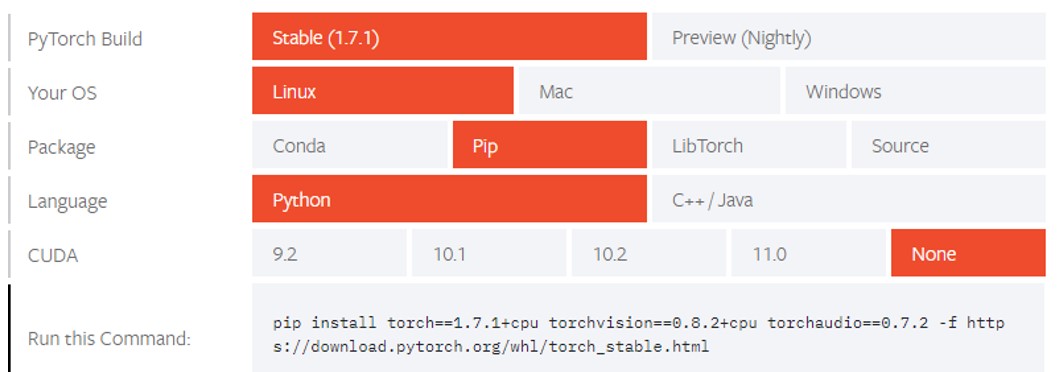
Step 3: Installation
pip install torch==1.7.1+cpu torchvision==0.8.2+cpu torchaudio==0.7.2 -f https://download.pytorch.org/whl/torch_stable.html
Optimization Recommendations for Training and Inferencing PyTorch-based Deep Learning Models
You may refer to the following website to learn more about optimization parameter settings for PyTorch* on the Intel® Xeon® Scalable Processor platform.
Introducing and Using Intel® Extension for PyTorch
Intel® Extension for PyTorch is a Python extension of PyTorch that aims to improve the computational performance of PyTorch on Intel® Xeon® Processors. Not only does this extension includes additional functions, but it also provides performance optimizations for new Intel hardware.
The Github links to the Intel Extension for PyTorch are:
https://github.com/intel/intel-extension-for-pytorch
Accelerating Vector Recall in the Recommendation System with Intel® Deep Learning Boost VNNI
A problem that needs to be resolved in the recommendation system is how to generate a recommendation list with the length of K for a given user that matches their interests and needs as much as possible (high accuracy) and as fast as possible (low latency)? Conventional recommendation systems include two components: vector recall and ranking. “Vector recall” roughly filters out hundreds or thousands of items from a huge recommendation pool that will most likely interest the user, passes the results on to the ranking module for further sorting before the final recommendation results are obtained.
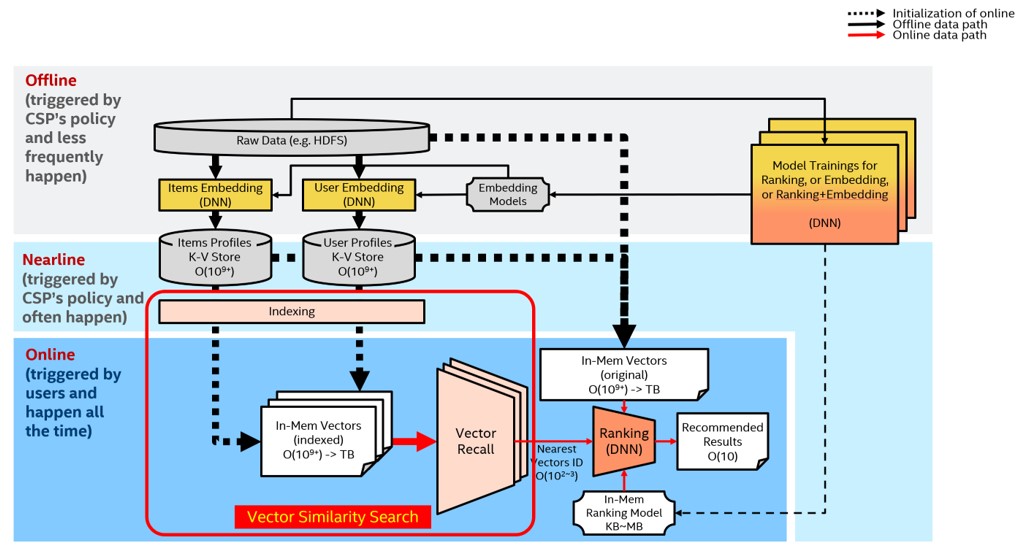
Vector recall can be converted into a high-dimensional vector similarity search problem.
The Hierarchical Navigable Small World (HNSW) algorithm is a type of Approximate Nearest Neighbor (ANN) vector similarity search algorithm based on graph structures. It is also one of the fastest and most precise algorithms.
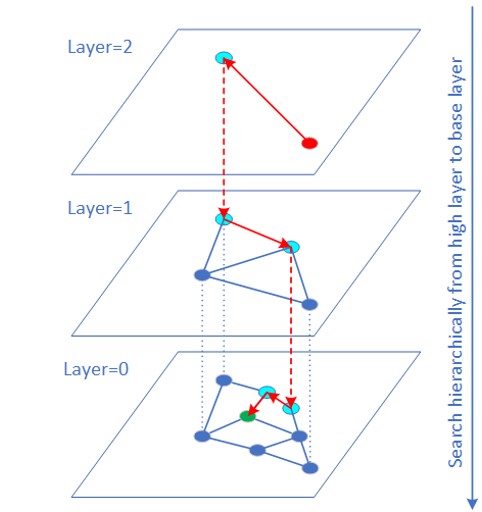
Usually, the data type of the raw vector data is FP32. For many applications (such as image search), vector data can be expressed in INT8/INT6 and the impact of quantization error on the final search result is limited. The “VNNI intrinsic” instruction can be used for inner product calculations for INT8/INT6 vectors. Many experiments have shown that QPS Performance has greatly improved, and that recall rate remains virtually unchanged. The reason for the improvement in QPS performance is that the memory–bandwidth ratio for INT8/INT16 is smaller than for FP32, and VNNI instructions accelerate the distance calculations in addition.
Currently, optimized source code is implemented based on the HNSWLib[10] open source project. We have already ported it to the Faiss[1] framework, which is widely used in the industry.
To achieve the optimal performance, the following deployment steps are recommended:
- Bind NUMA
- Each physical CPU core executes a single query process
Reference command (using 1 socket and 24 cores as an example):
# numactl -C 0-23 <test_program>
When the dataset is large (in the range of 100 million to billions for example), the traditional approach is to slice the dataset into several smaller datasets to get the topK for each dataset separately before merging them back together at the end. Since the amount of communication between multiple machines has increased, latency also increases while the QPS performance decreases. Our experience with HNSW on large datasets show that it is better not to slice datasets if possible, but rather establish indices and execute searches on complete datasets to get the best performance. When a dataset is too large and there is not enough DDR space (e.g. local memory space), you can consider using PMem (Intel® Optane™ persistent memory)
By saving the HNSW layer0 data on PMEM, the size of the dataset that can be supported has greatly increased (a single socket can support an INT8 database with up to 4 billion records @ d=100). The persistence feature allows you to skip the loading process for a large amount of data, which greatly reduces the time it takes to initialize.
AI Neural Network Model Quantization
AI neural network quantization process
Computations in neural networks are mainly concentrated in the convolutional layer and the fully connected layer. The computations on these two layers can be expressed as: Y = X * Weights + Bias. Therefore, it is natural to focus on matrix multiplication to optimize performance. The way to begin neural network model quantization is by trading-off precision (limited) for performance improvement. By replacing 32-bit floating-point numbers with low-precision integers for matrix operations, it not only speeds up calculations, but also compresses the model, thus saving memory bandwidth.
There are three approaches to the quantization of neural network models:
- Post-Training Quantization (PTQ), which is supported by most AI frameworks.
- Quantization-Aware-Training (QAT), which inserts the FakeQuantization node into the FP32 model when the training converges. It increases the quantization-induced noise. During the backpropagation stage of the training, the model weights fall into a finite interval which results in better quantization precision.
- Dynamic Quantization (DQ) is very similar to PTQ. They are both quantization methods used on post-trained models. The difference lies in that the quantization factor in the activation layer is dynamically decided by the data range used when the neural network model is run, while for PTQ samples from a small-scale pre-processed dataset are used to obtain data distribution and range information in the activation layer, then records it permanently in the newly generated quantization model. Of the Intel® Intel® Neural Compressor which we will talk about later on, onnxruntime supports this method at the backend only.
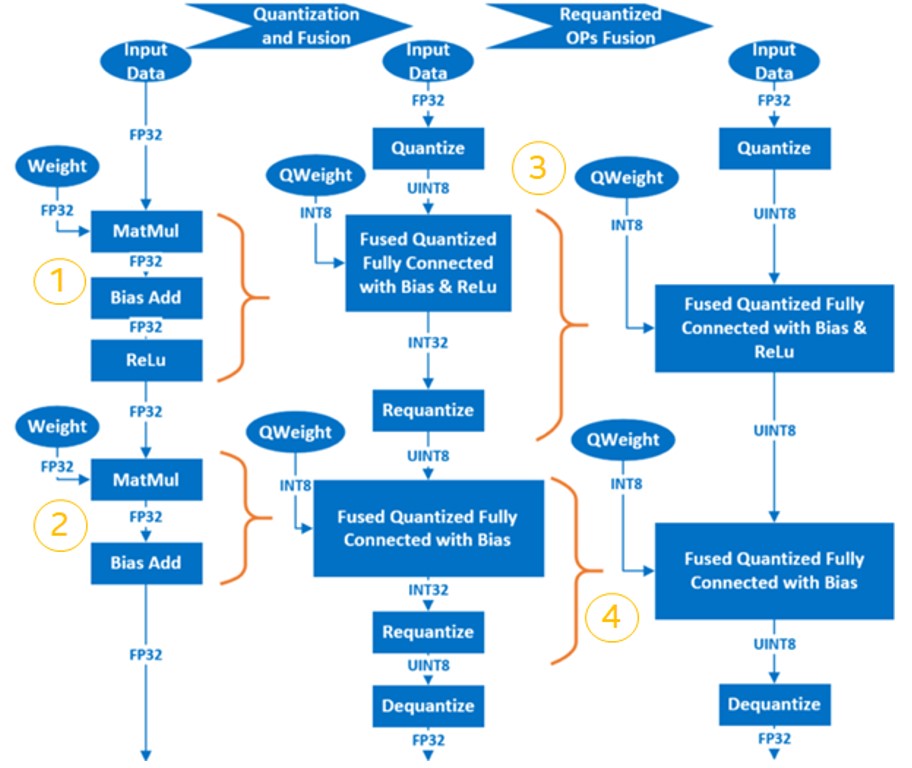
The basic procedure for the post-training quantization of neural networks is as follows:
- Fuse FP32 OP to INT8 OP. For example, MatMul, BiasAdd and ReLU can be fused into a single quantized OP at the fully connected layer, QuantizedMatMulWithBiasAndRelu. Different neural network frameworks support different fuse-able OPs. For Intel® Intel® Neural Compressor, which will be discussed later on, below we can see a list of fuse-able OPs supported by TensorFlow: https://github.com/intel/neural-compressor/blob/master/neural_compressor/adaptor/tensorflow.yaml.
For fuse-able OPs supported by pyTorch, please see : https://github.com/intel/neural-compressor/blob/master/neuralcompressor/adaptor/pytorchcpu.yaml
-
Quantize weights and save them in the quantized model.
-
Quantize the input/activation layer by sampling the calibration dataset to acquire the distribution and range information of the data in the activation layer, which is then recorded in the newly generated quantized model.
-
The Requantize operation is fused into its corresponding INT8 OP to generate the final quantized model.
Using a simple model which includes two layers of MatMul as an example, we can observe the quantization process as follows:
Intel® Neural Compressor
Intel® Neural Compressor is one of the key AI software components in the Intel® oneAPI AI Analytics Toolkit. It is an open-source Python library that runs on Intel CPUs and GPUs. This toolkit delivers unified interfaces across multiple deep learning frameworks for popular network compression technologies, such as quantization, pruning, and knowledge distillation. It supports automatic, accuracy-driven, tuning strategies to quickly find the best model. It also implements different weight pruning algorithms to generate a pruned model with a pre-defined sparsity goal and it supports knowledge distillation from a teacher model to a student model.
Reference: https://github.com/intel/neural-compressor
Intel® Neural Compressor currently support the following Intel optimized deep learning frameworks:
The frameworks and their versions that have already been verified are shown below:
| OS | Python | Framework | Version |
| CentOS 7.8 | 3.6 | TensorFlow | 2.2.0 |
| Ubuntu 18.04 | 3.7 | 1.15.0 UP1 | |
| 1.15.0 UP2 | |||
| 2.3.0 | |||
| 2.1.0 | |||
| 1.15.2 | |||
| PyTorch | 1.5.0 + cpu | ||
| Apache* MXNet | 1.7.0 | ||
| 1.6.0 | |||
| ONNX Runtime | 1.6.0 |
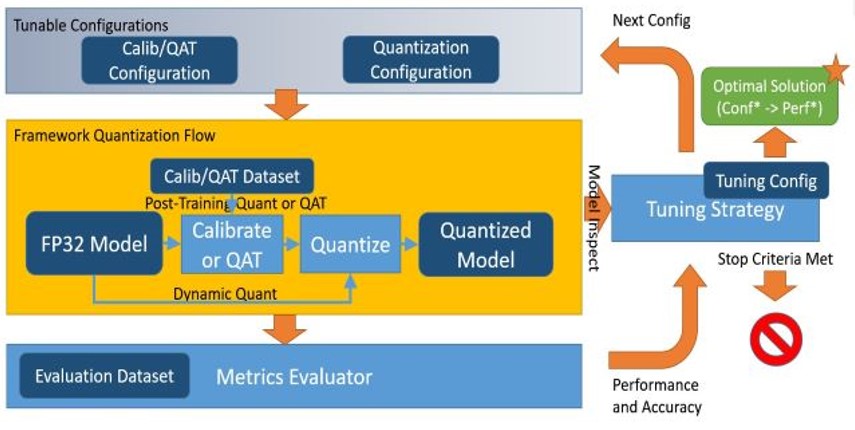
The tuning strategies supported by Intel® Neural Compressor include:
The workflow for Intel® Neural Compressor is shown below. The model quantization parameters matching the precision loss target are automatically selected according to the set tuning strategy, and the quantized model is generated:
Installing Intel® Neural Compressor
For details on installation, refer to: https://github.com/intel/neural-compressor#installation
Step 1: Use Anaconda to create a Python3.x virtual environment with the name of lpot. We are using Python 3.7 here as an example:
# conda create -n lpot python=3.7

# conda activate lpot
Step 2: Install lpot; the two following installation methods are available:
Installing with the binary file:
# pip install lpot
Install from the source code
# git clone https://github.com/intel/neural-compressor.git

# cd lpot

# pip install –r requirements.txt

# python setup.py install
Using Intel® Neural Compressor
We are using ResNet50 v1.0 as an example to explain how to use this tool for quantization.
Dataset preparation:
Step 1: Download and decompress the ImageNet validation dataset:
# mkdir –p img_raw/val && cd img_raw

# wget http://www.image-net.org/challenges/LSVRC/2012/dd31405981ef5f776aa17412e1f0c112/ILSVRC2012_img_val.tar

# tar –xvf ILSVRC2012_img_val.tar -C val
Step 2: Move the image files to the child directories sorted by label:
# cd val

# wget -qO- https://raw.githubusercontent.com/soumith/imagenetloader.torch/master/valprep.sh | bash
Step 3: Use the script, prepare_dataset.sh, to convert raw data to the TFrecord format:
# cd examples/tensorflow/image_recognition

# bash prepare_dataset.sh --output_dir=./data --raw_dir=/PATH/TO/img_raw/val/ --subset=validation
Model preparation:
# wget https://storage.googleapis.com/intel-optimized-tensorflow/models/v1_6/resnet50_fp32_pretrained_model.pb
Run Tuning:
Edit the file: examples/tensorflow/imagerecognition/resnet50v1.yaml, making sure the dataset path for quantizationcalibration, evaluationaccuracy and evaluationperformance is the user's real local path. It should be where the TFrecord data generated previously during the data preparation stage, is located.
# cd examples/tensorflow/image_recognition/tensorflow_models/quantization/ptq

# bash run_tuning.sh --config=resnet50_v1.yaml \n
--input_model=/PATH/TO/resnet50_fp32_pretrained_model.pb \n
--output_model=./lpot_resnet50_v1.pb
Run Benchmark:
# bash run_benchmark.sh --input_model=./lpot_resnet50_v1.pb --config=resnet50_v1.yaml
The output is shown below. The performance data is for reference only:
Accuracy mode benchmark result:
Accuracy is 0.739
Batch size = 32
Latency: (results will vary)
Throughput: (results will vary)
Performance mode benchmark result:
Accuracy is 0.000
Batch size = 32
Latency: (results will vary)
Throughput: (results will vary)
Using Intel® Distribution of OpenVINO™ Toolkit for Inference Acceleration
Intel® Distribution of OpenVINO™ Toolkit
Intel® Distribution of OpenVINOTM toolkit’s official website and download websites:
https://www.intel.com/content/www/us/en/developer/tools/openvino-toolkit/overview.html
Online documentation:
https://docs.openvino.ai/latest/index.html
Online documentation in Simplified Chinese:
https://docs.openvino.ai/cn/latest/index.html
The Intel® Distribution of OpenVINOTM toolkit is used to accelerate the development of computer vision and deep learning applications. It supports deep learning applications with various accelerators, including CPUs, GPUs, FPGAs, and Intel® Movidius™ CPUs on the Intel® Xeon® Processor platform, and it also directly supports heterogenous execution.
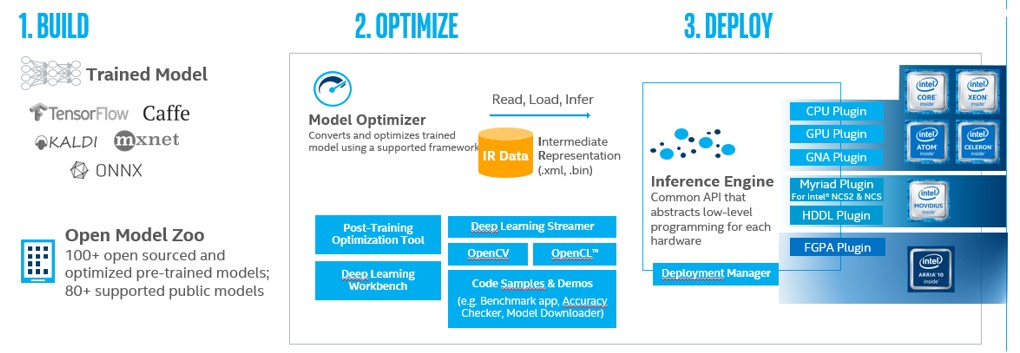
The Intel® Distribution of OpenVINOTM toolkit is designed to improve the performance and reduce the development time of computer vision processing and deep learning inference solutions. It includes two components: computer vision and deep learning development kits.
The Deep Learning Deployment Toolkit (DLDT) is a cross-platform tool for accelerating deep learning inference performance, and includes the following components:
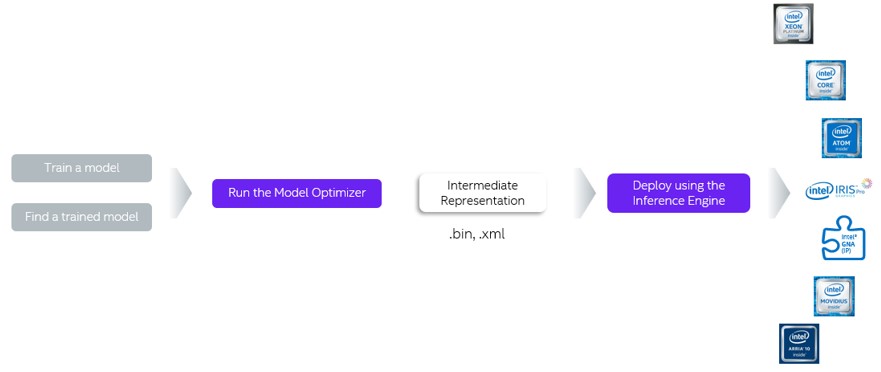
- Model Optimizer: converts models trained with Caffe*, TensorFlow, Mxnet, and other frameworks into Intermediate Representations (IR).
- Inference Engine: executes the IR on CPU, GPU, FPGA, VPU, and other hardware. It automatically calls the hardware acceleration kit to accelerate inference performance.
The Intel® Distribution of OpenVINOTM toolkit Workflow:
Deploying the Intel® Distribution of OpenVINO™ Toolkit
You can refer to the installation documentation in Simplified Chinese:
Installing the Intel® Distribution of OpenVINO™ toolkit for Linux*:
Using Deep Learning Deployment Toolkit (DLDT) of the Intel® Distribution of OpenVINO Toolkit
Introduction to the Intel® Deep Learning Deployment toolkit
Image Classification C++ Sample (Async)
Object Detection C++ Sample (SSD)
Automatic Speech Recognition C++ Sample
Action Recognition Python* Demo
Human Pose Estimation C++ Demo
Interactive Face Detection C++ Demo
Using the Intel® Distribution of OpenVINO™ Toolkit for INT8 Inference Acceleration
By inferencing on an INT8-based model and using Intel DL Boost on the Intel® Xeon® Scalable Processor platform for acceleration, you can greatly increase inference efficiency. At the same time, it saves computing resources and reduces power consumption. The 2020 version and later versions of OpenVINO™ all provide INT8 quantization tools which support the quantization of FP32-based models.
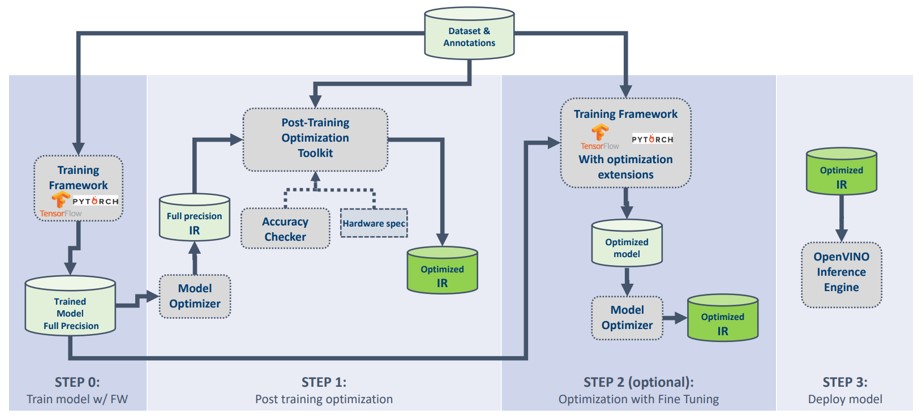
The INT8-based model quantization tool provided by OpenVINO is a Post-training Optimization Toolkit (POT) is used to optimize and quantize trained models. There is no need to re-train or fine-tune models or to modify model structures. The figure below shows the process of how OpenVINO is used to optimize new models.
Step 0: Acquire the trained model,
Step 1: POT generation and optimization,
Step 2: Optional operation (Whether to fine-tune the model will be determined according to the actual situation for better accuracy), and
Step 3: Use OpenVINO IE for model inference.
POT provides an independent command line tool and Python API and it mainly supports the following features:
- Two types of post-training INT8 quantization algorithms: fast DefaultQuantization and precise AccuracyAwareQuantization.
- Uses the Tree-structured Parzen Estimator for global optimization of post-training quantization parameters
- Supports both symmetrical and asymmetrical quantization
- Supports compression for multiple hardware platforms (CPU, GPU)
- Quantizes all channels at the convolutional layer and full connection layer
- Supports multiple applications: computer vision, recommendation system
- Provides customized optimization methods through provided API
Please refer to the following websites for instructions of operations and use:
Introduction to the Post-Training Optimization Toolkit
Post-training Optimization Toolkit Best Practices
Post-training Optimization Toolkit Frequently Asked Questions
INT8 quantization and optimization using DL Workbench’s web interface
Using Intel® DAAL for Accelerated Machine Learning
Intel® Data Analytics Acceleration Library (Intel® DAAL)
As a branch of artificial intelligence, machine learning is currently attracting a huge amount of attention. Machine learning-based analytics is also getting increasingly popular. The reason is that, when compared to other analytics, machine learning can help IT staff, data scientists, and various business teams and their organizations to quickly unleash the strengths of AI. Furthermore, machine learning offers many new commercial and open-source solutions, providing a vast ecosystem for developers. In addition, developers can choose from a variety of open-source machine learning libraries such as Scikit-learn, Cloudera* and Spark* MLlib.
Intel® Distribution for Python*
Intel® Distribution for Python* is a Python development toolkit for artificial intelligence software developers. It can be used to accelerate computational speed of Python on the Intel® Xeon® Scalable Processor platform. It is available at Anaconda, and it can also be installed and used with Conda, PIP, APT GET, YUM, Docker, among others. Reference and download site: https://www.intel.com/content/www/us/en/developer/tools/oneapi/distribution-for-python.html
Intel® Distribution for Python* features:
- Out-of-the-box: no or little change to source code required to achieve faster Python application performance.
- The Integrated Intel® performance libraries: Intel® Math Kernel Library (MKL) and Intel® Data Analytics Acceleration Library (Intel® DAAL), for example, can be used to accelerate NumPy, SciPy, and scikit-learn*
- Latest vector and multithread instructions: Numba* and Cython can be combined to improve concurrency and vectorization efficiency.
Intel® DAAL
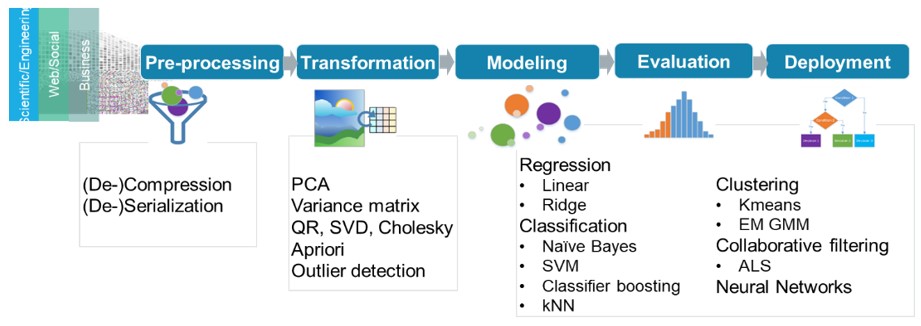
Intel® Data Analytics Acceleration Library (DAAL) is designed for data scientists to accelerate data analytics and prediction efficiency. In particular, it can take full advantage of vectorization and multithreading for applications with huge amount of data, as well as utilize other technologies to increase the overall performance of machine learning on the Intel® Xeon® Scalable Processor platform.
Intel® DAAL is a complete end-to-end software solution designed to help data scientists and analysts quickly build everything from data pre-processing, to data feature engineering, data modeling and deployment. It provides various data analytics needed to develop machine learning and analytics as well as high-performance building blocks required by algorithms. It currently supports linear regression, logic regression, LASSO, AdaBoost, Bayesian classifiers, support vector machines, k-nearest neighbors, k-means clustering, DBSCAN clustering, various types of decision trees, random forest, gradient boosting, and other classic machine learning algorithms. These algorithms are highly optimized to achieve high performance on Intel® processors. For example, a leading big data analytics technology and service provider has used these resources to improve the performance of data mining algorithms by several times.
To make it easier for developers to use Intel® DAAL in machine learning applications in Intel-based environments, Intel has open-sourced the entire project: https://github.com/intel/daal, and provides full-memory, streaming and distributed algorithm support for different big data scenarios. For example, DAAL Kmeans can be combined with Spark to perform multi-node clustering on a Spark cluster. In addition, DAAL provides interfaces for C++, Java*, and Python.
DAAL4py
In order to provide better support for Scikitlearn, which is the most widely used with Python, Intel® DAAL provides a very simple Python interface, DAAL4py. See the open source website for more details: https://github.com/IntelPython/daal4py. It can be used seamlessly with Scikitlearn and provides acceleration for machine learning algorithms at the underlying layer.
Developers do not need to modify the Scikitlearn source code to benefit from the advantages of automatic vectorization and multithreading. DAAL4py currently supports the following algorithms in Scikitlearn:
- Sklearn linear regression, Sklearn ridge regression and logic regression
- PCA
- KMeans
- pairwise_distance
- SVC (SVM classification)
Installing Intel® Distribution for Python & Intel® DAAL
Download and install Intel® Distribution for Python* (Intel® DAAL already included)
Installing Intel® DAAL separately
Using Intel® DAAL
There are two ways to use Intel® DAAL to accelerate scikit-learn:
Method 1: Using the command line
# python -m daal4py <your-scikit-learn-script>
Method 2: Adding it to source code
import daal4py.sklearn

daal4py.sklearn.patch_sklearn('kmeans')
References
[1] Open source of Faiss project: https://github.com/facebookresearch/faiss
Additional References
Intel® AVX-512 info: https://colfaxresearch.com/skl-avx512/
Intel® Optimized AI Frameworks: https://www.intel.com/content/www/us/en/developer/tools/frameworks/overview.html
Intel® Distribution of OpenVINO™ toolkit: https://docs.openvino.ai
Intel® Analytics Zoo: https://github.com/intel-analytics/analytics-zoo
Open source of HNSWLib project: https://github.com/nmslib/hnswlib