Introduction
Testpmd is a built-in Data Plane Development Kit (DPDK) test application. Run testpmd to display and verify Poll Mode Driver (PMD) related features supported by a network interface card (NIC).
For upper-layer developers, this tool serves as an excellent reference for code development, and knowledge of testpmd always means better efficiency for the development process.
This paper focuses on code interpretation. You can find the Testpmd Application User Guide at the official DPDK website.
After getting DPDK source code, you can find testpmd code in the directory app/test-pmd. The code can be classified into the following three types:
The Basic Code
Basic code includes the code in charge of initiation and execution of testpmd, parameter parsing, and device detection and configuration. It includes the following files:
- testpmd.c
- parameters.c
User Interface-Related Code
Testpmd includes a command-line interface (CLI) Interactive mode. When running testpmd, you can configure the devices under test and enable or disable certain features through the CLI. This makes it easier to see clearly the effects of various PMD features.
Due to the increasing number of features supported by DPDK, the user interface (UI) code is no longer packed into a single file but is distributed over multiple files, with most files added to categorize the code by function. This is convenient for reading and maintaining the code.
UI-related code includes:
- config.c
- cmdline.c
- bpf_cmd.c
- cmdline_flow.c
- cmdline_mtr.c
- cmdline_tm.c
Forwarding Code
For convenient use of PMD functional tests, testpmd presets several forwarding modes, each representing a different way of processing the packet before transmitting or abandoning it.
The goal of forwarding mode design is to simplify the decision-making process to avoid forwarding mode switching configurations that are too complicated to execute.
Each of the following files represents a different forwarding mode:
- csumonly.c
- flowgen.c
- icmpecho.c
- ieee1588fwd.c
- iofwd.c
- macfwd.c
- macswap.c
- rxonly.c
- softnicfwd.c
- txonly
Basic Functions
In this section, we describe testpmd initialization and configuration functionality.
Main Function
As with any application, the main function is a good place to begin learning about the execution of a program. Upon launch, testpmd performs initial configuration, checks the input parameters, finds and configures the device, and configures forwarding logic. When all the work is done, testpmd will wait for user input if it is running in interactive mode. Figure 1 illustrates the testpmd execution process.

Figure 1. Testpmd execution flowchart
Next, we elaborate on some of the issues that can be encountered when executing testpmd. Interactive processing and forwarding functions are described in later sections.
rte_eal_init
rte_eal_init is a gigantic and intricate function that is included in librte_eal, and is beyond the scope of this article. It provides initialization of the DPDK operating environment, including the initialization of CPU and memory, and conducts the search for devices. Following execution of this function, all DPDK-supported devices can be traced for later analysis.
One thing calls for special attention. You may provide some parameters when launching testpmd that can be divided into two parts separated by "--".
- eal command-line options are used by eal to determine CPU type, memory size, and some specific devices (by blacklists or whitelists). Use rte_eal_init to properly initialize CPU and memory.
- testpmd command-line options that are automatically handled by testpmd are covered later.
Configuration
The following functions are used to configure testpmd.
set_def_fwd_config
This function sets the default forwarding-related configuration.
set_default_fwd_lcores_config
This function logs the logical cores as well as socket-related information. Testpmd records all the logical cores that are configured. By default, there is only one core engaged in forwarding, meaning that the rest of the configured cores are not used. This is because the number of cores to be used is decided by testpmd parameters that are configured in later code. Before that happens, the number of logical cores needed is unknown, and therefore the number is set by default to 1 at this stage. This is workable because running testpmd occupies at least one logical core.
set_def_peer_eth_addrs
This function sets a default Ethernet address as the destination address of the Ethernet frame header used in forwarding. Whether or not this address is used is decided by the forwarding mode.
set_default_fwd_ports_config
This function records previously analyzed port information, for use in a later process.
launch_args_parse
This function parses testpmd command-line options, matching character strings with parameters to acquire configuration details. The information collected at this stage involves the number of CPUs, ports, queues, and the kinds of features enabled, and is recorded for later processing.
init_config
After the parameter parsing, initial configurations can be made accordingly. Several major functions can be realized here, including:
- Configuration of logical cores for running DPDK
- Configuration of mbuf needed in transmitting and receiving packets
-
Device configuration
Stores configuration information to be used after hardware setup when devices are enabled. - Forwarding engine configuration
All of the above are explained in more detail later in the article.
The flowchart in Figure 2 shows the step-by-step initial configuration include acquiring the device, setting offload, distributing memory, and initializing forwarding.
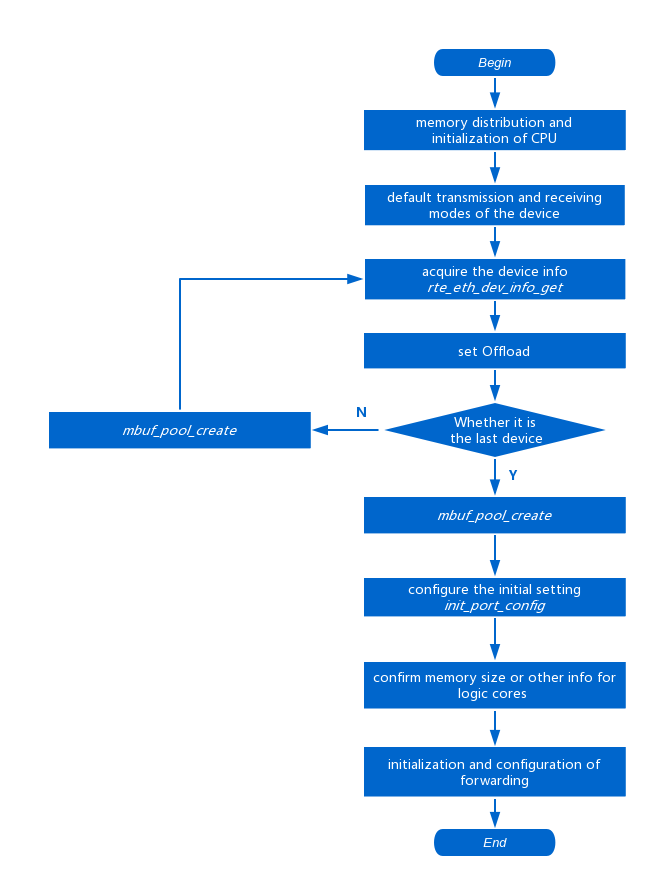
Figure 2. Steps in testpmd initial configuration
start_port
The device under test can be launched when configuration is complete. The flowchart in Figure 3 illustrates this process, including configuring the device and queue, and launching the device.
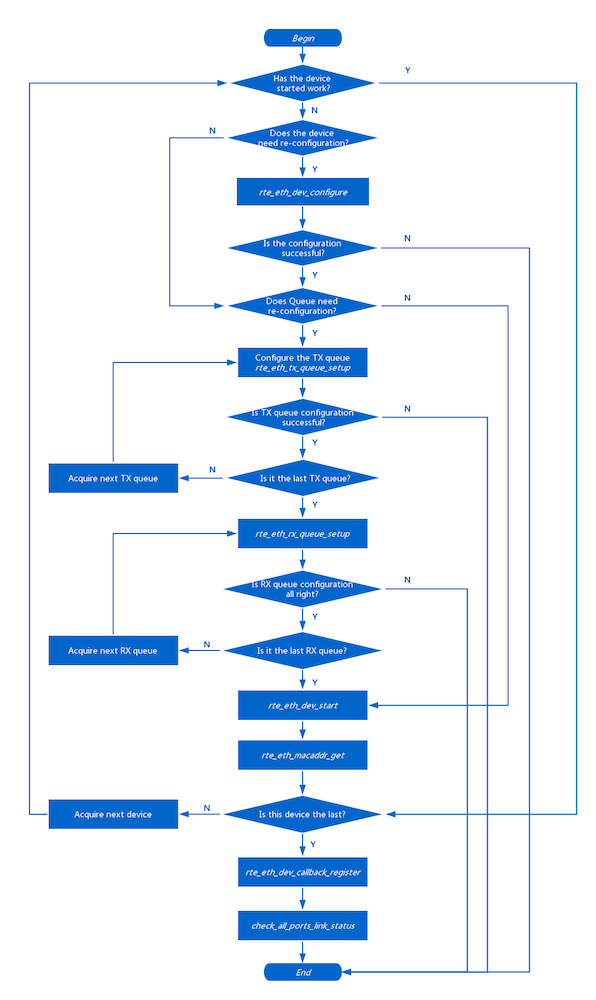
Figure 3. Steps to configure the device and queue, then launch the device
Next, we look at CLI user interface interactions.
User Interface
As described earlier, testpmd includes a command line interface that provides limited functionality. By using the CLI, you can control the size of your project and prevent unnecessary effort on non-core features.
DPDK-based application developers can also choose to call testpmd APIs from the application. This approach can be very helpful for experimental development. Modifying CLI code during this stage enables you to interact with testpmd to debug and verify new features.
The Testpmd Application User Guide can be found at DPDK.org. The file doc\guides\testpmd_app_ug\testpmd_funcs.rst provides an introduction to testpmd functions. Developers who want to add, modify, or delete CLI commands should update this file, based on tools that automatically generate PDF documents.
The CLI implementation process consists of parsing strings, associating them with an API, and executing it. Some functions are provided by other libraries. Because testpmd is a test program for PMD, in most cases it is the ethdev library. Of course, users can expand the CLI and call an API to respond to different test goals. The following example shows the implementation of CLI codes in general.
Show Port Information
Let’s look at a simple CLI command to learn about the implementation of CLI-related code. Following is an example of executing show port info through the user interface in testpmd. When show port info is typed in, the user interface shows port information. To set testpmd to interactive mode, start the program using the parameter -i.
testpmd> show port info 0
********************* Infos for port 0 *********************
MAC address: 3C:FD:FE:9D:25:8C
Device name: 0000:07:00.0
Driver name: net_i40e
Connect to socket: 0
Memory allocation on the socket: 0
Link status: up
Link speed: 10000 Mbps
Link duplex: full-duplex
MTU: 1500
Promiscuous mode: enabled
Allmulticast mode: disabled
Maximum number of MAC addresses: 64
Maximum number of MAC addresses of hash filtering: 0
VLAN offload:
strip off
filter off
qinq(extend) off
Hash key size in bytes: 52
Redirection table size: 512
Supported flow types:
ipv4-frag
ipv4-tcp
ipv4-udp
ipv4-sctp
ipv4-other
ipv6-frag
ipv6-tcp
ipv6-udp
ipv6-sctp
ipv6-other
l2_payload
Minimum size of RX buffer: 1024
Maximum configurable length of RX packet: 9728
Maximum number of VMDq pools: 64
Current number of RX queues: 1
Max possible RX queues: 320
Max possible number of RXDs per queue: 4096
Min possible number of RXDs per queue: 64
RXDs number alignment: 32
Current number of TX queues: 1
Max possible TX queues: 320
Max possible number of TXDs per queue: 4096
Min possible number of TXDs per queue: 64
TXDs number alignment: 32
Data Structure
Let’s look at how testpmd processes strings and executes corresponding APIs.
Each CLI corresponds to a data structure variable, which is saved in the file cmdline.c. The variable of "show port info" is:
cmdline_parse_inst_t cmd_showport = {
               .f =cmd_showport_parsed,
               .data =NULL,
               .help_str= "show|clear port "
                              "info|stats|xstats|fdir|stat_qmap|dcb_tc|cap"
                              "<port_id>",
               .tokens= {
                              (void*)&cmd_showport_show,
                              (void*)&cmd_showport_port,
                              (void*)&cmd_showport_what,
                              (void*)&cmd_showport_portnum,
                              NULL,
               },
};
Cmd_showport includes four parts
- f describes the function to be executed by the CLI.
- data is the parameter to be passed to the function. Because it is not a parameter entered by a user, data does not need to be seen as a part of the UI. It is generally not used and is set to null.
- help_str contains a request for help. The CLI includes functions to display port information and statistics; it can also clear statistics being collected. The following section analyzes and verifies these functions in detail.
- tokens describe each string that makes up the CLI. The CLI consists of four strings:
- cmd_showport_show can either be show or clear.
- cmd_showport_port can only be port.
- cmd_showport_what can be one of the following: info, stats, xstats, fdir, stat_qmap, dcb_tc, or cap.
- cmd_showport_portnum is required to be an unsigned integer.
CLI Resolution
The function specified by f is executed if a string of characters matches the combination of the four strings mentioned in the previous section, namely tokens. But the question is, how can testpmd tell whether it matches a CLI?
The variable cmd_showport mentioned above is stored in the array main_ctx. After a user enters a string of characters, the program processes all variables in the array main_ctx to find out if there are any matches between the string and variables. This part of the work is done by librte_cmdline. The general process is as follows:
- Split the string obtained into several substrings. When doing this, one space or several consecutive spaces in the string can separate those substrings, and the terminator \0 of the string signals the end.
- Match the substrings one by one with the variables in the main_ctx array. Specifically, match the substring with the tokens field of the variable. For example, the following strings may match cmd_showport.
- show port info 0
- show port stats 1
- clear port xstats 4
- clear port fdir 5
- …
-
Matching will not stop if a variable is found to match the input string; instead, it continues to process the remaining variables. But when another variable is also found to be a match, the system reports an error.
This requires testpmd code implementers to ensure that the CLIs they are designing are not similar to existing CLIs. -
If the process finds only one match, functions are executed through the f field of the variable. For show port info, the function is cmd_showport_parsed.
If no match is found, the system reports an error.
Function Execution
We move on to function execution after CLI parsing is completed, but we are not doing it mechanically. Instead, execution allows for flexibility with some operations. Take the execution function of show port info, for example. There are many combinations of its tokens for variable cmd_showport, but only a few are actually supported. The Figure 4 flowchart shows the execution process where by matching each word in the string, the specific CLI function is found and executed.

Figure 4. Match strings to identify the requested CLI function and execute the function
Port Information Display
As previously mentioned, if a user enters an appropriate token combination, testpmd will display information for the specified port using the testpmd function port_infos_display. It gets the required information by calling the rte_eth API. See the flowchart in Figure 5.

Figure 5. Display port information
Summary
The CLI is a big part of testpmd, but in principle it is not complicated. We recommend that DPDK users develop a basic understanding of the CLI, then use existing code to implement some simple debugging commands. The understanding gained will speed up debugging and increase code development efficiency.
Commonly Used Forwarding Engines
Testpmd supports many different forwarding engines, each representing a distinct way of receiving and transmitting packets. Testpmd users should have enough knowledge about forwarding engines to anticipate how testpmd will receive, transmit, and allocate data packets.
For developers, different forwarding engines are also useful references. They can combine the needed functions, refer to the appropriate forwarding engine code, quickly develop code, and debug errors.
To simplify the implementation process and configuration, testpmd does not choose complex and dynamic forwarding configurations. Instead, it presets several fixed forwarding engines. The behavior of each forwarding engine cannot be configured. Users need to choose the appropriate forwarding engine according to their needs. However, this comes with a downside, which is that the behavior of these forwarding engines are not transparent, and users can only roughly guess an engine’s possible behavior. Therefore, we provides a convenient reference for readers with descriptions and explanations of each engine’s behavior.
In this section we introduce each preset engine. They are listed below, ranked according to the frequency of their use. The default choice is iofwd, but macfwd, rxonly, and txonly are also frequently used engines.
- iofwd.c
- macfwd.c
- rxonly.c
- txonly.c
- macswap.c
- csumonly.c
- flowgen.c
- icmpecho.c
- ieee1588fwd.c
- softnicfwd.c
Let’s review a simple guide to configure forwarding engines before introducing them.
As noted above, the default engine choice for testpmd is iofwd. To use a different one, you can use the CLI command set fwd … to change the forwarding engine presently in use. For example, set fwd io sets the forwarding engine to be iofwd; set fwd mac sets the forwarding engine to macfwd.
iofwd
iofwd is the simplest forwarding engine. Its function is to forward the packets it receives without any processing. In most cases, this engine can be used to verify the proper functionality of the NIC’s receive and transmit behavior.
However, it should also be noted that in its default setting, the NIC does not always support this straightforward way of receiving and transmitting packets. More commonly, when receiving packets, the NIC may discard the packets whose destination MAC address is not its port, and when transmitting packets, it may also discard those whose source MAC address is not its port.
Because it is a simple forwarding engine, if iofwd doesn’t function properly, the problem can be pinned down by looking at the NIC’s receive and transmit processes. To locate the problem, users should check the two processes separately using the rxonly and the txonly engines that will be described later.
iofwd code is relatively simple. Its main function is pkt_burst_io_forward. The flowchart in Figure 6 shows the main functions of iofwd, including invoking the packet receive function, collecting the packets received by the NIC, and invoking the packet transmit function to transmit the received packets from NIC.
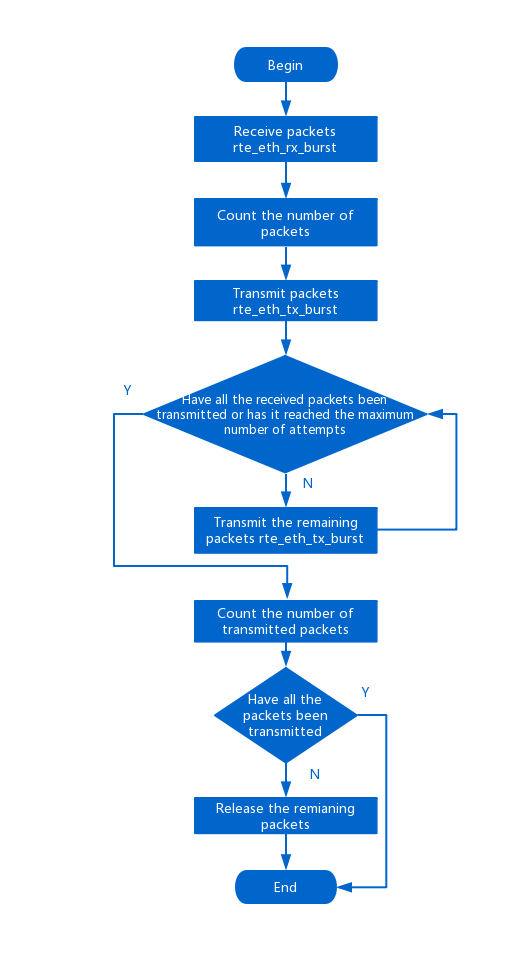
Figure 6. Execution of iofwd
Note DPDK mainly uses polling mode, meaning that when forwarding is started by CLI-start, one or more threads repeatedly executes pkt_burst_io_forward, and the application keeps forwarding until CLI-stop is implemented. The use of the following forwarding engines is similar.
macfwd
This forwarding mode is called macfwd because all the packet processing happens in Layer 2. macfwd is similar to iofwd, but it is more complex than iofwd. They both forward the received packets, but the main difference is that after receiving packets, macfwd processes them first before forwarding them. The main manipulation function of macfwd is pkt_burst_mac_forward. In Figure 7,, we can see that before forwarding the packets, macfwd changes the MAC address of the received packets and configures TX offload to enable the function in hardware.

Figure 7. macfwd changes received packet MAC addresses and configures TX offload to hardware
rxonly
What rxonly does is very simple— it receives and releases packets. It’s generally used to test the functionality of NIC’s receiving process. Its main function pkt_burst_receive works as seen in Figure 8:
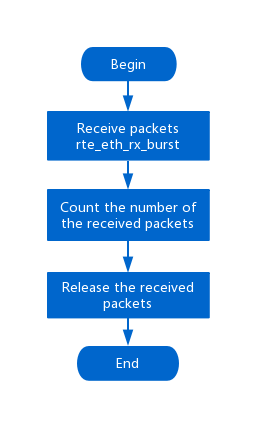
Figure 8. Flowchart for rxonly
txonly
txonly functionality is limited to transmitting packets. When packets are sent to the NIC with the forwarding engine set to txonly there will be no software functions to receive them. Packets will be accumulated in the NIC’s hardware cache until the cache is full and starts to throw them.
txonly does not depend on or process packets received by the NIC, but instead generates the packets it transmits. Theoretically speaking, txonly can be used as a sender. But at the same time, txonly is only a very simple engine, and it doesn’t support protocol stack editing. To edit contents of packets to be sent, users need to modify the code, and write the contents in binary form in the code. Because of this inconvenience, in most cases, txonly is only used for simple outsourcing testing, but it can be a temporary replacement if you don't have a suitable sender on hand. It should be noted that txonly transmits only UDP packets. If you need to transmit other types of packets, you should remember to modify the relevant IP and UDP header code.
Before executing txonly, the content of IP header and UDP header data structures, which will be implemented in the function setup_pkt_udp_ip_headers must be filled in.
When the transmit process starts, the main processing function pkt_burst_transmit is executed to transmit the packet. The flow is as follows in Figure 9:

Figure 9. Flowchart for txonly
macswap
macswap and macfwd are very similar. As the name suggests, for received packets, macswap also makes changes in Layer 2. The simple change is just to exchange the source and destination MAC address in the Layer 2 header.
This change can circumvent restrictions some NICs place on transmitting and receiving packets. For example, if the NIC does not support hybrid mode, the destination MAC address of the packet must be filled in correctly. If in transmit mode the NIC has an anti-spoofing function, the source MAC address of the packet must be filled in correctly. In this scenario, if a port transmits and receives packets by itself, it can enable the forwarding function by macswap.
The main processing function of macswap is pkt_burst_mac_swap. The process is as follows:

Figure 10. Macswap processing flowchart
Others
The five most commonly used forwarding engines are described above. The other forwarding engines mentioned earlier in the chapter are complex and not commonly used. They will be discussed in future articles.
Summary
This article described how to use the testpmd CLI to support debugging and verification of DPDK applications. For more information, visit DPDK.org, and visit the Networking site on Intel® Developer Zone to find meetup links and technical articles and videos on a variety of networking topics.
About the Author
Lu Wenzhuo is a DPDK software developer from Intel, Shanghai. His interest lies in PMD-related development.
Notices
TWEET: Testpmd is a built-in test tool of the DPDK, an application, and a reference for code development. Run testpmd to display and verify PMD related features supported by the NIC.
SUMMARY: Testpmd is a built-in test tool of the DPDK, an application, and a reference for code development. Run testpmd to display and verify PMD related features supported by the NIC.
"