How Intel® Media Accelerator Reference Software Works on Windows* and Linux*
Intel® Media Accelerator Reference Software is a reference implementation for media processing using the Intel® Quick Sync Video technology, compositing using Intel® Graphics Technology and inferencing using the Intel® Distribution of OpenVINO toolkit Inference Engine
On the Windows* platform, the reference implementation is developed using Microsoft* Media Foundation to create the media processing pipeline and calls Intel® Media SDK API for media to decode, encode and video processing in the Intel® graphics hardware. It utilizes Microsoft DirectX* for compositing and rendering. It implements the inference engine in the Intel Distribution of OpenVINO toolkit for inferencing on Intel® Core™ processors, integrated graphics from Intel, or Intel® Vision Accelerator Design with Intel® Movidius™ Vision Processing Unit (VPU).
On Linux*, the reference implementation takes advantage of VA-API and QSV API via FFMPEG and Weston Wayland compositor to create a pipeline for video ingestion, processing, compositing and rendering. It implements the inference engine in the Intel Distribution of OpenVINO toolkit for inferencing on Intel® Core™ processors, integrated graphics from Intel, or Intel Vision Accelerator Design with Intel Movidius Vision Processing Unit (VPU).
Feature Highlights
- Interactive GUI to build various screen layouts for single or multiple custom media and video analytics pipeline on a variety of workloads
- Multiple displays, up to three, which can be different, tiled, or identical
- 4K or Ultra High Definition (UHD) Resolution
- Landscape and Portrait Mode
- Support for Ticker Text, RSS Feed, Image input, HTML5
- Video overlay and Alpha Blending
- Transcode, Video Post Processing
- DASH broadcasting
- Resource utilization report
- IP Camera, Capture Card Input (Includes USB Camera, HDMI-IN, 3G-SDI Camera)
- Source Code Access under Intel proprietary license
Windows System Requirements
- OS: Windows® 10 RS3 onwards
- CPU: Intel® Core™ processor family, Intel® Xeon processor, or Intel Atom® processor (Apollo Lake)
- RAM: 8GB (2x 4GB)
- Hard Disk: 80GB
- Drivers: Intel® Graphics Driver and Intel® Management Engine (Intel® ME) driver
Linux System Requirements
- OS: Ubuntu* 18 LTS
- CPU: Intel Core processor family, Intel Xeon processor, or Intel Atom Processor (Apollo Lake)
- RAM: 8GB (2x 4GB)
- Hard Disk: 80GB
- Drivers: Intel® Open Source Graphics Driver
M.A.R.S supports Windows 10, 64-bit and runs on the following Intel® platforms
- Intel 6th generation core
- Intel 7th generation core
- Intel 8th generation core
- Intel 9th generation core
- Intel Atom Processor (Apollo Lake)
- Intel Atom Processor (Braswell)
Get Started
Follow these steps to begin working with Intel Media Accelerator Reference Software.
Step 1: Download and Set Up
The Intel Media Accelerator Reference Software release kit is available at this site.
You will receive a serial number to register for Intel Media Accelerator Reference Software. Once you have your serial number, enter the serial number into the box shown in the screenshot below:

Upon registration of serial number, Intel Media Accelerator Reference Software beta will appear available for selection.

By clicking Intel® Media Accelerator Reference Software Beta the different options available for Windows and Linux platforms will be displayed.

Once you have chosen a download option and the package has downloaded, you can use any of the popular unzipping applications to unzip the content.
Step 2: Running Basic Configurations
To start playing around with the software launch the M.A.R.S application by typing MARS into the Windows search bar and clicking the M.A.R.S desktop application when it appears.


When the application launches the default Full HD configuration will appear, displaying multiple overlapping zones containing components such as videos, tickers and images.
Creating Video Pipeline (4K)
To open the M.A.R.S configuration GUI press the s key on your keyboard. The current configuration is displayed in the top pane. Below this is the Display Unit Configuration options that allow you to define orientation, resolution and audio output for all connected displays. Below this is the main layout configuration area which you’ll use to define zones and place them in the available spaces on the display unit.


Clicking on a zone in the Zone Configuration pane will populate on the right-hand side, enabling you to configure different options based on the content type you have selected. If the zone has overlapping zones these will be shown in the Overlapped Zones pane on the left-hand side, and therefore can still be selected when not visible in the Visible Zones pane.
Once you have finished making changes to the configuration of the various zones you can test this by clicking the Finish button in the navigation pane at the bottom of the GUI. The Exit button closes the application when in the configuration GUI. Additionally, you can also press q on your keyboard to exit the application when not in the configuration GUI.
Step 3: Running Sample Configuration (4K Configuration)
The default configuration for M.A.R.S is designed for displays with a resolution of 1920x1080 and does not fill the 4K resolution displays you are currently using. You’ll now be shown how to create a new configuration designed for a resolution of 3840x2160.
To begin, select the New Config button in the bottom pane, then update the Resolution configuration of the display unit by changing the width to 3840 and height to 2160 and then clicking on the Visible Zones pane to expand your working area.
If the desktop resolution was changed for this task, perform a reboot so M.A.R.S can register the resolution at OS start up.

Next, add a new zone by selecting the Add Zone button. You’ll see Zone 1 appear in the Visible Zones window and will have the capability to drag the zone around the display unit working area and resize it by dragging the corners of the zone. You’ll want to make this zone fill the entire display. To do this hold down the Ctrl key and click on the zone. This will automatically size the zone to fill the available space.

Next, you’ll need to configure the zone content. This is the zone where you’ll be playing back video content, so this zone should be the default. To make sure this is the case, check that Content is set to Video and Hardware Acceleration is ticked (as shown in the screenshot below). You can play around with the rest of the configuration options later.

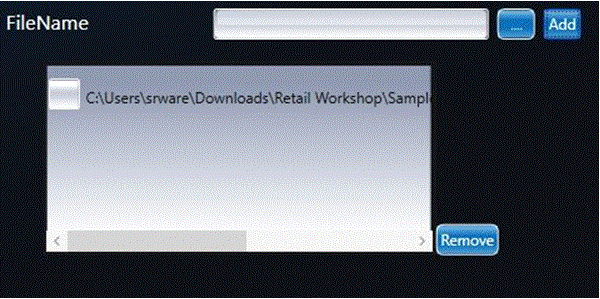
Next, you’ll need to let M.A.R.S know what content to play in this zone. To do this click the .. button next to the FileName field to open an explorer window. You’ll find some sample content in the Test Vectors directory under the M.A.R.S Installation directory/Support Files folder. As this is a 4K zone, select the City-UHD-60FPS-HEVC-12.2Mbps-Landscape.mp4 file which is a 60FPS HEVC 4K video file and the Add button. The file should then appear in the box below (as shown in the screenshot below).
Before testing, make sure to click the Save button and give your configuration file a name. This will save your configuration in XML format to disk so you can reload it into M.A.R.S at any time.
Once saving, you are ready to test your current configuration by clicking the Finish button in the M.A.R.S interface. At this stage, you only have a very simple video player, so it’s time to add some more zones. To get back to the configuration GUI press the s key on your keyboard.
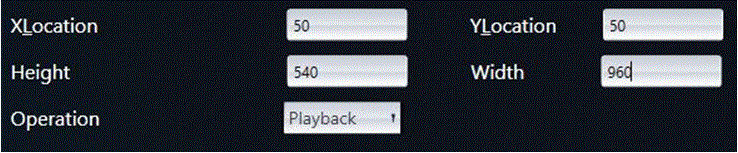
To add an additional video zone, click the Add Zone button, you can make this zone as big or small as you like, but the width we would recommend to maintaining the correct aspect ratio of the video is Height 540 and Width 960.
In its current state, this zone will overlap with your main video zone. Adding a border helps to avoid this and make it stand out. To do this set the Border configuration option to ON. This will give you some additional configuration options.

Next, you’ll need to set the content for the zone. This can be done by selecting another video file (*.mp4) from the Test Vectors directory under the M.A.R.S Installation directory/Support Files folder. Click Add. You should now have a layout similar to the screenshot below.
Click Save and Finish to test your configuration.

Note To get back to the configuration GUI press the s key on your keyboard.
Next, you’ll add an RSS Feed to display dynamic content along the bottom of the screen. This is done by clicking the Add Zone button to add a third zone to your layout, drag this zone to the bottom left corner of the screen and then resize it to the entire width of the display by dragging the right edge of the zone. You’ll also need to resize the height of the zone by dragging the top edge to make it as thin as possible. You also have the option to manually set the Height to 83 and Width to 3840 in the zone configuration panel. Your layout should now look like the screenshot below.
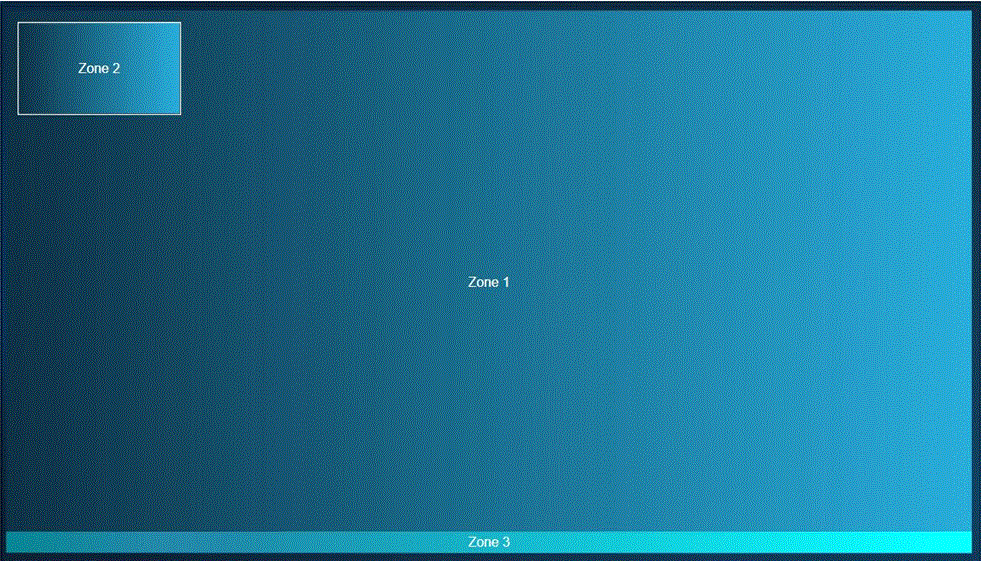
To configure Zone 3 you’ll need to update the following zone configuration parameters and set the text and background color to a color of your choice.
- Content: RSS
- URL: http://feeds.bbci.co.uk/news/england/rss.xml
- Font Size: 40
- Font Style: Normal
- Scroll Direction: Horizontal
Once you have updated the zone configuration parameters once again click Save and then Finish to see the configuration in action.

Hopefully this guide has given you a basic idea of the workflow and functionality of M.A.R.S. We recommend to continue adding zones and playing with the available configuration options to familiarize yourself with the software.
Creating Video Analytics Pipeline (1080p)
Below are the configuration options for creating an end to end video analytics pipeline.
To start select, input source (video file, or IP camera or USB camera stream). Then select the inference workflow and configure inference.
Inference Workflow: Option to enable/disable Intel Distribution of OpenVINO toolkit inference
Configure Inference: Option to configure all the Intel Distribution of OpenVINO toolkit models
Selecting the Configure Inference will open the Intel Distribution of OpenVINO toolkit Inference Configuration page.
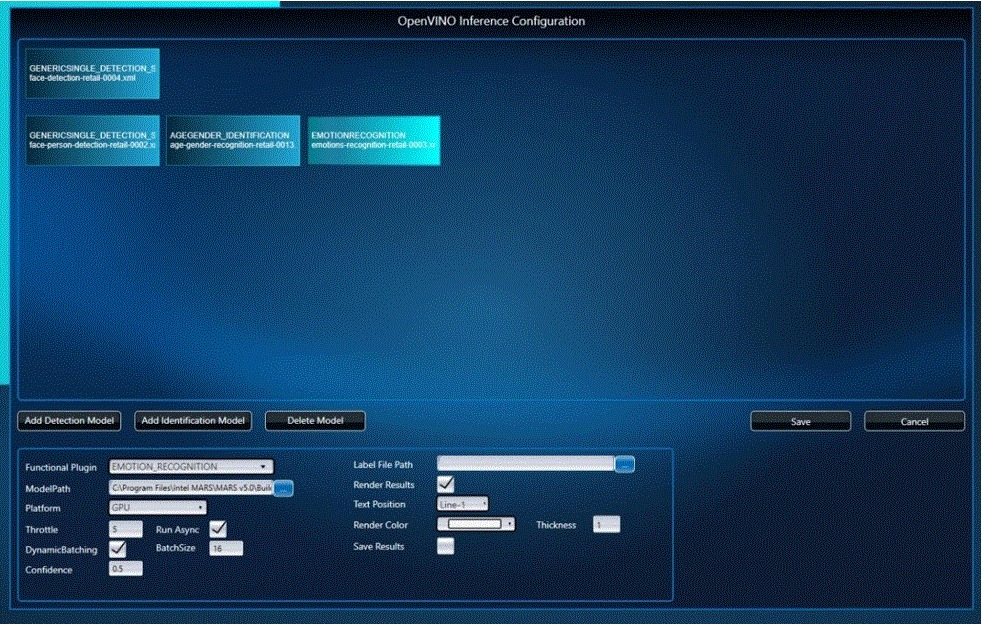
At the Intel Distribution of OpenVINO toolkit inference configuration page, use the below definition to add one or more deep learning models. There is no SW limitation on how many models can be added, although the limitation may be defined by the hardware configuration.
Add Detection Model: An Option to add a Detection Inference Model and to enable user to configure the various parameters for that model.
Add a Detection Model at the start of the Model chain.
Add Identification Model: An Option to add an Identification Inference Model and to enable user to configure the various parameters for that model.
Add an Identification Model to an existing Detection Model.
Delete Model: Deletes the selected model.
Save: Accepts the currently set configuration.
Cancel: Closes the window without saving the changes.
Model Path: An Option to browse through the system to select the corresponding model .xml
Platform: An Option to select the Platform on which inference should run. The available platforms are CPU, GPU, MYRIAD, HETERO.
Note A brief black screen will appear before video starts to play when using GPU based inferencing.
Functional Plugin: An Option to select the detection plugin from the dropdown menu.
Run Async: An option to execute the inference Synchronous or Asynchronous. Enabling this flag will make it Asynchronous.
Confidence: A value based on which the Detection/Identification results are categorized as valid and invalided Detection/Identification.
Batch Size: The maximum number of inputs the inference engine can process in a single inference request.
Dynamic Batching: If the maximum batch size is not known, then we enable this flag to configure the Inference engine to auto set the maximum batch size.
Throttle: The frequency of the frames on which inferencing is applied.
Example: A value 5 means that inference is applied on every 5th frame.
Render Inference Results: An option to enable/disable the rendering of inference results on the display unit configured.
Inference Text Position: Specifies the offset “Line” on which the Inference result text must be rendered.
Label File Path: An Option to browse through the system to select the Label file.
Color: This allows the user to configure the color in which the inference results are to be displayed. Takes RGB values as input from the sliders.
Thickness: Allows to configure the thickness of the Bounding box.
Save CSV Results: Option to enable/disable saving the inference results to a csv file.
CSV Path: An Option to browse through the system to select the folder in which Csv result file are to be stored.
Once the inference configuration for the Intel Distribution of OpenVINO toolkit is done, select the save button to continue. At the main screen, if no other configuration is to be done, click finish to execute the pipeline.
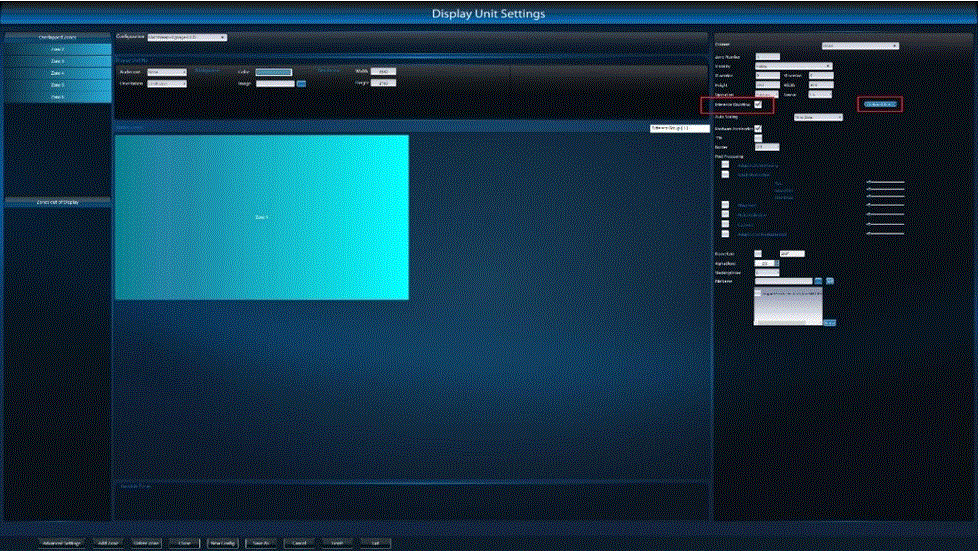
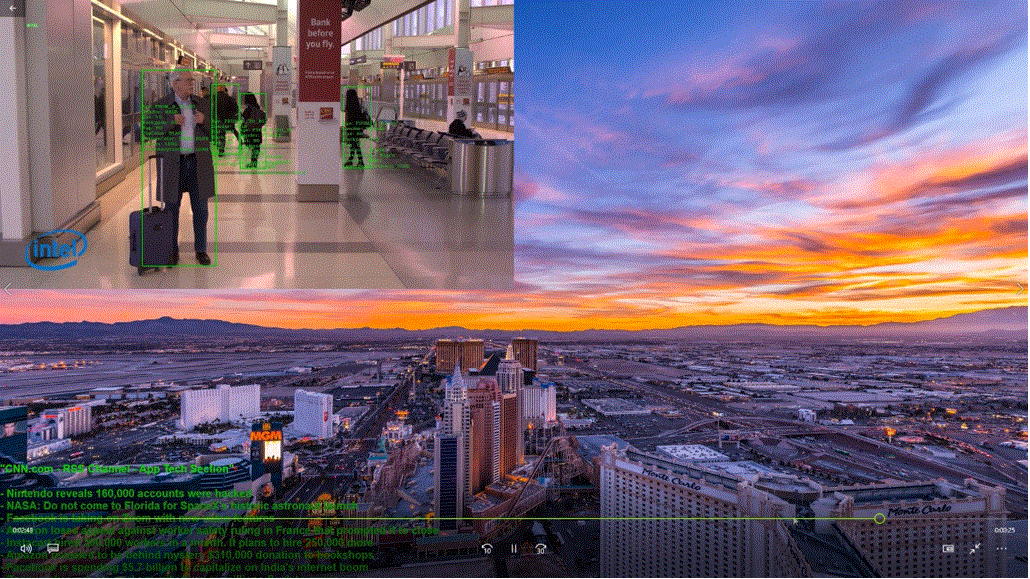
An example configuration with Person Attribute Detection model is shown in the picture. The picture below shows a configuration with inference workflow in playback mode.
The table below provides the configuration setting for the pre-trained models that are provided with the software kit.
| S. No | Models | Function Plugin | Platform | Threashold | Batch Size | Dynamic Batching |
|---|---|---|---|---|---|---|
| 1 | face-detection-retail-0004 | GENERIC_SINGLE_DETECTION_SSD,FACE_DETECTION | CPU/GPU | 0.5 | 1 | |
| 2 | person-detection-retail-0013 | GENERIC_SINGLE_DETECTION_SSD,FACE_DETECTION | CPU/GPU | 0.5 | 1 | |
| 3 | face-person-detection-retail-0002 | GENERIC_SINGLE_DTECTION_SSD | CPU/GPU | 0.5 | 1 | |
| 4 | vehicle-detection-adas-0002 | GENERIC_SINGLE_DETECTION_SSD,FACE_DETECTION | CPU/GPU | 0.5 | ` | |
| 5 | person-vehicle-bike-detection-crossroad-0078 | GENERIC_SINGLE_DETECTION_SSD,FACE_DETECTION | CPU/GPU | 0.5 | 1 | |
| 6 | pedestrian-detection-adas-0002 | GENERIC_SINGLE_DETECTION_SSD,FACE_DETECTION | CPU/GPU | 0.5 | 1 | |
| 7 | pedestrian-and-vehicle-detector-adas-0001 | GENERIC_SINGLE_DETECTION_SSD,FACE_DETECTION | CPU/GPU | 0.5 | 1 | |
| 8 | person-detection-action-recognition-0005 | ACTION_DETECTION | CPU/GPU | 0.5 | 1 | |
| 9 | age-gender-recognition-retail-0003 | AGE_GENDER_IDENTIFICATION | CPU/GPU | 0.5 | 16 | Yes |
| 10 | emotions-recognition-retail-0003 | EMOTION_RECOGNITION | CPU/GPU | 0.5 | 16 | Yes |
| 11 | facial-landmarks-35-adas-0001 | LANDMARK_IDENTIFICATION | CPU/GPU | 0.5 | 16 | Yes |
| 12 | head-post-estimation-adas-0001 | HEADPOSE_ESTIMATION | CPU/GPU | 0.5 | 16 | Yes |
| 13 | face-reidentification-retail-0095 | FACE_REIDENTIFICATION | CPU/GPU | 0.5 | 16 | Yes |
For more information on the pre-trained models, refer to the documentation.
Note When GPU inferencing is selected, there will be slight delay in the form of black screen as the pre-trained network is loaded to the GPU target.
"