Overview
This article describes how to use the Data Plane Development Kit (DPDK) version 16.11.8 LTS (long-term support) and Test Suite version 17.08.0 to run DPDK tests and collect the results of the device under test (DUT). The DPDK Test Suite (DTS), an automation test tool written in Python, supports custom test plans and automation scripts for benchmarks. Below is a block diagram of the DPDK Test Suite framework.
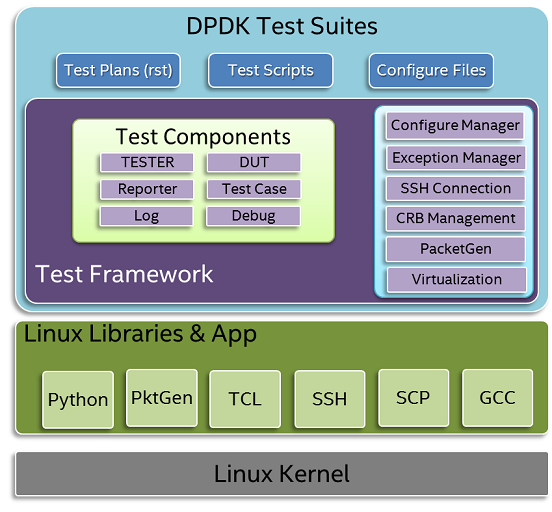
DTS Block Diagram
Requirements
Before we get to the tutorial, we must set up the tester system and DUT. For this tutorial, the tester and DUT will be the same system. Going forward, it is assumed that you have ssh access and are logged in as root on the system.

Diagram of the Tester and DUT System
The system demonstrated in this tutorial is running Ubuntu 16.04.5 LTS on an Intel® Xeon® processor E5-2699v4 with two 10-gigabit NICs. Each NIC has two 10-gigabit ports. The NICs used are the Intel® Ethernet Controller 10 Gigabit 82599 and Intel® Ethernet Controller X540-AT2.
Tester system setup
Installing libraries and tools
apt install python-xlwt
apt install python-pexpect
apt install python-numpy
apt install python-docutils
apt install python-pcapy
apt install python-xlrd
apt install scapy
After libraries and tools have been installed, edit this file:
vim /usr/lib/python2.7/dist-packages/scapy/config.py

use_pcap = True  # find use_pcap and set it to True
This setting will allow scapy to use libpcap for monitoring network packets.
Installing DPDK test suite
cd
apt install git
git clone --branch 17.08 http://dpdk.org/git/tools/dts
wget http://fast.dpdk.org/rel/dpdk-16.11.8.tar.xz
tar -xf dpdk-16.11.8.tar.xz
mv dpdk-stable-16.11.8 dpdk
tar czf dpdk.tar.gz dpdk
mv dpdk.tar.gz/ ~/dts/dep
The DPDK Test Suite comprises several file and directories:
- dts: main module of DPDK Test Suite
- exectution.cfg: configuration file of DPDK Test Suite
- framework: folder with dts framework modules
- nics: folder that contains different network device modules
- output: folder that contains running log files and result files
- test_plans: folder with rst files, which contain the descriptions of test cases
- tests: folder with test-case scripts
DUT system setup
First, we must turn on the correct BIOS knobs on our DUT system.
Configure BIOS options
- Note: On most Intel server boards, the BIOS setup key is F2.
- The high-precision event timer (HPET) must be enabled in the platform BIOS if the HPET is to be used. Otherwise, the time-stamp counter (TSC) is used by default. The user can then navigate to the HPET option. On the Intel® Communications Chipset 89xx Series platform BIOS, this is the path:
Advanced -> PCH-IO Configuration -> High Precision Timer - Enhanced Intel SpeedStep® technology must be disabled in the platform BIOS to ensure that the processor voltage and core frequency do not change. This is necessary for consistency of data. On the Intel® Communications Chipset 89xx Series platform BIOS this is the path:
Advanced -> Processor Configuration -> Enhanced Intel SpeedStep - Processor state C3 and C6 must be disabled for performance measure too. On the Intel Communications Chipset 89xx Series platform BIOS, this is the path:
Advanced -> Processor Configuration -> Processor C3 Advanced -> Processor Configuration -> Processor C6 - Hyper-Threading Technology must be enabled. On the Intel Communications Chipset 89xx Series platform BIOS, this is the path:
Advanced -> Processor Configuration -> Intel® Hyper-Threading Tech
Installing DPDK & Tools
apt update
apt install build-essential
apt install linux-headers-`uname -r`
apt install libnuma-dev
After DPDK has been installed on the DUT we must edit GRUB_CMDLINE_LINUX_DEFAULT for DPDK to take advantage of hugepages.
To configure Ubuntu for optimal use of DPDK, we will change the GRUB* command-line options that are passed to Ubuntu at boot time for our system. To do this we will edit the config file /etc/default/grub.
Change the setting GRUB_CMDLINE_LINUX_DEFAULT to the following:
GRUB_CMDLINE_LINUX_DEFAULT="default_hugepagesz=1G hugepagesz=1G hugepages=16 iommu=pt intel_iommu=on
This makes GRUB aware of the new options to pass to Ubuntu during boot time.
After both files have been updated run the following commands:
update-grub
reboot
A reboot will apply the new settings.
Once logged back into your Ubuntu session, create a mount path for the hugepages:
mkdir -p /mnt/huge
mount -t hugetlbfs none /mnt/huge
mount -t hugetlbfs none /dev/hugepages
Configuring DPDK Test Suite
Create execution configuration
On the Tester System cd into dts directory and create and edit a file named execution.cfg.
[Execution1]
crbs=127.0.0.1
drivername=igb_uio
test_suites=hello_world,l2fwd
targets=x86_64-native-linuxapp-gcc
parameters=nic_type=cfg:func=true
- crbs: IP address of the DUT CRB. The detail information of this CRB is defined in file crbs.py.
- test_suites: Lists the test suites that will be executed.
- targets: Lists DPDK targets to be tested.
- parameters: You can define multiple keywords.
- scenario: Scenario of DPDK virtualization environment for this execution.
- nic_type: The type of the NIC to use. The types are defined in the file dts/framework/settings.py.
- func=true run only functional test
- perf=true run only performance test
- drivername: Name of DUT NIC driver.
After the execution.cfg file has been updated, dts will need information about your DUT. So edit the file conf/crbs.conf as follows.
[127.0.0.1]
dut_ip=127.0.0.1
dut_user=root
dut_passwd=
os=linux
tester_ip=127.0.0.1
tester_passwd=
ixia_group=None
channels=4
bypass_core0=True
- dut_ip: IP address of DUT
- dut_user: user name of DPDK Test Suite used to log in into DUT
- dut_passwd: password of DPDK Test Suite used to log in into DUT
- os: distribution of operation system
- tester_ip: IP address of tester
- tester_passwd: password to login into Tester
- ixia_group: IXIA group name for DUT
- channels: number of memory channels for DPDK EAL
- bypass_core0: skip the first core when initialize DPDK
Finally, we will edit the conf/ports.conf to configure the NICs the DTS will test.
- pci: device pci address of DUT
- peer: device pci address of Tester port which connected to the DUT device
To do that, we must find out the NICs on our system. To do that, run this command:
lspci | grep Ethernet
From the image below we see that we have three NICs on our system; however, we are only going to use two for this demonstration.

lspci | grep Ethernet
The two NICs we will use have the following bus device function:
- Intel® Ethernet Controller 10 Gigabit 82599: 03.00.0
- Intel® Ethernet Controller 10 Gigabit 82599: 03.00.1
- Intel® Ethernet Controller X540-AT2: 81.00.0
- Intel® Ethernet Controller X540-AT2: 81.00.1
We will edit the conf/ports.conf to use both of the 10-gigabit NICs on our demo system, as shown below.
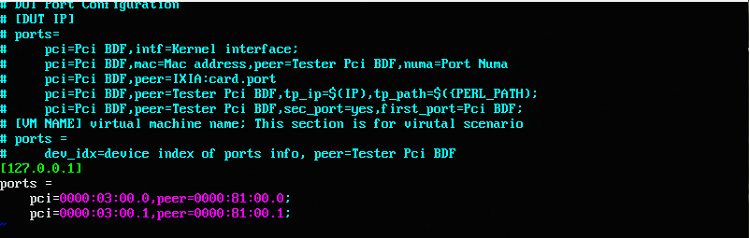
ports.conf
Running the DPDK Test Suite
In this demonstration we will be running the hello_world and l2fwd tests. To see what other available tests there are to run, read the executions/exection.cfg file. The hello_world test will print a “helloworld” message on every enabled lcore. The l2fwd test performs L2 forwarding for each packet that is received.
Since we have our Tester and DUT configured properly we can now run the tests. Log in to the Tester system and run the following.
NOTE: The configured test can take 5-10mins to run.
cd dts
./dts
If all goes well, you should see output as shown below.
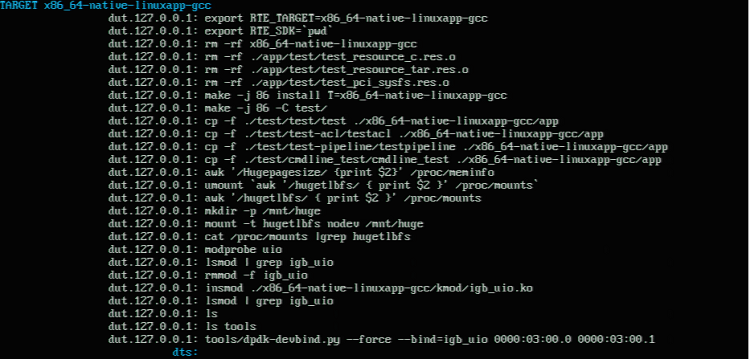
Building of DPDK

hello world test
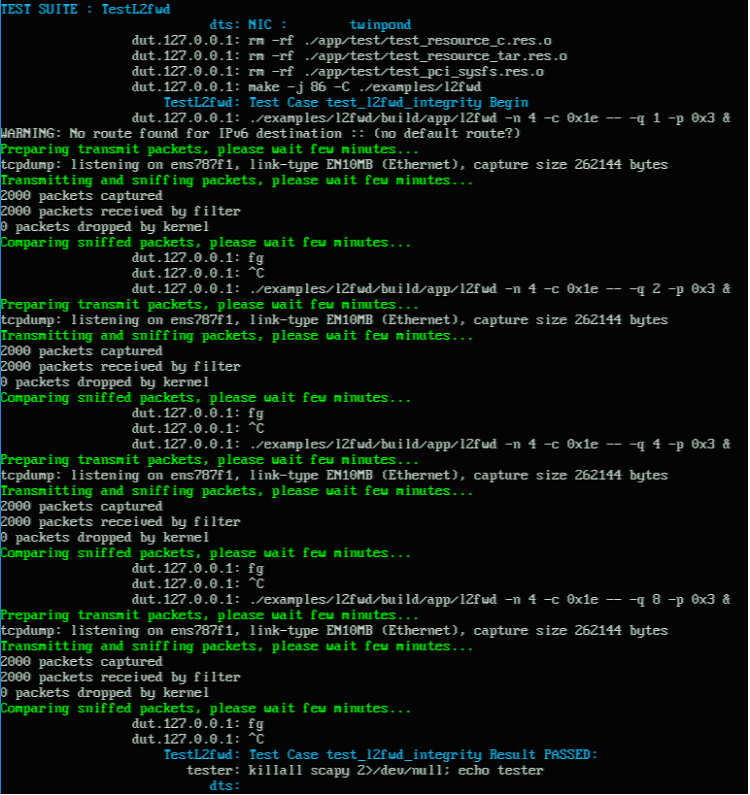
l2fwd test
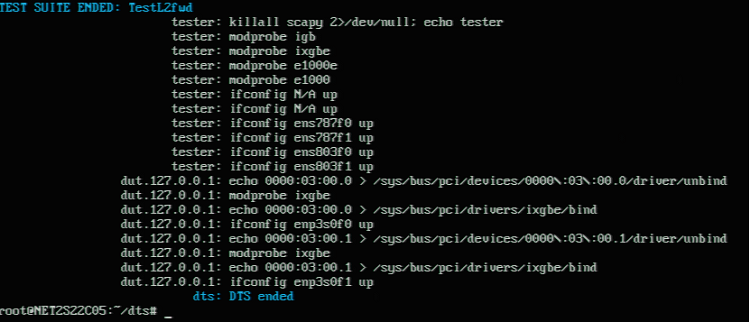
l2fwd test continue
After all the configured tests have been run, a summary of the run can be found in dts/output.

Test output directory
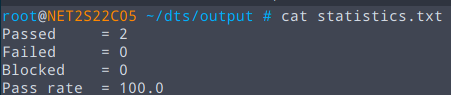
statistics.txt output
Summary
In this article we have successfully set up our Tester and DUT system, run our configured tests successfully, and viewed the output of our DTS run. Out of the box, the DTS can run a myriad of tests. See a list at The DPDK Test Plans on dpdk.org. In addition, the DTS can run user-defined tests to stress-test your network.
References
Getting Started Guide for the DPDK Test Suite at DPDK.org
Networking site on Intel Developer Zone
"