Purpose of This Document
This document describes how to install the Intel® SDK for OpenCL™ applications for Linux* onto Ubuntu* 16.04 and get the Intel® OpenCL code samples up and running in the Eclipse Integrated Development Environment (IDE).
I assume that you already have Ubuntu set up with the Eclipse IDE for C++ development installed.
Environment
Ubuntu* 16.04
Eclipse Oxygen*
Installing Intel®OpenCL™ SDK and library onto Ubuntu* 16.04
All the setup was done on a fresh, clean Ubuntu 16.04 build.
To set up the Ubuntu environment, I recommend you follow the instructions on Getting Started in Linux with Intel® SDK for OpenCL™ Applications, which has two main parts, as follows.
Installing the OpenCL™ Drivers
The first step is to install the OpenCL™ Drivers onto your Ubuntu system. This can be done using the script that is provided. Explaining the details of this script is beyond the scope of this document.
Installing the Intel® SDK for OpenCL™ Applications
Further down the page you will find a script that installs the Intel SDK for OpenCL applications. This script performs all the necessary steps to put the SDK in the proper locations.
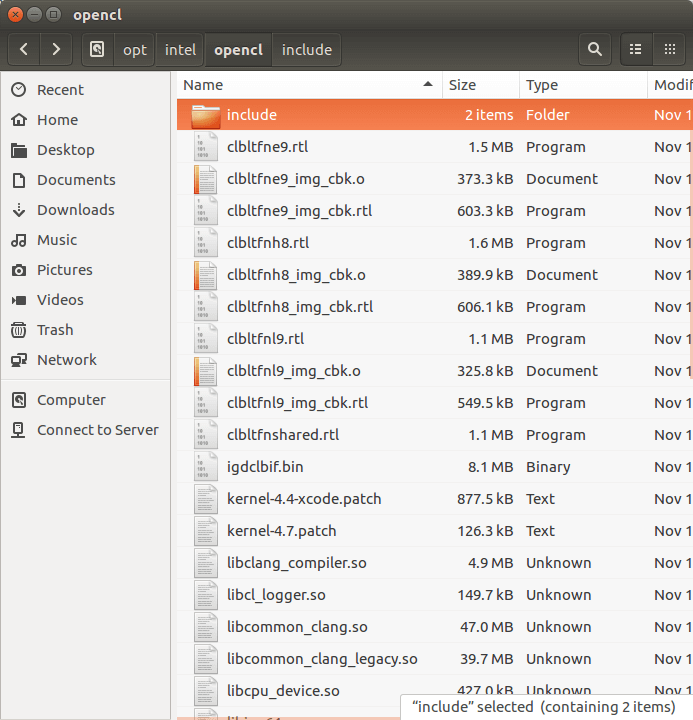
These two scripts can take a little while to run. Once the run completes, the Intel SDK for OpenCL applications has been installed at this location:
Getting the OpenCL™ Code Samples
Intel has several OpenCL™ code samples for both Windows* and Linux at Intel® SDK for OpenCL™ Applications Support. If you scroll you will see a link to download the Linux samples, or you can click OpenCL 1.2 samples.
What gets extracted
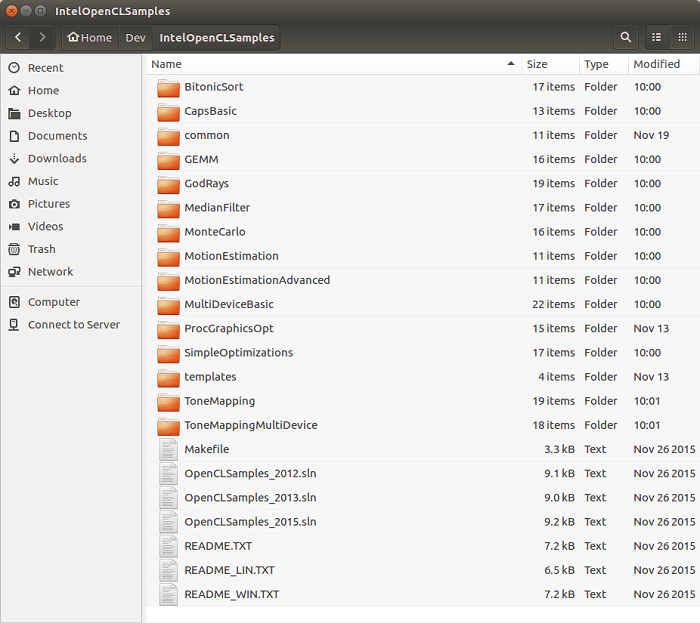
After extracting your samples onto the hard drive, you should see the following. I placed my samples in Home/Dev/IntelOpenCLSamples.
Example descriptions
Each sample folder has a .PDF file that gives you a full description of each project. The following is a brief description of each sample.
- BitonicSort. Demonstrates how to sort an arbitrary input array of integer values with OpenCL technology using Single Instruction Multiple Data (SIMD) bitonic sorting networks.
- CapsBasic. Demonstrates how to query all OpenCL™ platforms available on the system and lists all devices for a given platform.
- GEMM (General Matrix Multiply). Demonstrates how to efficiently utilize an OpenCL™ device to perform a general matrix multiply operation on two dense square matrices.
- GodRays. Demonstrates how to use high dynamic range (HDR) rendering with the God Rays (crepuscular rays) effect in OpenCL.
- MedianFilter. Demonstrates how to use medial filter in OpenCL by optimizing the filtration process using implicit Single Instruction Multiple Data (SIMD) code vectorization performed by built in OpenCL compiler vectorizer.
- MonteCarlo. Demonstrates implementation of the Monte Carlo simulation for the European stock option pricing.
- MotionEstimation. Provides step-by-step guidelines on using Intel’s motion estimation extension for OpenCL.
- MotionEstimationAdvanced. Expands motion estimation by including a set of host-callable functions for frame-based video motion estimation.
- MultiDeviceBasic. Sample utilizes the capabilities of the multidevice system, CPU/GPU.
- ProGrapicsOpt. Demonstrates how to optimize OpenCL™ kernels for running on Intel graphics devices with the Intel® Processor Graphics optimization sample based on the Sobel Filter algorithm.
- SimpleOptimizations. Demonstrates simple ways to measure the performance of OpenCL kernels in an application.
- ToneMapping. Demonstrates how to use HDR rendering with the tone mapping effect in OpenCL.
The samples come ready to be compiled on either Windows or Linux. At the root of the entire samples folder and in each individual project folder are Visual Studio files that are not needed for the Linux environment. I removed them as they were unnecessary.
The common folder
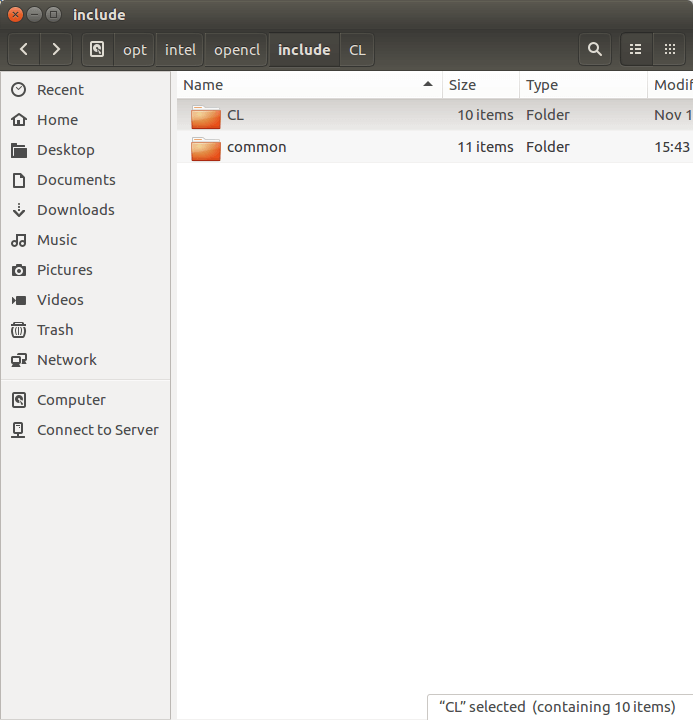
The “common” folder contains wrapper .hpp and .cpp source code files that aid in the sample apps. These are specific to the SDK samples and are NOT part of the Intel SDK for OpenCL applications library itself.
While it may not be necessary, I copied the common folder to the default Intel SDK for OpenCL applications install location and put it in the includes folder. This is because I wanted to better organize my projects and have just one main include directory. In Eclipse I reference this location in every project. My rationale is that this is Intel’s implementation of OpenCL and samples, and some of the extra classes created in the common folder could be useful in other projects.
Creating the Projects in Eclipse: Oxygen*
Assumptions
As mentioned, Oxygen is the current version that’s available at the time of this writing. I also assume that you have a basic knowledge of using the IDE, and know how to create a C++ project and set the Eclipse workspace.
Overview of the process
There are 14 samples, each of these will be converted into an Eclipse project. They all follow the same basic pattern.
- Create a new Eclipse C++ project with the exact same name as the original source sample.
- Set up the properties for the project: Header file location, OpenCL lib path, and so on.
- Create a “src” folder and copy in all required .CPP files.
- Create a “resources” folder for any extra files needed per sample project.
- Rebuild the Project C/C++ Index.
- Compile and fix any issues.
Create a new Eclipse project
Step 1. Create a new project.
From the File menu, choose new C/C++ project. In this image you can see that I was working with the “SimpleOptimization” project. I chose an Empty Project with Linux GCC.
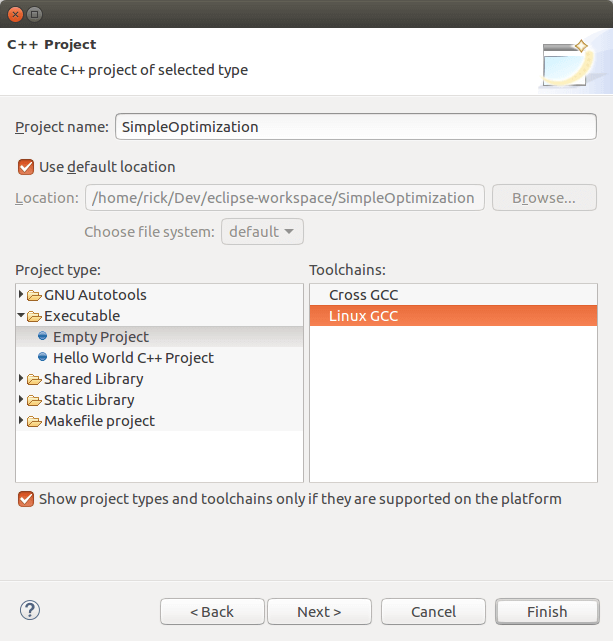
Click Next >.
The Select Configurations dialog box appears.
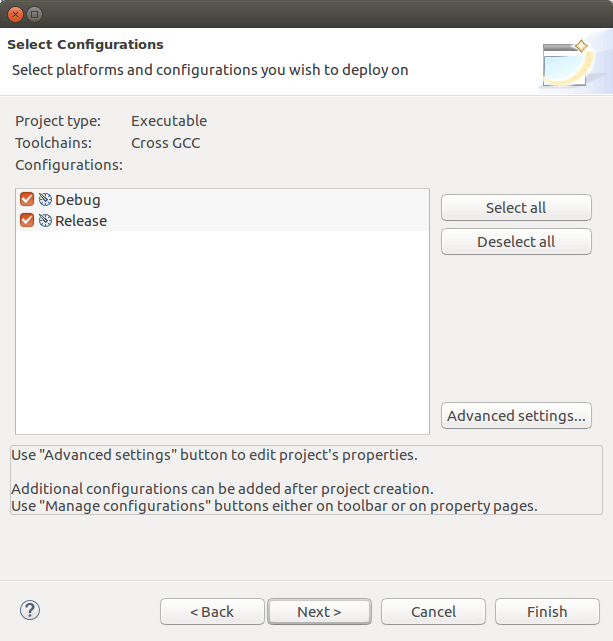
Click Advanced Settings…
The Properties dialog box for the Eclipse project appears.
It’s not mandatory to click Advanced Settings at this stage to fill out the project properties. You can instead click Finish, and once the project is created, enter this information later by right-clicking a project and choosing properties.
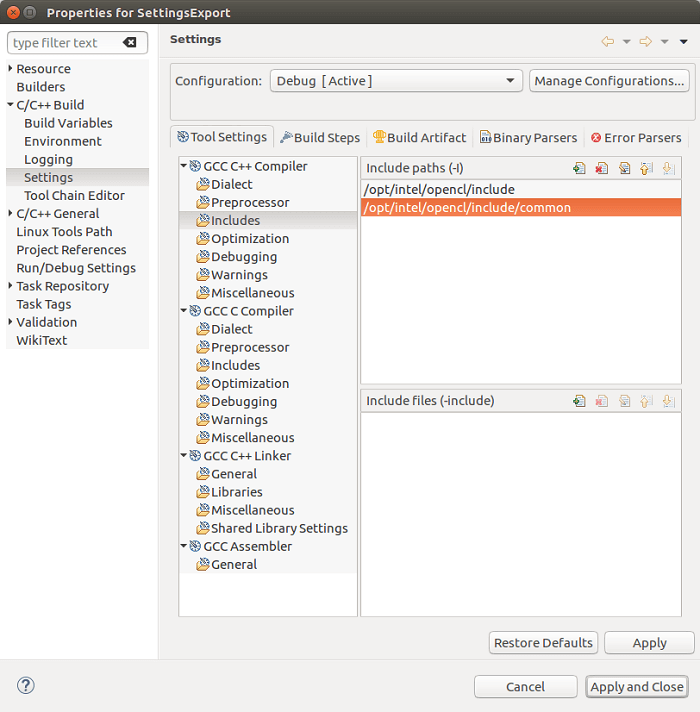
Step 2. Add the include file paths.
Add the paths to both the OpenCL header files. Recall that I copied the entire common folder from the samples folder to be in the same location as the Intel SDK for OpenCL applications installation location. You may or may not have done this already, but you will need to add a reference to the common folder no matter where you have it on your hard drive.
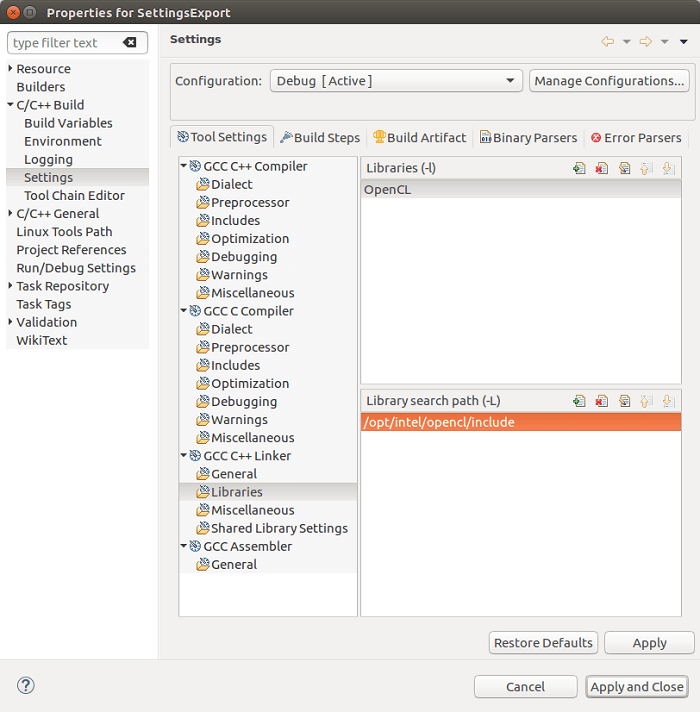
Step 3. Add the OpenCL library and path.
You need to add both the OpenCL library itself and the path where Eclipse should look for the library.
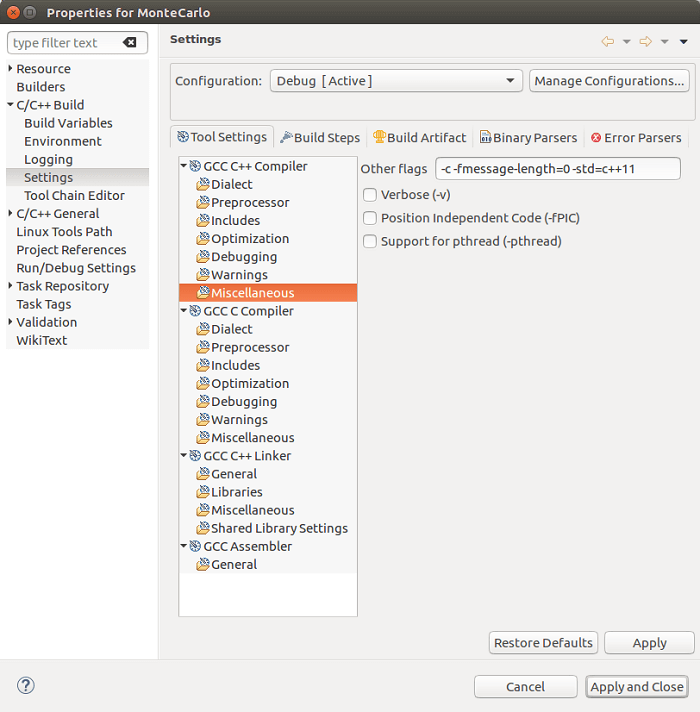
Step 4. Choose compiler options.
I added the -std=c++11 flag under Miscellaneous settings. I found that some of code sample applications needed this so I added it to all of the projects.
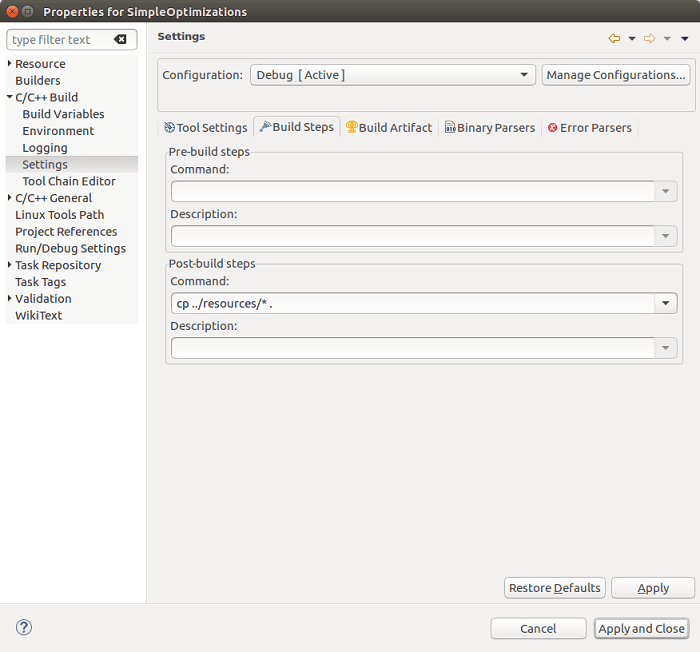
Step 5. Post build command.
This step is not required. It copies everything from the resources folder into the Debug folder so that once the compile is done, you can jump into a terminal, navigate to the executable, and have everything ready to go in the proper folder.
Once you have completed filling in the project properties, click Apply and Close.
The Select Configurations dialog box appears.
Click Finish.
You now have an empty project set up and ready to go.
Step 6. Create an “src” folder.
At this point there is an empty project with no source code files. By convention it’s common to put source code files in an src folder. Next you need to create a new folder called “src” that will hold all the .CPP files.
- Right-click the name of the project.
- Click New -> Folder.
- Name the new folder “src”.
Your project now has an src folder under the root.
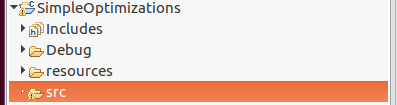
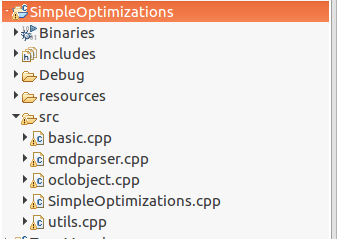
Step 7. Copy the application and supporting .CPP files.
Now that you have a folder to hold the CPP files, we need to copy the existing sample files into this new src folder. This is as simple as navigating to the original samples folder for a given project, grabbing the .CPP files and dropping them into the Eclipse IDE’s corresponding project.
In this screenshot, there is only one .CPP file that I need, the SimpleOptimizations.cpp file, which happens to be the main app source code file.
Step 8. Copy the CPP files from the common folder.
Next you need to determine which .CPP files from the samples common folder you need to copy into the src folder. To do this, look at the main source code file, In this case, the SimpleOptimizations.cpp file.
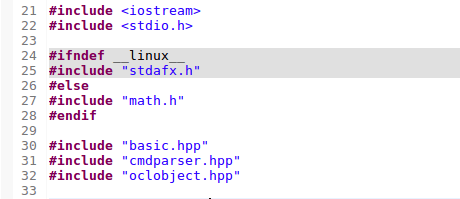
Looking at this image of the code snippet, you can see that this file relies on Basic.hpp, Cmdparser.hpp, and Oclobject.hpp.
This means that you need to import the corresponding .CPP files from the common folder and place them into the project’s src folder.
As previously mentioned, I put a copy of the common folder alongside the Intel SDK for OpenCL applications include folder, which is located at:
/opt/intel/opencl/include
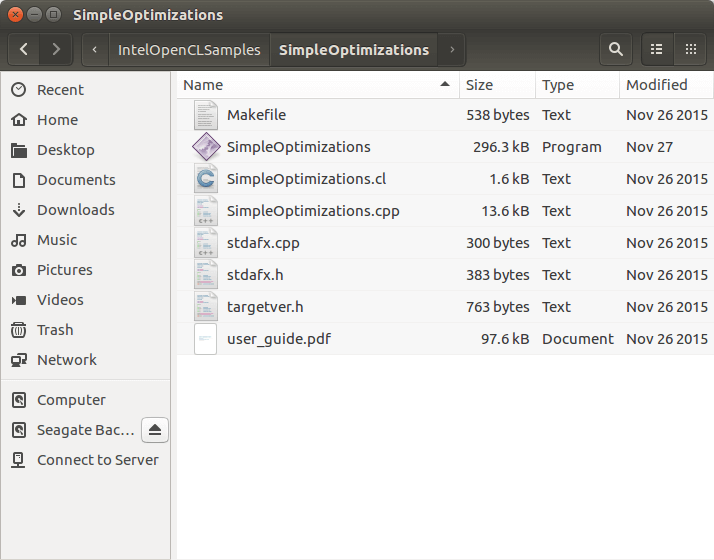
After grabbing all the files needed for the project to compile properly, you will end up with a src folder that looks like this:
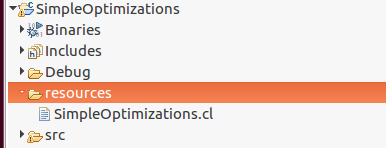
Step 9. Create the “resources” folder.
This folder contains the .CL kernel files, images, and any other files that are needed at the application’s runtime. Collecting all the files into one folder makes it easy for the post-build process to easily find them to copy into the Debug folder.
Not ALL projects have extra files that need to run. If not, you can omit this step for that project. Otherwise, just like we did with the src folder, right-click the project, click New->Folder, and then name it “resources”
Now, we have to go back to the original samples project folder. For this example I can see that there is only one additional file, SimpleOptimizations.CL
Copy SimpleOptimizations.CL into the Eclipse project’s resource folder. You should now have a resources folder that look like this:
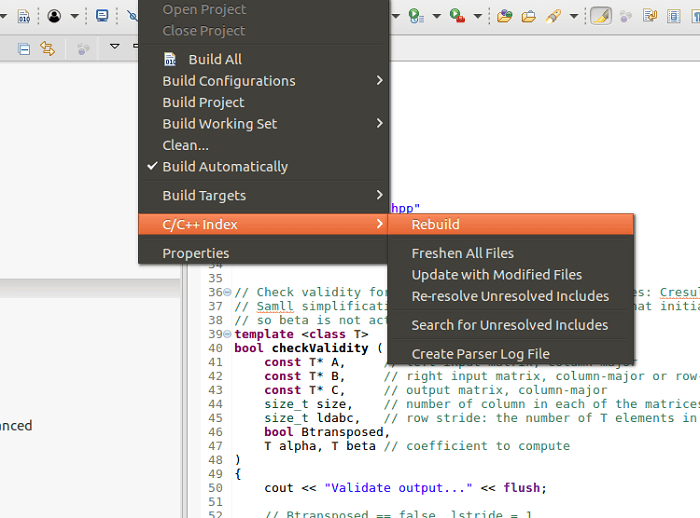
Re-Index C++
Because the Eclipse IDE has syntax completion like Visual Studio*, sometimes it needs to be re-indexed so that it knows about new source code. To do this, from the Project menu, click C/C++ Index and then Rebuild.
The following are some useful links that discuss how to set up Eclipse properly so it can detect and know about the new source code headers and classes.
C/C++ Project properties: Preprocessor Include Paths, Macros, etc. - Entries tab
Setting Up Include Paths and Macros for C/C++ Indexer
Project File References
The following is a list of the files I added to each project src and resources folder. This list includes ONLY the supporting files needed for each project and not the actual project main source code files.
At the time of this writing, every sample application compiled and ran with the exception of MotionEstimation and MotionEstimationAdvanced. I suspect this is due to the fact that I have an Nvidia graphics card in my system and have not downloaded the proper Nvidia drivers. On a system with Intel® graphic technology, this should run.
NOTE: I’m not sure why the original developers put the cmdoptions.hpp/cpp file in the original project rather than in the common folder. However because there are a couple of projects that use these files, I left things as they were and left them in each individual folder’s src location.
BitonicSort |
|
| src | BitonicSort.cpp, basic.cpp, cmdparser.cpp, oclobject.cpp, utils.cpp |
| resources | BitonicSort.cl |
CapsBasic |
|
| src | CapsBasic.cpp |
| resources | N/A |
GEMM |
|
| src | Gemm.cpp, basic.cpp, cmdparser.cpp, oclobject.cpp, utils.cpp, cmdoptions.cpp, cmdoptions.hpp |
| resources | gemm.cl |
GodRays |
|
| src | GodRays.cpp, basic.cpp, cmdparser.cpp, GodRaysNative.cpp, oclobject.cpp, stdafx.cpp, utils.cpp |
| resources | GodRays.cl, GodRays.rgb |
MedianFilter |
|
| src | MedianFilter.cpp, basic.cpp, cmdparser.cpp, oclobject.cpp, utils.cpp |
| resources | MedianFilter.cl |
MonteCarlo |
|
| src | MonteCarlo.cpp, basic.cpp, cmdparser.cpp, oclobject.cpp, utils.cpp, cmdoptions.cpp |
| resources | MonteCarlo.cl |
MotionEstimation |
|
| src | basic.cpp, cmdparser.cpp, MotionEstimationAdvanced.cpp, oclobject.cpp, utils.cpp, yuv_utils.cpp |
| resources | video_1920x1080_5frames.yuv |
MotionEstimationAdvanced |
|
| src | basic.cpp, cmdparser.cpp, MotionEstimation.cpp, oclobject.cpp, utils.cpp, yuv_utils.cpp |
| resources | mea_video_1920x1080_5Frames.yuv |
MultiDeviceBasic |
|
| src | basic.cpp, cmdparser.cpp, kernel.cpp, multi.cpp, multidevice.cpp, oclobject.cpp, shared.cpp, system.cpp, utils.cpp |
| resources | cpu+mic.system-level.sh, cpu+multimic.system-level.sh, multimic.system-level.sh, universal.system-level.sh |
ProGraphicsOpt |
|
| src | ProGraphicsOpt.cpp, basic.cpp, cmdparser.cpp, oclobject.cpp, stdafx.cpp, utils.cpp |
| resources | ProGraphicsOpt.cl |
SimpleOptimizations |
|
| src | SimpleOptimizations.cpp, basic.cpp, cmdparser.cpp, oclobject.cpp, utils.cpp |
| resources | SimpleOptimizations.cl |
ToneMapping |
|
| src | ToneMapping.cpp, ToneMappingNative.cpp, basic.cpp, cmdparser.cpp, oclobject.cpp, utils.cpp |
| resources | ToneMapping.cl, ToneMapping.rgb |
ToneMapping |
|
| src | ToneMappingMultiDevice.cpp, ToneMappingNative.cpp, basic.cpp, cmdparser.cpp, oclobject.cpp, utils.cpp |
| resources | ToneMappingMultiDevice.cl, ToneMappingMultiDevice.rgb |