Introduction
This tutorial demonstrates several different ways of using single root input/output virtualization (SR-IOV) network virtual functions (VFs) in Linux* KVM virtual machines (VMs) and discusses the pros and cons of each method.
Here’s the short story: use the KVM virtual network pool of SR-IOV adapters method. It has the same performance as the VF PCI* passthrough method, but it’s much easier to set up. If you must use the macvtap method, use virtio as your device model because every other option will give you horrible performance. And finally, if you are using a 40 Gbps Intel® Ethernet Server Adapter XL710, consider using the Data Plane Development Kit (DPDK) in the guest; otherwise you won’t be able to take full advantage of the 40 Gbps connection.
There are a few downloads associated with this tutorial that you can get from intel/SDN-NFV-Hands-on-Samples:
- A script that groups virtual functions by their physical functions,
- A script that lists virtual functions and their PCI and parent physical functions, and
- The KVM XML virtual machine definition file for the test VM
SR-IOV Basics
SR-IOV provides the ability to partition a single physical PCI resource into virtual PCI functions which can then be injected into a VM. In the case of network VFs, SR-IOV improves north-south network performance (that is, traffic with endpoints outside the host machine) by allowing traffic to bypass the host machine’s network stack.
Supported Intel Network Interface Cards
A complete list of Intel Ethernet Server Adapters and Intel® Ethernet Controllers that support SR-IOV is available online, but in this tutorial, I evaluated just four:
- The Intel® Ethernet Server Adapter X710, which supports up to 32 VFs per port
- The Intel Ethernet Server Adapter XL710, which supports up to 64 VFs per port
- The Intel® Ethernet Controller X540-AT2, which supports 32 VFs per port
- The Intel® Ethernet Controller 10 Gigabit 82599EB, which supports 32 VFs per port
Assumptions
There are several different ways to inject an SR-IOV network VF into a Linux KVM VM. This tutorial evaluates three of those ways:
- As an SR-IOV VF PCI passthrough device
- As an SR-IOV VF network adapter using macvtap
- As an SR-IOV VF network adapter using a KVM virtual network pool of adapters
Most of the steps in this tutorial can be done using either the command line virsh tool or using the virt-manager GUI. If you prefer to use the GUI, you’ll find screenshots to guide you; if you are partial to the command line, you’ll find code and XML snippets to help.
Note that there are several steps in this tutorial that cannot be done via the GUI.
Network Configuration
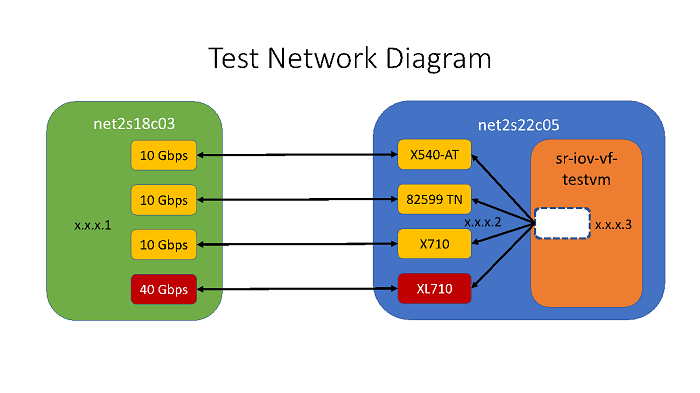
The test setup included two physical servers—net2s22c05 and net2s18c03—and one VM—sr-iov-vf-testvm—that was hosted on net2s22c05. Net2s22C05 had one each of the four Intel Ethernet Server Adapters listed above with one port in each adapter directly linked to a NIC port with equivalent link speed in net2s18c03. The NIC ports on each system were in the same subnet: those on net2s18c03 all had static IP addresses with .1 as the final dotted quad, the net2s22c05 ports had .2 as the final dotted quad, and the virtual ports in sr-iov-vf-testvm all had .3 as the final dotted quad:
System Configuration
Host Configuration
| CPU | 2-Socket, 22-core Intel® Xeon® processor E5-2699 v4 @ 2.20 GHz |
| Memory | 128 GB |
| NIC | Intel Ethernet Controller X540-AT2 |
| Intel® 82599 10 Gigabit TN Network Connection | |
| Intel® Ethernet Controller X710 for 10GbE SFP+ | |
| Intel® Ethernet Controller XL710 for 40GbE QSFP+ | |
| Operating System | Ubuntu* 16.04 LTS |
| Kernel parameters | GRUB_CMDLINE_LINUX="intel_iommu=on iommu=pt” |
Guest Configuration
The following XML snippets are taken via
# virsh dumpxml sr-iov-vf-testvmCPU
<vcpu placement='static'>8</vcpu>
<cpu mode='host-passthrough'>
<topology sockets='1' cores='8' threads='1'/>
</cpu>
Memory
<memory unit='KiB'>12582912</memory>
<currentMemory unit='KiB'>12582912</currentMemory>
NIC
<interface type='network'>
<mac address='52:54:00:4d:2a:82'/>
<source network='default'/>
<model type='rtl8139'/>
<address type='pci' domain='0x0000' bus='0x00' slot='0x08' function='0x0'/>
</interface>
The SR-IOV NIC XML tag varied based the configurations discussed in this tutorial.
| Operating System | Ubuntu 14.04 LTS. Note This OS and Linux kernel version were chosen based on a specific usage. Otherwise, newer versions would have been used. |
| Linux Kernel Version | 3.13.0-24-lowlatency |
| Software |
Note Ubuntu 14.04 LTS did not come with the i40evf driver preinstalled. I built the driver from source and then loaded it into the kernel. I used version 2.0.22. Instructions for building and loading the driver are located in the README file. Update January 2020: Ubuntu 14.04 LTS is no longer supported. If Intel® Network Adapter Virtual Function Driver sources are required, try downloading from here: Intel® Network Adapter Virtual Function Driver for Intel® Ethernet Controller 700 Series |
The complete KVM definition file is available online.
Scope
This tutorial does not focus on performance. And even though the performance of the Intel Ethernet Server Adapter XL710 SR-IOV connection listed below clearly demonstrates the value of the DPDK, this tutorial does not focus on configuring SR-IOV VF network adapters to use DPDK in the guest VM environment. For more information on this topic, see the Single Root IO Virtualization and Open vSwitch Hands-On Lab Tutorials. You can find detailed instructions on how to set up SR-IOV VFs on the host in this SR-IOV Configuration Guide and the video Creating Virtual Functions using SR-IOV. But to get you started, once you have enabled iommu=pt and intel_iommu=on as kernel boot parameters, if you are running a Linux kernel that is at least 3.8.x, to initialize SR-IOV VFs issue the following command:
#echo 4 > /sys/class/net/<device name>/device/sriov_numvfsOnce an SR-IOV NIC VF is created on the host, the driver/OS assigns a MAC address and creates a network interface for the VF adapter.
Parameters
When evaluating the advantages and disadvantages of each insertion method, I looked at the following:
- Host device model
- PCI device information as reported in the VM
- Link speed as reported by the VM
- Host driver
- Guest driver
- Simple performance characteristics using iperf
- Ease of setup
Host Device Model
This is the device type that is specified when the SR-IOV network adapter is inserted into the VM. In the virt-manager GUI, the following typical options are available:
- Hypervisor default (which in our configuration defaulted to rtl8139
- rtl8139
- e1000
- virtio
Additional options were available on our test host machine, but they had to be entered into the VM XML definition using # virsh edit. I additionally evaluated the following:
- ixgbe
- i82559er
VM Link Speed
I evaluated link speed of the SR-IOV VF network adapter in the VM using the following command:
# ethtool eth1 | grep Speed
Host Network Driver
This is the driver that the KVM Virtual Machine Manager (VMM) uses for the NIC as displayed in the <driver> XML tag when I ran the following command on the host after starting the VM:
# virsh dumpxml sr-iov-vf-testvm | grep -w hostdev -A9
Guest Network Driver
This is the driver that the VM uses for the NIC. I found the information by first determining the SR-IOV NIC PCI interface information in the VM:
# lshw -c network –businfo
Using this PCI bus information, I then ran the following command to find what driver the VM had loaded into the kernel for the SR-IOV NIC:
# lspci -vmmks 00:03.0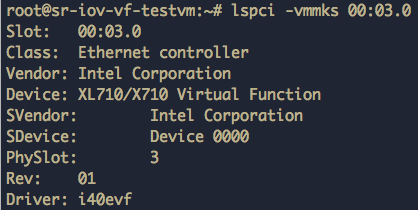
Performance
Because this is not a performance-oriented paper, this data is provided only to give a rough idea of the performance of different configurations. The command I ran on the server system was
# iperf -s -f m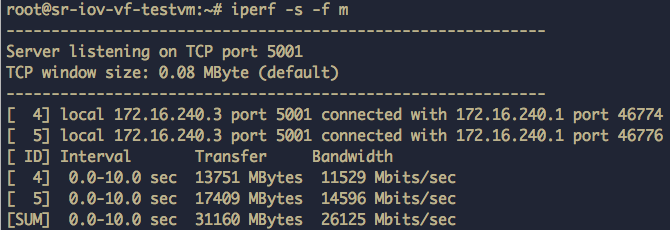
And the client command was:
# iperf -c <server ip address> -f m -P 2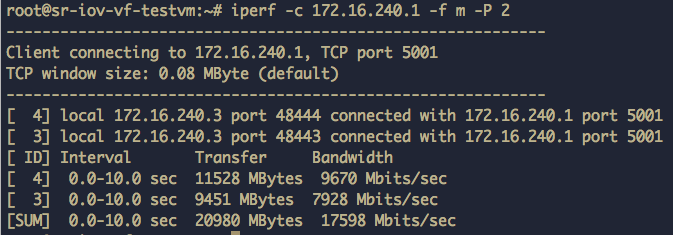
I only did one run with the test VM as the server and one run with the test VM as a client.
Ease of Setup
This is an admittedly subjective evaluation parameter. But I think you’ll agree that there was a clear loser: the option of inserting the SR-IOV VF as a PCI passthrough device.
SR-IOV Virtual Function PCI Passthrough Device
The most basic way to connect an SR-IOV VF to a KVM VM is by directly importing the VF as a PCI device using the PCI bus information that the host OS assigned to it when it was created.
Using the Command Line
Once the VF has been created, the network adapter driver automatically creates the infrastructure necessary to use it.
Step 1: Find the VF PCI bus information.
In order to find the PCI bus information for the VF, you need to know how to identify it, and sometimes the interface name that is assigned to the VF seems arbitrary. For example, in the following figure there are two VFs and the PCI bus information is outlined in red, but it is impossible to determine from this information which physical port the VFs are associated with.
# lshw -c network -businfo
The following bash script lists all the VFs associated with a physical function.
#!/bin/bash

NIC_DIR="/sys/class/net"
for i in $( ls $NIC_DIR) ;
do
	if [ -d "${NIC_DIR}/$i/device" -a ! -L "${NIC_DIR}/$i/device/physfn" ]; then
		declare -a VF_PCI_BDF
		declare -a VF_INTERFACE
		k=0
		for j in $( ls "${NIC_DIR}/$i/device" ) ;
		do
			if [[ "$j" == "virtfn"* ]]; then
				VF_PCI=$( readlink "${NIC_DIR}/$i/device/$j" | cut -d '/' -f2 )
				VF_PCI_BDF[$k]=$VF_PCI
				#get the interface name for the VF at this PCI Address
				for iface in $( ls $NIC_DIR );
				do
					link_dir=$( readlink ${NIC_DIR}/$iface )
					if [[ "$link_dir" == *"$VF_PCI"* ]]; then
						VF_INTERFACE[$k]=$iface
					fi
				done
				((k++))
			fi
		done
		NUM_VFs=${#VF_PCI_BDF[@]}
		if [[ $NUM_VFs -gt 0 ]]; then
			#get the PF Device Description
			PF_PCI=$( readlink "${NIC_DIR}/$i/device" | cut -d '/' -f4 )
			PF_VENDOR=$( lspci -vmmks $PF_PCI | grep ^Vendor | cut -f2)
			PF_NAME=$( lspci -vmmks $PF_PCI | grep ^Device | cut -f2).
			echo "Virtual Functions on $PF_VENDOR $PF_NAME ($i):"
			echo -e "PCI BDF\t\tInterface"
			echo -e "=======\t\t========="
			for (( l = 0; l < $NUM_VFs; l++ )) ;
			do
				echo -e "${VF_PCI_BDF[$l]}\t${VF_INTERFACE[$l]}"
			done
			unset VF_PCI_BDF
			unset VF_INTERFACE
			echo " "
		fi
	fi
done
With the PCI bus information from this script, I imported a VF from the first port on my Intel Ethernet Controller X540-AT2 as a PCI passthrough device.

Step 2: Add a hostdev tag to the VM.
Using the command line, use # virsh edit <VM name> to add a hostdev XML tag to the machine. Use the host machine PCI Bus, Domain, and Function information from the bash script above for the source tag’s address domain, bus, slot, and function attributes.
# virsh edit <name of virtual machine>
# virsh dump <name of virtual machine>
<domain>
…
<devices>
…
<hostdev mode='subsystem' type='pci' managed='yes'>
      <source>
        <address domain='0x0000' bus='0x03' slot='0x10' function='0x0'/>
      </source>
</hostdev>
…
</devices>
…
</domain>
Once you exit the virsh edit command, KVM automatically adds an additional <address> tag to the hostdev tag to allocate the PCI bus address in the VM.
Step 3: Start the VM.
# virsh start <name of virtual machine>
Using the GUI
Note I have not found an elegant way to discover the SR-IOV PCI bus information using graphical tools.
Step 1: Find the VF PCI bus information.
See the commands from Step 1 above.
Step 2: Add a PCI host device to the VM.
Once you have the host PCI bus information for the VF, using the virt-manager GUI, click Add Hardware.
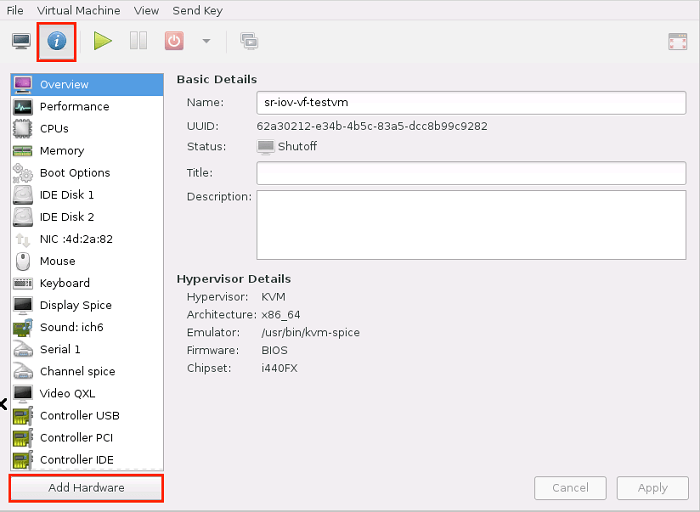
After selecting PCI Host Device, you’ll see an array of PCI devices shown that can be imported into our VM.
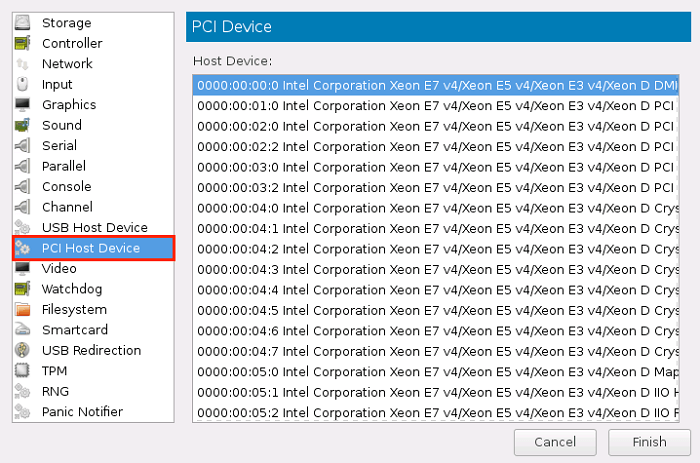
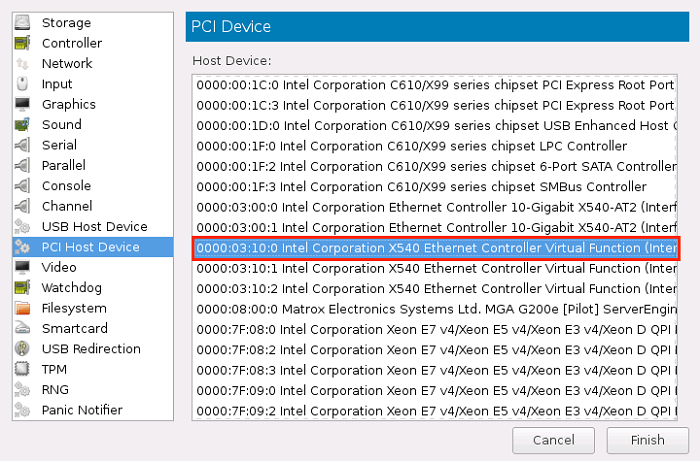
Give keyboard focus to the Host Device drop-down list, and then start typing the PCI Bus Device Function information from the bash script above, substituting a colon for the period (‘03:10:0’ in this case). After the desired VF comes into focus, click Finish.
The PCI device just imported now shows up in the VM list of devices.
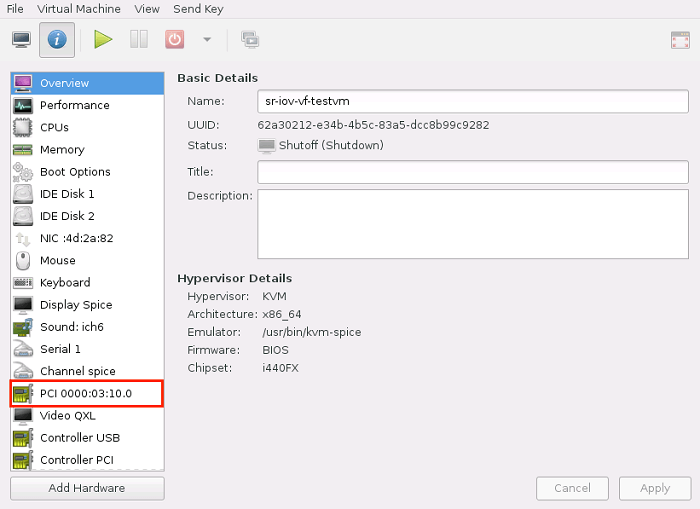
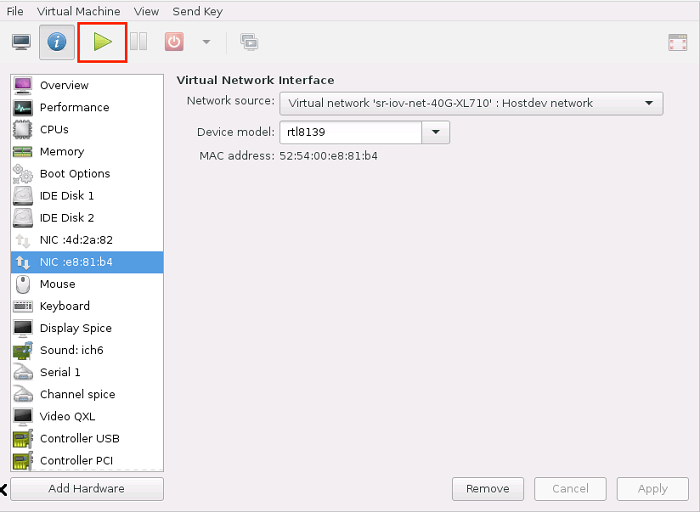
Step 3: Start the VM.
Summary
When using this method of directly inserting the PCI host device into the VM, there is no ability to change the host device model: for all NIC models, the host used the vfio driver. The Intel Ethernet Servers Adapters XL710 and X710 adapters used the i40evf driver in the guest, and for both, the VM PCI Device information reported the adapter name as “XL710/X710 Virtual Function”. The Intel Ethernet Controller X540-AT2 and Intel 82599 10 Gigabit Ethernet Controller adapters used the ixgbevf driver in the guest, and the VM PCI device information reported “X540 Ethernet Controller Virtual Function” and “82599 Ethernet Controller Virtual Function” respectively. With the exception of the XL710, which showed a link speed of 40 Gbps, all 10 GB adapters showed a link speed of 10 Gbps. For the X540, 82599, and X710 adapters, the iperf test ran at nearly line rate (~9.4 Gbps), and performance was roughly ~8 percent worse when the VM was the iperf server versus when the VM was the iperf client. While the XL710 performed better than the 10 Gb NICs, it performed at roughly 70 percent line rate when the iperf server ran on the VM, and at roughly 40 percent line rate when the iperf client was on the VM. This disparity is most likely due to the kernel being overwhelmed by the high rate of I/O interrupts, a problem that would be solved by using DPDK.
The one advantage to this method is that it allows control over which VF is inserted into the VM, whereas the virtual network pool of adapters method does not. This method of injecting an SR-IOV VF network adapter into a KVM VM is the most complex to set up and provides the fewest host device model options. Performance is not significantly different than the method that involves a KVM virtual network pool of adapters. However, that method is much simpler to use. Unless you need control over which VF is inserted into your VM, I don’t recommend using this method.
SR-IOV Network Adapter Macvtap
The next way to add an SR-IOV network adapter to a KVM VM is as a VF network adapter connected to a macvtap on the host. Unlike the previous method, this method does not require you to know the PCI bus information for the VF, but you do need to know the name of the interface that the OS created for the VF when it was created.
Using the Command-Line
Much of this method of connecting an SR-IOV VF to a VM can be done via the virt-manager GUI, but step 1 must be done using the command line.
Step 1: Determine the VF interface name
As shown in the following figure, after creating the VF, use the bash script listed above to display the network interface names and PCI bus information assigned to the VFs.

With this information, insert the VFs into your KVM VM using either the virt-manager GUI or the virsh command line.
Step 2: Add an interface tag to the VM.
To use the command-line with the macvtap adapter solution, with the VM shut off, edit the VM configuration file and add an interface tag with sub-elements and attributes shown below. The interface type is direct, and the dev attribute of the source sub-element must point to the interface name that the host OS assigned to the target VF. Be sure to specify the mode attribute of the source element as passthrough:
# virsh edit <name of virtual machine>
# virsh dump <name of virtual machine>
<domain>
…
<devices>
…
   <interface type='direct'>
      <source dev='enp3s16f1' mode='passthrough'/>
   </interface>
…
</devices>
…
</domain>
Once the editor is closed, KVM automatically assigns a MAC address to the SR-IOV interface, uses the default model type value of rtl8139, and assigns the NIC a slot on the VM’s PCI bus.
Step 3: Start the VM.
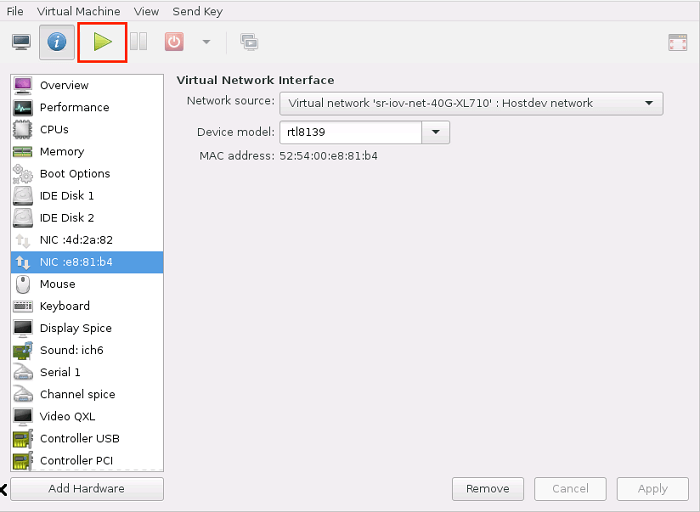
As the VM starts, KVM creates a macvtap adapter ‘macvtap0’ on the VF specified. On the host, you can see that the macvtap adapter that KVM created for your VF NIC uses a MAC address that is different than the MAC address on the other end of the macvtap in the VM:
# ip l | grep enp3s16f1 -A1
The fact that there are two MAC addresses assigned to the same VF—one by the host OS and one by the VM—suggests that the network stack using this configuration is more complex and likely slower.
Using the GUI
With the exception of determining the interface name of the desired VF, all the steps of this method can be done using the virt-manager GUI.
Step 1: Determine the VF interface name.
See the command line Step 1 above.
Step 2: Add the SR-IOV macvtap adapter to the VM.
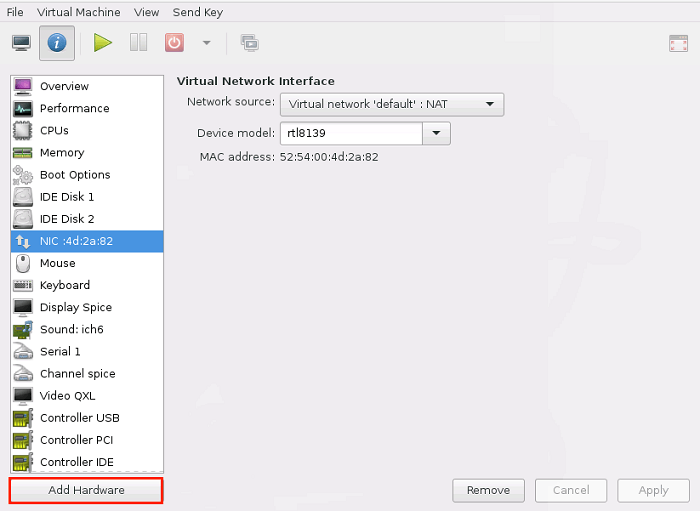
Using virt-manager, add hardware to the VM.
Select Network as the type of device.
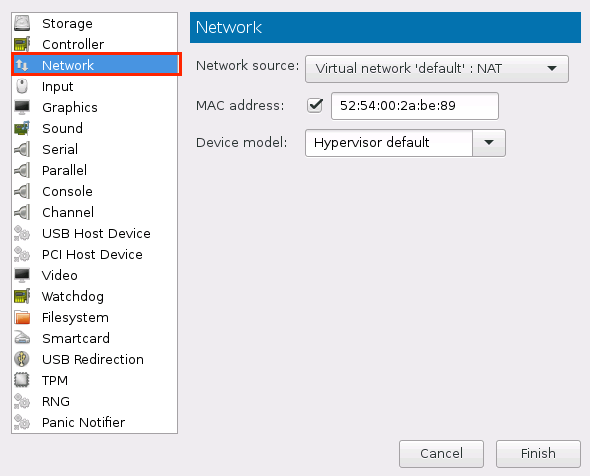
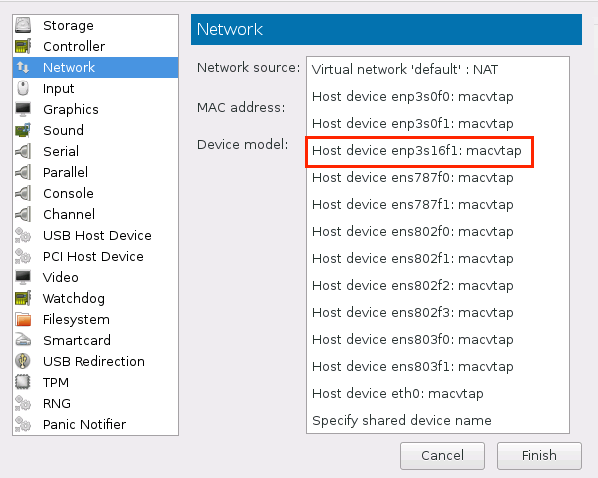
For the Network source, choose the Host device <interface name>: macvtap line from the drop-down control, substituting for “interface name” the interface that the OS assigned to the VF created earlier.
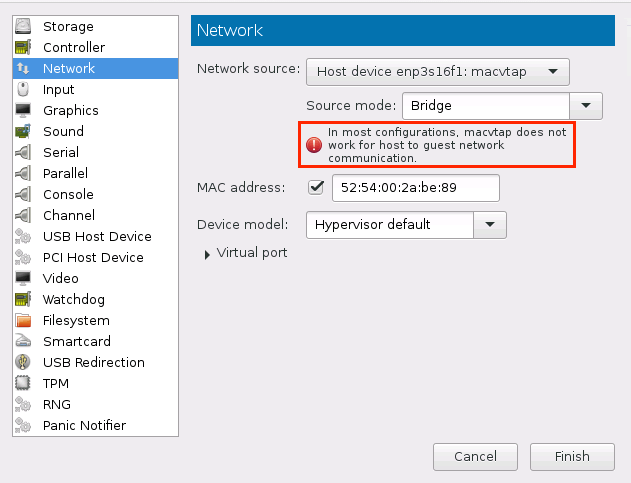
Note virt-manager’s warning about communication with the host using macvtap VFs.
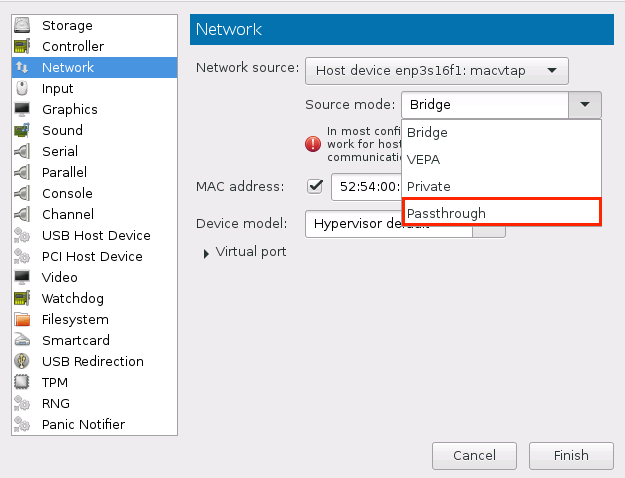
Ignore this warning and choose Passthrough in the Source mode drop-down control.
Note that virt-manager assigns a MAC address to the macvtap VF that is NOT the same address as the host OS assigned to the SR-IOV VF.
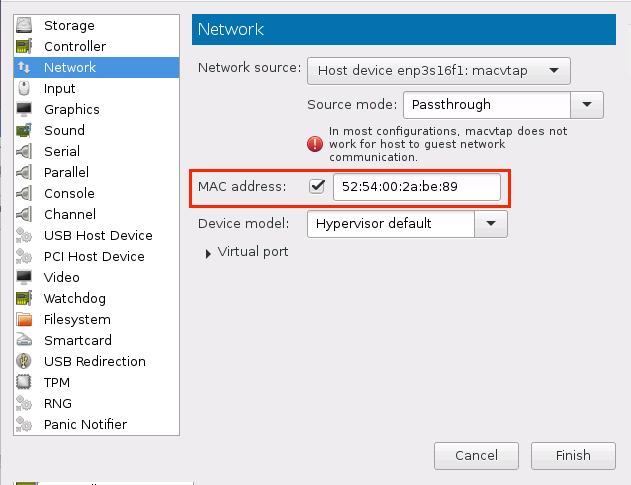
Finally, click Finish.
Step 3: Start the VM.
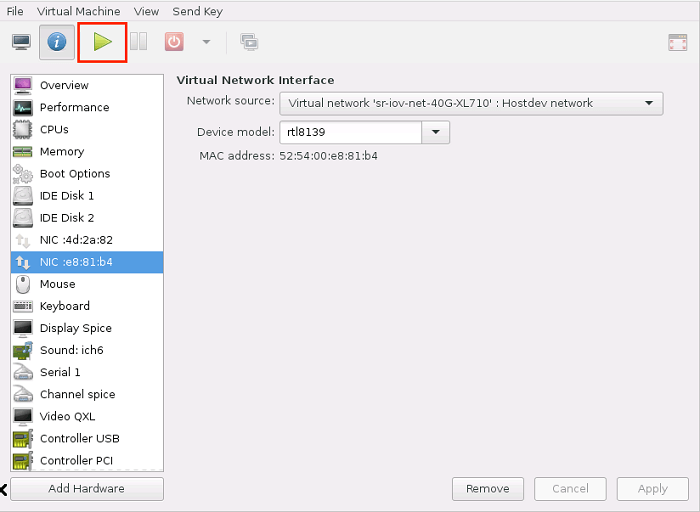
Summary
When using the macvtap method of connecting an SR-IOV VF to a VM, the host device model had a dramatic effect on all parameters, and there was no host driver information listed regardless of configuration. Unlike the other two methods, it was impossible to tell using the VM PCI device information the model of the underlying VF. Like the direct VF PCI passthrough insertion option, this method allows you to control which VF you wish to use. Regardless of which VF was connected, when the host device model was rtl8139 (the hypervisor default in this case), the guest driver was 8139cp, the link speed was 100 Mbps, and performance was roughly 850 Mbps. When e1000 was selected as the host device model, the guest driver was e1000, the link speed was 1 Gbps, and iperf ran at 2.1 Gbps with the client on the VM, and 3.9 Gbps with the client on the server. When the VM XML file was edited so that ixgbe was the host device model, the VM failed to boot. When the host device model tag in the VM XML was set to i82559er, the guest VM used the e100 driver for the VF, link speed was 100 Mbps, iperf ran at 800 Mbps when the server was on the VM, and 10 Mbps when the client was on the VM. Selecting virtio as the host device model clearly provided the best performance. No link speed was listed in that configuration, the VM used the virtio-pci driver, and iperf performance was roughly line rate for the 10 Gbps adapters. When the Intel Ethernet Server Adapter XL710 VF was inserted into the VM using the macvtap, with the client on the VM, performance was ~40 percent line rate, similar to the other insertion methods; however performance with the server on the VM was significantly worse than the other insertion methods: ~40 percent line rate versus ~70 percent line rate.
The method of inserting an SR-IOV VF network device into a KVM VM via a macvtap is simpler to set up than the option of directly importing the VF as a PCI device. However, the connection performance varies by a factor of 100 depending on which host device model is selected. In fact the default device model for both command line and GUI is rtl8139, which performs 10x slower than virtio, which is the most ideal option. And if the i82559er host device model is specified using the KVM XML file, performance is 100x worse than virtio. If virtio is selected, the performance is similar to that in other methods of inserting the SR-IOV VF NIC mentioned here. If you must use this method of connecting the VF to a VM, be sure to use virtio as the host device model.
SR-IOV Virtual Network Adapter Pool
The final method of using an SR-IOV VF NIC with KVM involves creating a virtual network based on the NIC PCI physical function. You don’t need to know PCI information as was the case with the first method, or VF interface names as was the case with the second method. All you need is the interface name of the physical function. Using this method, KVM creates a pool of network devices that can be inserted into VMs, and the size of that pool is determined by how many VFs were created on the physical function when they were initialized.
Using the Command Line
Step 1: Create the SR-IOV virtual network pool.
Once the SR-IOV VFs have been created, use them to create a virtual network pool of network adapters. List physical network adapters that have VFs defined. You can identify them with the lines that begin ‘vf’:
# ip l
Make an XML file (sr-iov-net-XL710.xml in the code snippet below) that contains an XML element using the following template, and then substitute for ‘ens802f0’ the interface name of the physical function used to create your VFs and a name of your choosing for ‘sr-iov-net-40G-XL710’:
# cat > sr-iov-net-XL710.xml << EOF
> <network>
>  <name>sr-iov-net-40G-XL710</name>
>  <forward mode='hostdev' managed='yes'>
>   <pf dev='ens802f0'/>
>  </forward>
> </network>
> EOF
Once this XML file has been created, use it with virsh to create a virtual network:
# virsh net-define sr-iov-net-XL710.xmlStep 2: Display all virtual networks.
To make sure the network was created, use the following command:
# virsh net-list --all
 Name                 State      Autostart     Persistent
----------------------------------------------------------
 default              active     yes           yes
 sr-iov-net-40G-XL710 inactive   no            yes
Step 3: Start the virtual network.
The following command instructs KVM to start the network just created. Note that the name of the network (sr-iov-net-40G-XL710) comes from the name XML tag in the snippet above.
# virsh net-start sr-iov-net-40G-XL710Step 4: Autostart the virtual network.
If you want to have the network automatically start when the host machine boots, make sure that the VFs get created at boot, and then:
# virsh net-autostart sr-iov-net-40G-XL710Step 5: Insert a NIC from the VF pool into the VM.
Once this SR-IOV VF network has been defined and started, insert an adapter on that network into the VM while it is stopped. Use virsh-edit to add a network adapter XML tag to the machine that has as its source network the name of the virtual network, remembering to substitute the name of your SR-IOV virtual network for the ‘sr-iov-net-40G-XL710’ label.
# virsh edit <name of virtual machine>
# virsh dump <name of virtual machine>
<domain>
…
<devices>
…
<interface type='network'>
  <source network='sr-iov-net-40G-XL710'/>
</interface>
…
</devices>
…
</domain>
Step 6: Start the VM.
# virsh start <name of virtual machine>
Using the GUI
Step 1: Create the SR-IOV virtual network pool.
I haven’t been able to find a good way to create an SR-IOV virtual network pool using the virt-manager GUI because the only forward mode options in the GUI are “NAT” and “Routed.” The required forward mode of “hostdev” is not an option in the GUI. See Step 1 above.
Step 2: Display all virtual networks.
Using the virt-manager GUI, edit the VM connection details to view the virtual networks on the host.

The virtual network created in step 1 appears in the list.
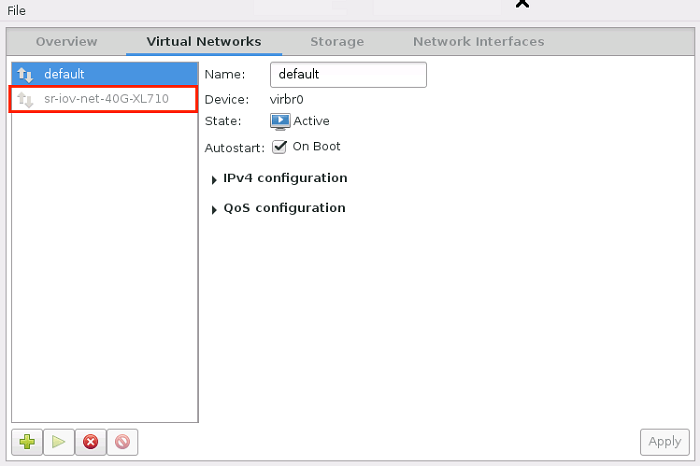
Step 3: Start the virtual network.
To start the network, select it on the left, and then click the green “play” icon.
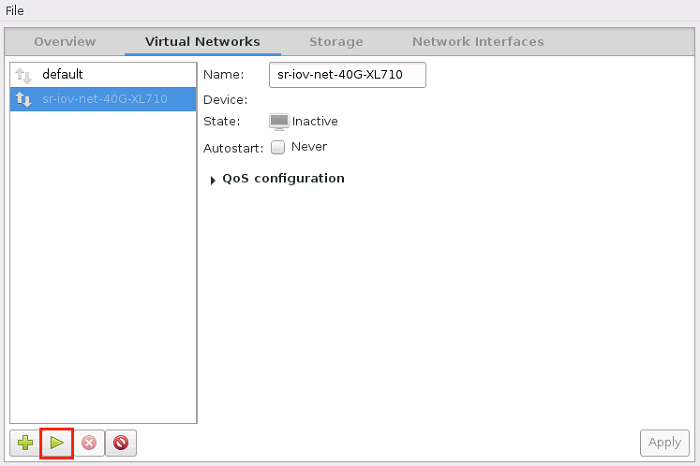
Step 4: Autostart the virtual network.
To autostart the network when the host machine boots, select the Autostart box so that the text changes from Never to On Boot. (Note: this will fail if you also don’t automatically allocate the SR-IOV VFs at boot.)
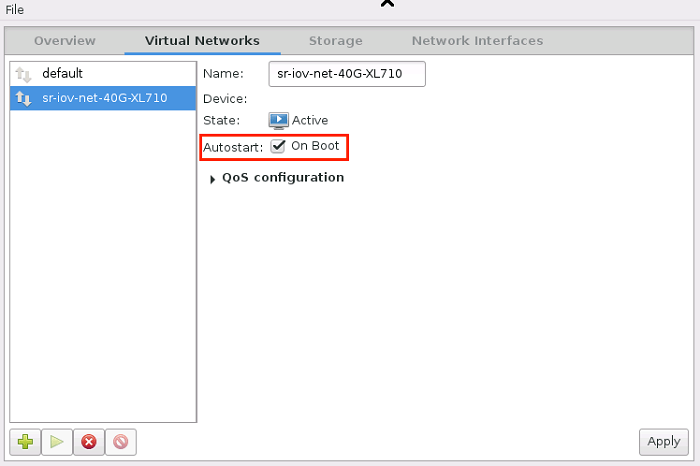
Step 5: Insert a NIC from the VF pool into the VM.
Open the VM.

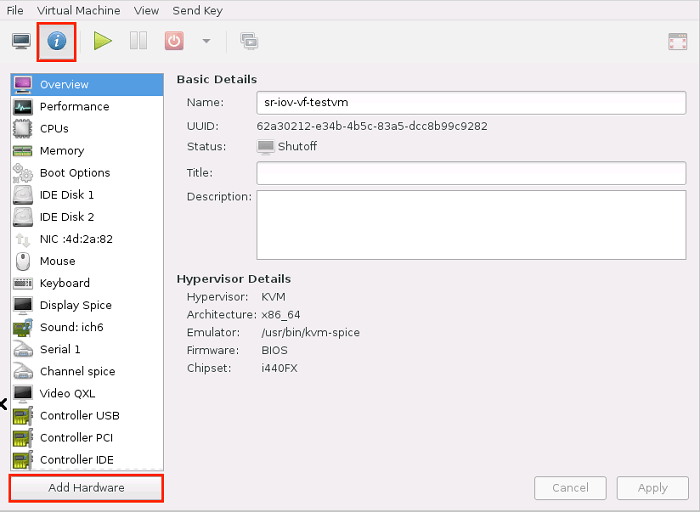
Click the information button (“I”) icon, and then click Add Hardware.
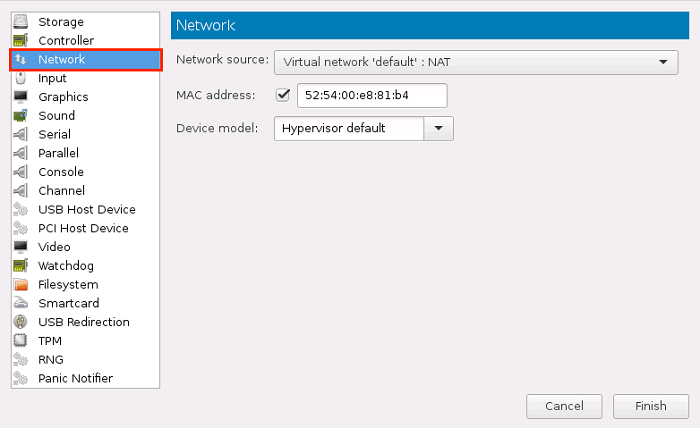
On the left side, click Network to add a network adapter to the VM.
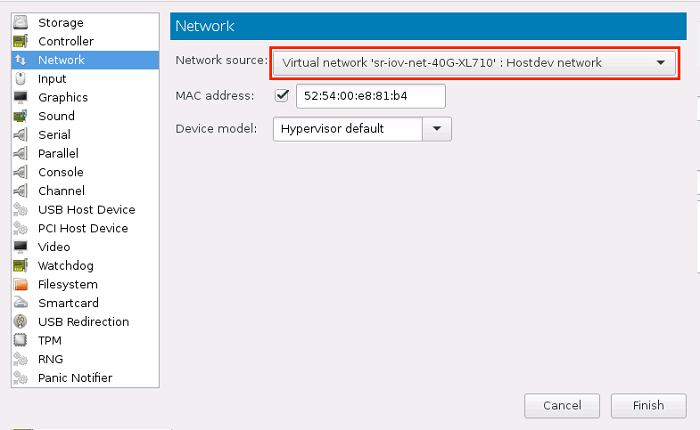
Then select Virtual network ‘<your virtual network name>’: Hostdev network as the Network source, allow virt-manager to select a MAC address, and leave the Device model as Hypervisor default.
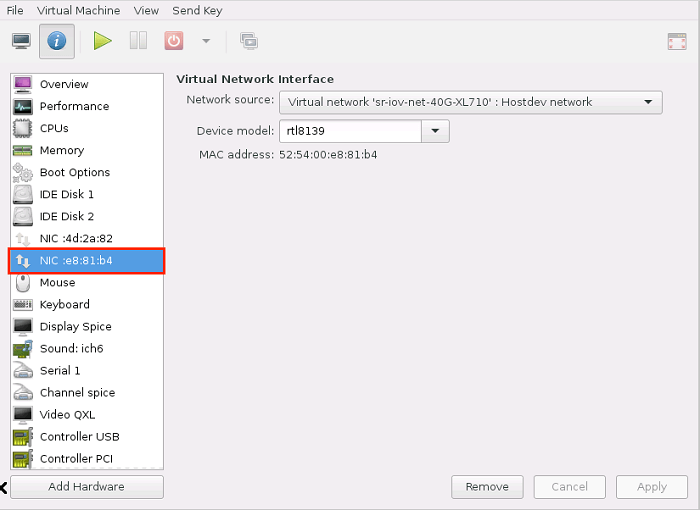
Click Finish. The new NIC appears in the list of VM hardware with “rtl8139” as the device model.
Step 6: Start the VM.
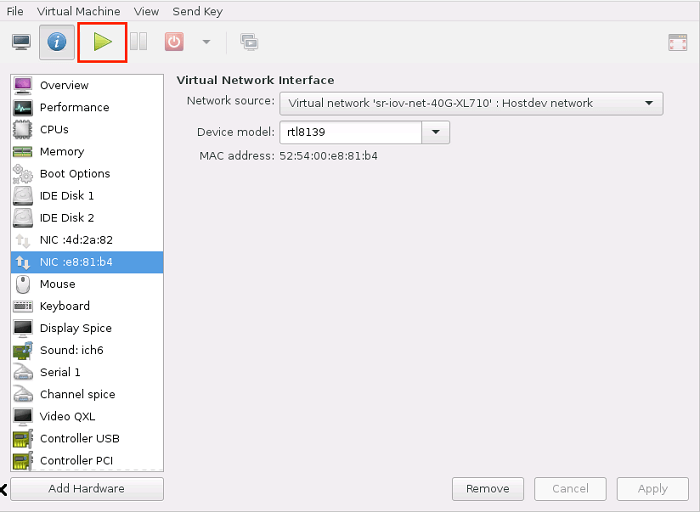
Summary
When using the Network pool of SR-IOV VFs, selecting different host device models when inserting the NIC into the VM makes no difference as far as iperf performance, guest driver, VM link speed, or host driver were concerned. In all cases, the host used the vfio driver. The Intel Ethernet Server Adapters XL710 and X710 used the i40evf driver in the guest, and for both, the VM PCI Device information reported the adapter name as “XL710/X710 Virtual Function.” The Intel Ethernet Controller X540-AT and The Intel Ethernet Controller 10 Gigabit 82599EB used the ixgbevf driver in the guest, and the VM PCI device information reported “X540 Ethernet Controller Virtual Function” and “82599 Ethernet Controller Virtual Function” respectively. With the exception of the Intel Ethernet Server Adapter XL710, which showed a link speed of 40 Gbps, all 10 GB adapters showed a link speed of 10 Gbps. For the Intel Ethernet Controller X540, Intel Ethernet Controller 10 Gigabit 82599 and Intel Ethernet Server Adapter X710, the iperf test ran at nearly line rate (~9.4 Gbps), and performance was roughly ~8 percent worse when the VM was the iperf server versus when the VM was the iperf client. While the Intel Ethernet Server Adapter XL710 performed better than the 10 Gb NICs, it performed at roughly 70 percent line rate when the iperf server ran on the VM, and at roughly 40 percent line-rate when the iperf client was on the VM. This disparity is most likely due to the kernel being overwhelmed by the high rate of I/O interrupts, a problem that would be solved by using the DPDK.
In my opinion, this method of using the SR-IOV NIC is the easiest to set up, because the only information needed is the interface name of the NIC physical function—no PCI information and no VF interface names. And with default settings, the performance was equivalent to the VF PCI passthrough option. The primary disadvantage of this method is that you cannot select which VF you wish to insert into the VM because KVM manages it automatically, whereas with the other two insertion options you can select which VF to use. So unless this ability to select which VF to use is a requirement for you, this is clearly the best method.
Additional Findings
In every configuration, the test VM was able to communicate with both the host and with the external traffic generator, and the VM was able to continue communicating with the external traffic generator even when the host PF had no IP address assigned to it as long as the PF link state on the host remained up. Additionally, I found that when all 4 VFs were inserted simultaneously using the virtual network adapter pool method into the VM and iperf ran simultaneously on all 4 network connections, each connection still maintained the same performance as if run separately.
Conclusion
Using SR-IOV network adapter VFs in a VM can accelerate north-south network performance (that is, traffic with endpoints outside the host machine) by allowing traffic to bypass the host machine’s network stack. There are several ways to insert an SR-IOV NIC into a KVM VM using the command line and virt-manager, but using a virtual network pool of SR-IOV VFs is the simplest to set up and provides performance that is as good as the other methods. If you need to be able to select which VF to insert into the VM, the VF PCI passthrough option will likely be best for your. And if you must use the macvtap method, be sure to select ‘virtio’ as your host device type, otherwise your performance will be very poor. Additionally, if you are using an Intel Ethernet Controller XL710, consider using DPDK in the VM in order to take full advantage of the SR-IOV adapter’s speed.
About the Author
Clayne Robison is a Platform Application Engineer at Intel, working with software companies in Software Defined Networks and Network Function Virtualization. He lives in Mesa, Arizona, USA with his wife and the six of his eight children still at home. He’s a foodie that enjoys travelling around the world, always with his wife, and sometimes with the kids. When he has time to himself (which isn’t very often), he enjoys gardening and tending the citrus trees in his yard.
Resources
Creating Virtual Functions Using SR-IOV
"