| File(s): |
Download |
| License: | Intel Sample Source Code License Agreement |
| Optimized for... | |
|---|---|
| OS: | Linux*, macOS*, Windows* |
| Hardware: | Intel® Xeon Phi™ processor |
| Software: (Programming Language, tool, IDE, Framework) |
C/C++, Python*, OpenMP*, Intel® Parallel Studio XE 2018 |
| Prerequisites: | Familiarity with Message Passing Interface and parallel computing |
Introduction
Message Passing Interface (MPI) is a standardized message-passing library interface designed for distributed memory programming. MPI is widely used in the high-performance computing (HPC) domain because it is well-suited for distributed memory architectures.
Python* is a modern, powerful interpreter that supports modules and packages. Python supports extension C/C++. While HPC applications are usually written in C or Fortran for performance, Python can be used to quickly prototype a proof of concept and for rapid application development because of its simplicity and modularity support.
The MPI for Python* (mpi4py*) package provides Python bindings for the MPI standard. The mpi4py package translates MPI syntax and semantics and uses Python objects to communicate. Thus, programmers can implement MPI applications in Python quickly. Note that mpi4py is object-oriented, and not all functions in the MPI standard are available in mpi4py; however, almost all the commonly used functions are. More information on mpi4py can be found here. In mpi4py, COMM_WORLD is an instance of the base class of communicators.
mpi4py supports two types of communications:
- Communication of generic Python objects: The methods of a communicator object are lower-case (
send(), recv(), bcast(), scatter(), gather(),and so on). In this type of communication, the sent object is passed as a parameter to the communication call. - Communication of buffer-like objects: The methods of a communicator object are upper-case letters (
Send(), Recv(), Bcast(), Scatter(), Gather(),and so on). Buffer arguments to these calls are specified using tuples. This type of communication is much faster than Python objects communication type.
Intel® Distribution for Python* 2018
Intel® Distribution for Python* is a binary distribution of the Python interpreter; it accelerates core Python packages including NumPy*, SciPy*, Jupyter*, matplotlib*, mpi4py, and so on. The package integrates Intel® Math Kernel Library (Intel® MKL), Intel® Data Analytics Acceleration Library (Intel® DAAL), Intel® MPI Library, and Intel® Threading Building Blocks (Intel® TBB).
The Intel Distribution for Python 2018 is available free for Python 2.7.x and 3.5.x on macOS*, Windows* 7 and later, and Linux* operating systems. The package can be installed as a standalone or with the Intel® Parallel Studio XE 2018.
In the Intel Distribution for Python, mpi4py is a Python wraparound for the native Intel MPI implementation (Intel® MPI Library). This document shows how to write an MPI program in Python, and how to take advantage of Intel® multi-core technology using OpenMP* threads and Intel® Advanced Vector Extensions 512 (Intel® AVX-512) instructions.
Intel Distribution for Python supports both Python 2 and Python 3. There are two separate packages available in the Intel Distribution for Python: Python 2.7 and Python 3.5. In this example, the Intel Distribution for Python 2.7 on Linux (l_python2_pu_2018.1.023.tgz) is installed on an Intel® Xeon Phi™ processor 7250 @ 1.4 GHz and 68 cores with 4 hardware threads per core (a total of 272 hardware threads). To install, extract the package content, run the install script, and follow the installer prompts:
$ tar -xvzf l_python2_pu_2018.1.023.tgz
$ cd l_python2_pu_2018.1.023
$ ./install.sh
After the installation completes, activate the root Intel® Distribution for Python* with the conda* package:
$ source /opt/intel/intelpython2/bin/activate root
Parallel Computing: OpenMP* and SIMD
While multithreaded Python workloads can use Intel TBB optimized thread scheduling, another approach is to use OpenMP* to take advantage of Intel® multi-core technology. This section shows how to implement multithread applications using OpenMP and the C math library in Cython*.
Cython is an interpreted language that can be built into native language. Cython is similar to Python, but it supports C function calls and C-style declaration of variables and class attributes. Cython is used for wrapping external C libraries that speed up the execution of a Python program. Cython generates C extension modules, which are used by the main Python program using the import statement.
For example, to generate an extension module, one can write a Cython code (.pyx) file. The .pyx file is then compiled by Cython to generate a .c file, which contains the code of a Python extension code. The .c file is in turn compiled by a C compiler to generate a shared object library (.so file).
One way to build Cython code is to write a disutils setup.py file (disutils is used to distribute Python modules). In the following multithreads.pyx file, the function vector_log_multiplication computes log(a)*log(b) for each entry in the A and B arrays and stores the result in the C array. Note that a parallel loop (prange) is used to allow multiple threads to be executed in parallel. The log function is imported from the C math library. The function getnumthreads() returns the number of threads:
$ cat multithreads.pyxcimport cython
import numpy as np
cimport openmp
from libc.math cimport log
from cython.parallel cimport prange
from cython.parallel cimport parallel
@cython.boundscheck(False)
def vector_log_multiplication(double[:] A, double[:] B, double[:] C):
cdef int N = A.shape[0]
cdef int i
with nogil, cython.boundscheck(False), cython.wraparound(False):
for i in prange(N, schedule='static'):
C[i] = log(A[i]) * log(B[i])
def getnumthreads():
cdef int num_threads
with nogil, parallel():
num_threads = openmp.omp_get_num_threads()
with gil:
return num_threads
The setup.py file invokes the setuptools build process that generates the extension modules. By default, this setup.py uses GNU Compiler Collection* to compile the C code of the Python extension. In order to take advantage of Intel AVX-512 and OpenMP multithreading in the Intel Xeon Phi processor, one can specify the options -xMIC-avx512 and -qopenmp in the compile and link flags, and use the Intel® C++ Compiler. For more information on how to create the setup.py file, refer to the Writing the Setup Script section of the Python documentation.
$ cat setup.pyfrom distutils.core import setup
from Cython.Build import cythonize
from distutils.extension import Extension
from Cython.Distutils import build_ext
setup(
name = "multithreads",
cmdclass = {"build_ext": build_ext},
ext_modules = [
Extension("multithreads",
["multithreads.pyx"],
libraries=["m"],
extra_compile_args = ["-O3", "-xMIC-avx512", "-qopenmp" ],
extra_link_args=['-qopenmp', '-xMIC-avx512']
)
]
)
In this example, the Intel Parallel Studio XE 2018 update 1 is installed. First, set the proper environment variables for the Intel® C compiler:
$ source /opt/intel/parallel_studio_xe_2018.1.038/psxevars.sh intel64
Intel(R) Parallel Studio XE 2018 Update 1 for Linux*
Copyright (C) 2009-2017 Intel Corporation. All rights reserved.
To explicitly use the Intel compiler icc to compile this application, execute the setup.py file with the following command:
$ LDSHARED="icc -shared" CC=icc python setup.py build_ext –inplace
running build_ext
cythoning multithreads.pyx to multithreads.c
building 'multithreads' extension
creating build
creating build/temp.linux-x86_64-2.7
icc -fno-strict-aliasing -Wformat -Wformat-security -D_FORTIFY_SOURCE=2 -fstack-protector -O3 -fpic -fPIC -DNDEBUG -g -fwrapv -O3 -Wall -Wstrict-prototypes -fPIC -I/opt/intel/intelpython2/include/python2.7 -c multithreads.c -o build/temp.linux-x86_64-2.7/multithreads.o -O3 -xMIC-avx512 -qopenmp
icc -shared build/temp.linux-x86_64-2.7/multithreads.o -L/opt/intel/intelpython2/lib -lm -lpython2.7 -o ./multithreads.so -qopenmp -xMIC-avx512
As mentioned above, this process first generates the extension code multithreads.c. The Intel compiler compiles this extension code to generate the dynamic shared object library multithreads.so.
How To Write a Python Application with Hybrid MPI/OpenMP
In this section, we write an MPI application in Python. This program imports the mpi4py and multithreads modules. The MPI application uses a communicator object, MPI.COMM_WORLD, to identify a set of processes that can communicate within the set. The MPI functions MPI.COMM_WORLD.Get_size(), MPI.COMM_WORLD.Get_rank(), MPI.COMM_WORLD.send(), and MPI.COMM_WORLD.recv() are methods of this communicator object. Note that in mpi4py there is no need to call MPI_Init() and MPI_Finalize() as in the MPI standard because these functions are called when the module is imported and when the Python process ends, respectively.
The sample Python application first initializes two large input arrays consisting of random numbers between 1 and 2. Each MPI rank uses OpenMP threads to do the computation in parallel; each OpenMP thread in turn computes the product of two natural logarithms c = log(a)*log(b) where a and b are random numbers between 1 and 2 (1 ≤ a,b ≤ 2). To do that, each MPI rank calls the vector_log_multiplication function defined in the multithreads.pyx file. Execution time of this function is short, about 1.5 seconds. For illustration purposes, we use the timeit utility to invoke the function 10 times, just to have enough time to demonstrate the number of OpenMP threads involved.
Below is the application source code mpi_sample.py. Note that if the running time of the program is too short, you may increase the value of FACTOR in the source code file to make the execution time longer. In this example, the value of FACTOR is changed from 512 to 1024:
$ cat mpi_sample.pyfrom mpi4py import MPI
from multithreads import *
import numpy as np
import timeit
def time_vector_log_multiplication():
vector_log_multiplication(A, B, C)
size = MPI.COMM_WORLD.Get_size()
rank = MPI.COMM_WORLD.Get_rank()
name = MPI.Get_processor_name()
THOUSAND = 1024
FACTOR = 1024
NUM_TOTAL_ELEMENTS = FACTOR * THOUSAND * THOUSAND
NUM_ELEMENTS_RANK = NUM_TOTAL_ELEMENTS / size
repeat = 10
numthread = getnumthreads()
if rank == 0:
print "Initialize arrays for %d million of elements" % FACTOR
A = 1 + np.random.rand(NUM_ELEMENTS_RANK)
B = 1 + np.random.rand(NUM_ELEMENTS_RANK)
C = np.zeros(A.shape)
if rank == 0:
print "Start timing ..."
print "Call vector_log_multiplication with iter = %d" % repeat
t1 = timeit.timeit("time_vector_log_multiplication()", setup="from __main__ import time_vector_log_multiplication",number=repeat)
print "Rank %d of %d running on %s with %d threads in %d seconds" % (rank, size, name, numthread, t1)
for i in xrange(1, size):
rank, size, name, numthread, t1 = MPI.COMM_WORLD.recv(source=i, tag=1)
print "Rank %d of %d running on %s with %d threads in %d seconds" % (rank, size, name, numthread, t1)
print "End timing ..."
else:
t1 = timeit.timeit("time_vector_log_multiplication()", setup="from __main__ import time_vector_log_multiplication",number=repeat)
MPI.COMM_WORLD.send((rank, size, name, numthread, t1), dest=0, tag=1)
Run the following command line to launch the above Python application with two MPI ranks:
$ mpirun -host localhost -n 2 python mpi_sample.py
Initialize arrays for 1024 million of elements
Start timing ...
Call vector_log_multiplication with iter = 10
Rank 0 of 2 running on knl-sb2 with 136 threads in 6 seconds
Rank 1 of 2 running on knl-sb2 with 136 threads in 6 seconds
End  timing ...
While the Python program is running, the top command in a new terminal displays two MPI ranks (shown as two Python processes). When the main module enters the loop (shown with the message "Start timing …"), the top command reports almost 136 threads running (about 13,600 percent CPU). This is because, by default, all 272 hardware threads on this system are utilized by two MPI ranks, thus each MPI rank has 272/2 = 136 threads.
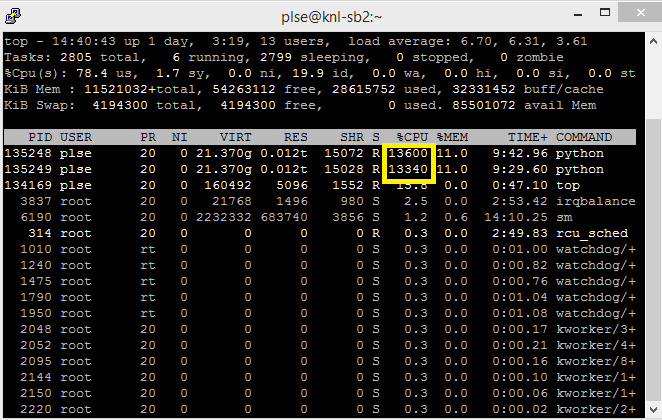
Figure 1. On an Intel® Xeon Phi™ processor, the "top" command shows two MPI ranks running. Each MPI rank spawns 136 threads.
To get detailed information about MPI at run time, we can set the I_MPI_DEBUG environment variable to a value ranging from 0 to 1000. The following command runs four MPI ranks and sets the I_MPI_DEBUG to the value 4. Each MPI rank has 272/4 = 68 OpenMP threads as indicated by the top command:
$ mpirun -n 4 -genv I_MPI_DEBUG 4 python mpi_sample.py
[0] MPI startup(): Multi-threaded optimized library
[0] MPI startup(): shm data transfer mode
[1] MPI startup(): shm data transfer mode
[2] MPI startup(): shm data transfer mode
[3] MPI startup(): shm data transfer mode
[0] MPI startup(): Rank    Pid      Node name             Pin cpu
[0] MPI startup(): 0       136454   knl-sb2 {0,1,2,3,4,5,6,7,8,9,10,11,12,13,14,15,16,68,69,70,71,72,73,74,75,76,77,78,79,80,
81,82,83,84,136,137,138,139,140,141,142,143,144,145,146,147,148,149,150,151,152,
204,205,206,207,208,209,210,211,212,213,214,215,216,217,218,219,220}
[0] MPI startup(): 1       136455   knl-sb2 {17,18,19,20,21,22,23,24,25,26,27,28,29,30,31,32,33,85,86,87,88,89,90,91,92,93,94
,95,96,97,98,99,100,101,153,154,155,156,157,158,159,160,161,162,163,164,165,166,
167,168,169,221,222,223,224,225,226,227,228,229,230,231,232,233,234,235,236,237}
[0] MPI startup(): 2       136456   knl-sb2  {34,35,36,37,38,39,40,41,42,43,44,45,46,47,48,49,50,102,103,104,105,106,107,108,1
09,110,111,112,113,114,115,116,117,118,170,171,172,173,174,175,176,177,178,179,1
80,181,182,183,184,185,186,238,239,240,241,242,243,244,245,246,247,248,249,250,2
51,252,253,254}
[0] MPI startup(): 3       136457   knl-sb2  {51,52,53,54,55,56,57,58,59,60,61,62,63,64,65,66,67,119,120,121,122,123,124,125,1
26,127,128,129,130,131,132,133,134,135,187,188,189,190,191,192,193,194,195,196,1
97,198,199,200,201,202,203,255,256,257,258,259,260,261,262,263,264,265,266,267,2
68,269,270,271}
Initialize arrays for 1024 million of elements
Start timing ...
Call vector_log_multiplication with iter = 10
Rank 0 of 4 running on knl-sb2 with 68 threads in 6 seconds
Rank 1 of 4 running on knl-sb2 with 68 threads in 6 seconds
Rank 2 of 4 running on knl-sb2 with 68 threads in 6 seconds
Rank 3 of 4 running on knl-sb2 with 68 threads in 6 seconds
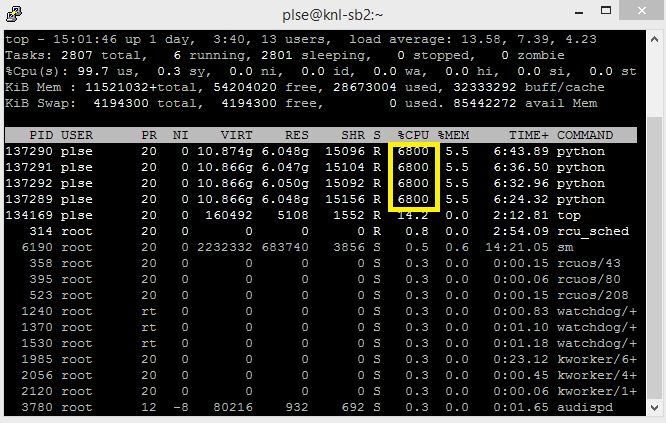
Figure 2. Run with four MPI ranks, each MPI rank spawns 68 threads.
We can specify the number of OpenMP threads used by each rank in the parallel region by setting the OMP_NUM_THREADS environment variable. The following command starts four MPI ranks; 34 threads for each MPI rank (or 2 threads/core):
$ mpirun -host localhost -n 4 -genv OMP_NUM_THREADS 34 python mpi_sample.py
Initialize arrays for 1024 million of elements
Start timing ...
Call vector_log_multiplication with iter = 10
Rank 0 of 4 running on knl-sb2 with 34 threads in 6 seconds
Rank 1 of 4 running on knl-sb2 with 34 threads in 6 seconds
Rank 2 of 4 running on knl-sb2 with 34 threads in 6 seconds
Rank 3 of 4 running on knl-sb2 with 34 threads in 6 seconds
End  timing ...
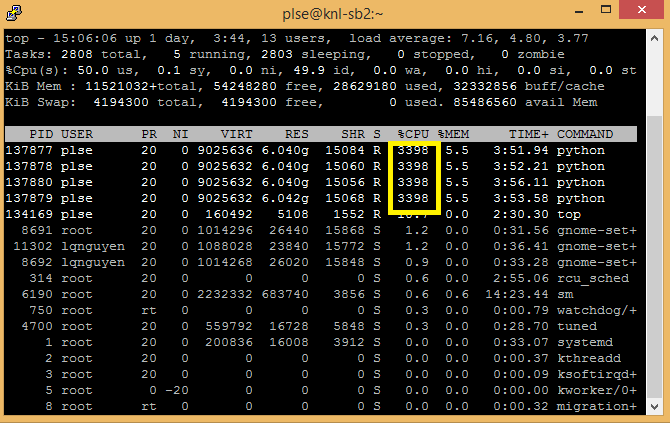
Figure 3. Run with four MPI ranks, each MPI rank spawns 34 threads.
Note that if we run four MPI ranks, 17 threads for each MPI rank (or 1 thread/core), the program takes more time to run as expected:
$ mpirun -host localhost -n 4 -genv OMP_NUM_THREADS 17 python mpi_sample.py
Initialize arrays for 1024 million of elements
Start timing ...
Call vector_log_multiplication with iter = 10
Rank 0 of 4 running on knl-sb2 with 17 threads in 8 seconds
Rank 1 of 4 running on knl-sb2 with 17 threads in 8 seconds
Rank 2 of 4 running on knl-sb2 with 17 threads in 8 seconds
Rank 3 of 4 running on knl-sb2 with 17 threads in 8 seconds
End  timing ...
Finally, we can force the program to allocate memory in MCDRAM (high-bandwidth memory on the Intel Xeon Phi processor). For example, before the execution of the program, the "numactl –hardware" command shows the system has two NUMA nodes: node 0 consists of CPUs and 96 GB DDR4 memory, node 1 is the on-board 16 GB MCDRAM memory:
$ numactl --hardware
available: 2 nodes (0-1)
node 0 cpus: 0 1 2 3 4 5 6 7 8 9 10 11 12 13 14 15 16 17 18 19 20 21 22 23 24 25 26 27 28 29 30 31 32 33 34 35 36 37 38 39 40 41 42 43 44 45 46 47 48 49 50 51 52 53 54 55 56 57 58 59 60 61 62 63 64 65 66 67 68 69 70 71 72 73 74 75 76 77 78 79 80 81 82 83 84 85 86 87 88 89 90 91 92 93 94 95 96 97 98 99 100 101 102 103 104 105 106 107 108 109 110 111 112 113 114 115 116 117 118 119 120 121 122 123 124 125 126 127 128 129 130 131 132 133 134 135 136 137 138 139 140 141 142 143 144 145 146 147 148 149 150 151 152 153 154 155 156 157 158 159 160 161 162 163 164 165 166 167 168 169 170 171 172 173 174 175 176 177 178 179 180 181 182 183 184 185 186 187 188 189 190 191 192 193 194 195 196 197 198 199 200 201 202 203 204 205 206 207 208 209 210 211 212 213 214 215 216 217 218 219 220 221 222 223 224 225 226 227 228 229 230 231 232 233 234 235 236 237 238 239 240 241 242 243 244 245 246 247 248 249 250 251 252 253 254 255 256 257 258 259 260 261 262 263 264 265 266 267 268 269 270 271
node 0 size: 98200 MB
node 0 free: 61787 MB
node 1 cpus:
node 1 size: 16384 MB
node 1 free: 15921 MB
node distances:
node   0   1
  0:  10  31
  1:  31  10
Run the following command, which indicates allocating memory in MCDRAM if possible:
$ mpirun -n 4 numactl --preferred 1 python mpi_sample.pyWhile the program is running, we can observe that it allocates memory in MCDRAM (NUMA node 1):
$ numactl --hardwareavailable: 2 nodes (0-1)
node 0 cpus: 0 1 2 3 4 5 6 7 8 9 10 11 12 13 14 15 16 17 18 19 20 21 22 23 24 25 26 27 28 29 30 31 32 33 34 35 36 37 38 39 40 41 42 43 44 45 46 47 48 49 50 51 52 53 54 55 56 57 58 59 60 61 62 63 64 65 66 67 68 69 70 71 72 73 74 75 76 77 78 79 80 81 82 83 84 85 86 87 88 89 90 91 92 93 94 95 96 97 98 99 100 101 102 103 104 105 106 107 108 109 110 111 112 113 114 115 116 117 118 119 120 121 122 123 124 125 126 127 128 129 130 131 132 133 134 135 136 137 138 139 140 141 142 143 144 145 146 147 148 149 150 151 152 153 154 155 156 157 158 159 160 161 162 163 164 165 166 167 168 169 170 171 172 173 174 175 176 177 178 179 180 181 182 183 184 185 186 187 188 189 190 191 192 193 194 195 196 197 198 199 200 201 202 203 204 205 206 207 208 209 210 211 212 213 214 215 216 217 218 219 220 221 222 223 224 225 226 227 228 229 230 231 232 233 234 235 236 237 238 239 240 241 242 243 244 245 246 247 248 249 250 251 252 253 254 255 256 257 258 259 260 261 262 263 264 265 266 267 268 269 270 271
node 0 size: 98200 MB
node 0 free: 61789 MB
node 1 cpus:
node 1 size: 16384 MB
node 1 free: 112 MB
node distances:
node 0 1
0: 10 31
1: 31 10
Readers can also try the above code on an Intel® Xeon® processor system with the appropriate setting; for example, on an Intel® Xeon® Scalable processor, using –xCORE-AVX512 instead of –xMIC-AVX512, and set the appropriate number of available threads. Also note that the Intel Xeon Scalable processor doesn’t have high-bandwidth memory.
Conclusion
This article introduced the MPI for Python package and demonstrated how to use it via the Intel Distribution for Python. Furthermore, it showed how to use OpenMP and Intel AVX-512 instructions in order to fully take advantage of the Intel Xeon Phi processor architecture. A simple example was included to show how one can write a parallel Cython function with OpenMP, compile it with the Intel compiler with Intel AVX-512 enabled option, and integrate it with an MPI Python program to fully take advantage of the Intel Xeon Phi processor architecture.
About the Author
Loc Q Nguyen received an MBA from University of Dallas, a master’s degree in Electrical Engineering from McGill University, and a bachelor's degree in Electrical Engineering from École Polytechnique de Montréal. He is currently a software engineer at Intel Software and Services Group. His areas of interest include computer networking, parallel computing, and computer graphics.
References
Intel® Distribution for Python*
"